OAuth 2.0 and OpenID Connect are broadly used frameworks to address delegating of authentication and authorization. Despite their popularity they are such complex to be a tough nut to crack even for veterans: the scenarios and use cases they cover are very security sensitive and wide, so acquainting them is certainly a huge challenge very often causing a lot of pain and frustration.
The "OpenID Connect With Kratos And Hydra Tutorial - Gitea OAuth" post aim is to provide a good starting point for exploring this tough topic: after a short but comprehensive overview of them, we quickly focus on a real life scenario installing a full featured on premise suite made of Ory Kratos (the IDM), Ory Hydra (the OpenID Connect and OAuth 2 API) and the Ory Kratos Self Service UI node (the Resource Server - in this case it is just a demo).
Once the suite is up and running, we also explore a real life use case implementing the OAUth2 Authorization Code grant by configuring OpenID Connect as an authentication source into a Gitea instance.
As we said, let's start from the bare minimum theoretical concepts to make sense of the rest of the post.
OpenID
It is a framework Developed by OpenID Foundation in 2005 with the aim to provide a single source of authentication between different parties (Relying Parties – RP) with the hope that it became the authentication protocol most used by providers. Released versions were OpenID 1 and OpenID 2 that have been deprecated and must not be used nowadays: in 2014 OpenID Connect was released, but this time it was made to be on top of OAuth 2.0 authorization framework.
OAuth 2
The Open Authorization 2 (it is actually at its third revision - it comes after 1.0 and 1.0a) is a delegated authorization framework that enables applications to get access to services without having to share credentials. It has been developed by a joint of Google and Twitter to overcome some SAML's deficiencies on mobile platforms - for example they switched from XML to JSON to make it more lightweight. Its first version was released as RFC 5849 in 2010, but we had to wait until 2012 before version 2.0 (RFC6749) to pop-up.
OAuth2 implements only authorization supporting several use cases such as server-to-server apps, browser-based apps, mobile/native apps, and consoles or TV: the authentication is delegated to other frameworks - such as OpenID Connect. For example, OpenID Connect adds the authentication layer on top of OAuth2 by adding a token dedicated to identity, leveraging on claims signed with JWT.
If you want to learn more about JWT and JWE, you might be interested in the post "JSON Web Token - JWT": besides providing the necessary theory, it shows you some practical JWT and JWE examples with Python.
Roles
OAuth 2 identifies the following roles:
Resource Owner (RR)
It is who actually takes the decision of accepting or denying the access to the protected resource
Client Application
It is the application that wants to access a protected resource from the resource server - the process leverages on an Access Token with a limited lifespan
Authorization Server
It provides two distinct endpoints: one for verifying the Resource Owner's identity, getting its consent for granting the access to the protected resource and finally shipping the Access Token to the client. The other endpoint is the Token endpoint, which is involved when dealing with machine to machine interaction.
Resource Server
It is the API server that, after verifying the Authentication Token along with the granted scopes, actually delivers the requested protected resources to the Client Application.
Grant Types
The OAuth 2 authorization flow has been designed to implement the following grant types.
Authorization Code
The Authorization server returns a one-time Authorization Code to the Client, immediately exchanged to gain an Access Token. Mostly suitable for traditional web apps, but it has shortcomings with Single Page Applications (SPA) and Mobile Apps: since the client secret cannot be stored securely, and so authentication, during the exchange, is limited to the use of client id alone.
Implicit
The Access Token is immediately returned to the Client Application, either after a POST call or as a parameter of the callback URI - this last method is currently deprecated because of the risk of leakages.
Authorization Code Grant With PKCE
It leverages on the Authorization Code grant, but it adds challenges generated by the Client Application to fill the gap of the missing client_secret when dealing with Single Page Applications (SPA) and Mobile Apps.
Resource Owner Credentials
The Client Applications acquires the Resource Owner’s credentials first, then passes them to the Authorization server. Since no redirect to the Authorization server is involved, it is suitable in the use cases when the redirect is infeasible. The drawback is that its design makes it suitable only for completely trusted Client Applications.
Client Credentials
The Client Application is authenticated per se by using its client id and secret. Suitable for non-interactive applications such as automated processes, microservices, etc.
Device Authorization Flow
This flow was designed with devices with limited input options or without browsers in mind: the device asks the Authorization Server for a “user code” that is requested to be provided back by the user by using a QR code or visiting a verification uri.
Refresh Token Grant
It is just the process for the exchange of a Refresh Token for a new Access Token.
OpenID Connect
As we said, OAuth 2 delegates authentication to other protocols: when working with OAuth 2, OpenID Connect is certainly the most used one.
Started in 2014, leveraging on on OAuth 2, it uses some of the OAuth 2's grants - that are called flows in the OpenID Connect context, and extends it, for example adding the "openid" special scope, adding the id token (it is used to encapsulate the JSON formatted identity claims), adding the UserInfo endpoint on the server side and so on.
Flows
The most commonly used OpenID Connect flows are as follows:
Implicit Flow
It maps to the OAuth 2 Implicit grant
Authorization Code Flow
It maps to the OAuth 2 Authorization Code grant
Authorization Code Flow with PKCE
It maps to the OAuth 2 Authorization Code with PKCE grant
Hybrid Flow
It is a combination of Implicit and Authorization Code flows: in this flow, instead of directly returning the Access Token to the Client Ap[plication, it returns the ID Token along with an Authorization Code that is then exchanged for an Access Token.
OpenID Autodiscover URI
Since it is required to provide it when setting up OpenID Connect Authentication, it is worth spending some words explaining the OpenID Autodiscover URI..
This is the endpoint providing the metadata about all the other endpoints.
It can be called even by running a curl statement such as:
curl https://idm-ca-up1a001.p1.carcano.corp:4444/.well-known/openid-configurationit returns a JSON formatted document similar to the following one – mind I stripped the information not interesting for the explanation:
{
    "issuer": "https://idp.carcano.local/login",
    "authorization_endpoint": "https://idp.carcano.local/login/authorize",
    "token_endpoint": "https://idp.carcano.local/login/token",
    "introspection_endpoint": "https://idp.carcano.local/login/token/introspect",
    "revocation_endpoint": "https://idp.carcano.local/login/token/revoke",
    "userinfo_endpoint": "https://idp.carcano.local/profiles/oidc/userinfo"
}
The purpose of the "issuer" and "authorization_endpoint" are straightforward - as for the other ones:
token_endpoint
URL of the token endpoint. After a client has received an authorization code, that code is presented to the token endpoint and exchanged for an identity token, an access token, and a refresh token.
introspection_endpoint
URL of the authorization server’s introspection endpoint: by default, access tokens and refresh tokens are "opaque" to clients. This means that at the time of every access a large amount of opaque metadata is exchanged: since often Resource Servers are not equipped to decipher tokens and to retrieve this metadata, they get these metadata by contacting the introspection endpoint. This enables them to determine whether a token is valid and whether access to a specific resource should be granted.
revocation_endpoint
URL of the revocation endpoint, the endpoint used to revoke access or refresh tokens issued by the authorization server This is needed at logout, to minimize the risk of someone stealing that tokens and reuse them maliciously.
userinfo_endpoint
URL of the user info endpoint, which returns to the Client Application user the sections of the user profile information that has been both requested and granted
the IDM/OAUTH 2/OpenID Connect Suite
We are now ready to set up our on premise IDM/OAuth 2/OpenID Connect suite.
As we said it is made of the following components:
- Ory Kratos - an API-first identity and user management system built following cloud architecture best practices
- Ory Hydra - an API-only, "headless", OAuth 2.0 and OpenID Connect provider that can interface with any identity and user management system
- Ory Kratos Self Service UI node - a reference implementation for Ory Kratos' in NodeJS / ExpressJS / Handlebars / NextJS. It implements all Ory Kratos flows (login, registration, account settings, account recovery, account verification).
We are going to install them as containers using Docker compose - this is suitable for a Lab, but mind that in a production system it is almost mandatory to install them on a Kubernetes cluster so to implement a scalable and high-available solution.
Before deploying Hydra and Kratos we must perform some prerequisite tasks.
PostgreSQL Prerequisites
Both Hydra and Kratos require a database to store their data: because of his rock solid reliability, we will use PostgreSQL as the database engine.
When using PostgreSQL as an engine, both Ory Hydra and Ory Kratos databases leverage on some features provided by the PostgreSQL contributions package. For this reason it is necessary to install it on the hosts running the PostgreSQL engine where these databases are to be created.
For example, on a Red Hat family distribution, run:
sudo dnf install -y postgresql14-contribOnce installed, as the "postgres" user, launch the PostgreSQL CLI:
sudo -u postgres psqlFirst, create the database user "kratos" with a password of your choice ("grimoire" in this example) and create the database "kratos" owned by it:
CREATE USER kratos WITH ENCRYPTED PASSWORD 'grimoire';
CREATE DATABASE kratos OWNER kratos;
Then, same way, create the database user "hydra" with a password of your choice ("grimoire" in this example) along with the database "hydra" owned by it:
CREATE USER hydra WITH ENCRYPTED PASSWORD 'grimoire';
CREATE DATABASE hydra OWNER hydra;
The Hydra's Database Backend
As we said, Hydra requires a database backend - the first time you deploy the Hydra container the database schema must be created. Same way, each time you deploy a new Hydra's container version, the database schema must be upgraded. Both these tasks can be achieved by running the "migrate" Hydra's action.
First, we must define some variables
HYDRA_PG_INSTANCE=pgsql-ca-up1a001.p1.carcano.corp:5432
HYDRA_PG_DB=hydra
HYDRA_PG_USER=hydra
- HYDRA_PG_INSTANCE it the PostgreSQL database endpoint with the Hydra database schema
- HYDRA_PG_DB is the database schema used by Hydra
- HYDRA_PG_USER is the username to be used to connect to the database engine
To avoid its password to be tracked in the shell's history, we read it interactively as follows:
read -s HYDRA_PG_PASSWORD
We still need to set the DSN (Data Source Name) variable as follows:
HYDRA_DSN=postgres://${HYDRA_PG_USER}:${HYDRA_PG_PASSWORD}@${HYDRA_PG_INSTANCE}/${HYDRA_PG_DB}?sslmode=disableWe can now run the Hydra container with the "migrate" action as follows:
docker run -it --rm \
  docker.io/oryd/hydra:v2.2.0 \
  migrate sql --yes ${HYDRA_DSN}
If the PostgreSQL database host is not registered in your DNS server - for example you are working on a lab, you can easily have it added to the container as a hosts entry by using the "--add-host" option. For example:
--add-host pgsql-ca-up1a001.p1.carcano.corp:10.211.55.202The Krato's Database Backend
As we said, also Kratos requires a database backend - the mechanism is exactly the same as the one we described for Hydra.
As we did already, we define the variables:
KRATOS_PG_INSTANCE=pgsql-ca-up1a001.p1.carcano.corp:5432
KRATOS_PG_DB=kratos
KRATOS_PG_USER=kratos
- KRATOS_PG_INSTANCE it the PostgreSQL database endpoint with the Kratos database schema
- KRATOS_PG_DB is the database schema used by Kratos
- KRATOS_PG_USER is the username to be used to connect to the database engine
To avoid its password to be tracked in the shell's history, we read it interactively as follows:
read -s KRATOS_PG_PASSWORD
We still need to set the DSN (Data Source Name) variable as follows:
KRATOS_DSN=postgres://${KRATOS_PG_USER}:${KRATOS_PG_PASSWORD}@${KRATOS_PG_INSTANCE}/${KRATOS_PG_DB}?sslmode=disableWe can now run the Kratos container with the "migrate" action as follows:
docker run -it --rm \
  docker.io/oryd/kratos:v1.1.0 \
  migrate sql --yes ${KRATOS_DSN}
If the PostgreSQL database host is not registered in your DNS server - for example you are working on a lab, you can easily have it added to the container as a hosts entry by using the "--add-host" option. For example:
--add-host pgsql-ca-up1a001.p1.carcano.corp:10.211.55.202Check The PostgreSQL schemas
For the sake of curiosity, let's have a look to what the Kratos and Hydra container runs did: on the PostgreSQL host, connect to the "hydra" database:
sudo -u postgres hydraand list the tables:
hydra=> \dt
                            List of relations
 Schema |                      Name                      | Type  | Owner
--------+------------------------------------------------+-------+-------
 public | hydra_client                                   | table | hydra
 public | hydra_jwk                                      | table | hydra
 public | hydra_oauth2_access                            | table | hydra
 public | hydra_oauth2_authentication_session            | table | hydra
 public | hydra_oauth2_code                              | table | hydra
 public | hydra_oauth2_flow                              | table | hydra
 public | hydra_oauth2_jti_blacklist                     | table | hydra
 public | hydra_oauth2_logout_request                    | table | hydra
 public | hydra_oauth2_obfuscated_authentication_session | table | hydra
 public | hydra_oauth2_oidc                              | table | hydra
 public | hydra_oauth2_pkce                              | table | hydra
 public | hydra_oauth2_refresh                           | table | hydra
 public | hydra_oauth2_trusted_jwt_bearer_issuer         | table | hydra
 public | networks                                       | table | hydra
 public | schema_migration                               | table | hydra
(15 rows)
then, switch to the "kratos" database:
\c kratosand list its tables as well:
kratos=> \dt
                     List of relations
 Schema |              Name               | Type  | Owner
--------+---------------------------------+-------+--------
 public | continuity_containers           | table | kratos
 public | courier_message_dispatches      | table | kratos
 public | courier_messages                | table | kratos
 public | identities                      | table | kratos
 public | identity_credential_identifiers | table | kratos
 public | identity_credential_types       | table | kratos
 public | identity_credentials            | table | kratos
 public | identity_login_codes            | table | kratos
 public | identity_recovery_addresses     | table | kratos
 public | identity_recovery_codes         | table | kratos
 public | identity_recovery_tokens        | table | kratos
 public | identity_registration_codes     | table | kratos
 public | identity_verifiable_addresses   | table | kratos
 public | identity_verification_codes     | table | kratos
 public | identity_verification_tokens    | table | kratos
 public | networks                        | table | kratos
 public | schema_migration                | table | kratos
 public | selfservice_errors              | table | kratos
 public | selfservice_login_flows         | table | kratos
 public | selfservice_recovery_flows      | table | kratos
 public | selfservice_registration_flows  | table | kratos
 public | selfservice_settings_flows      | table | kratos
 public | selfservice_verification_flows  | table | kratos
 public | session_devices                 | table | kratos
 public | session_token_exchanges         | table | kratos
 public | sessions                        | table | kratos
Configuring the IDM/OAUTH 2/OpenID Connect Suite
We are now ready to start with the configuration of the suite; since in this Lab we are going to use docker-compose to spin-up everything, we must create a directory where to store the deployment's manifests:
mkdir ory-network
Since we are working with containers, we must create the directory where to store the configuration files and bootstrap scripts - create the "config" and "scripts" inside the "ory-network" directory we just created as follows:
cd ory-network
mkdir -m 755 config scripts
these directories will be bind-mounted into the Hydra and Kratos containers.
X509 Certificate And Key
Since we are dealing with identities, it is mandatory to enable TLS to guarantee confidentiality on the wire - let's create the TLS key as follows:
openssl genrsa -out config/idm-ca-up1a001.key 2048then we generate a Certificate Signing Request (CSR) - since all the three containers (Kratos, Hydra and the Kratos Self Service UI node) run on the same host, as CN we must specify the FQDN of the host providing the IDM services:
openssl req -new -key config/idm-ca-up1a001.key -out config/idm-ca-up1a001.csr \
-subj "/C=CH/ST=Tessin/O=Carcano SA/CN=idm-ca-up1a001.p1.carcano.corp"
We are almost ready to generate a self-signed certificate - create the "v3.ext" file with the following contents:
subjectKeyIdentifier   = hash
authorityKeyIdentifier = keyid:always,issuer:always
basicConstraints       = CA:TRUE
keyUsage               = digitalSignature, nonRepudiation, keyEncipherment, dataEncipherment, keyAgreement, keyCertSign
subjectAltName         = DNS:idm-ca-up1a001.p1.carcano.corp, DNS:idm0.p1.carcano.corp, DNS:hydra, DNS:kratos, IP: 10.211.55.200
issuerAltName          = issuer:copy
in this example the "SubjectAltName" contains::
- "idm-ca-up1a001.p1.carcano.corp" - the FQDN of the host running the containers
- "idm0.p1.carcano.corp" - the FQDN assigned to the services exported by the containers (they are using different ports) - specifying a FQDN dedicated to the services enables using a load balancer, promoting high-availability
- "hydra" - the Hydra's container hostname in the container's intranet network
- "kratos" - the Kratos' container hostname in the container's intranet network
- "10.211.55.200" - the IP address of the host running the containers
Once completed the above file, run the following statement:
openssl x509 -req -in config/idm-ca-up1a001.csr -signkey config/idm-ca-up1a001.key \
-out config/idm-ca-up1a001.crt -days 3650 \
-sha256 -extfile v3.extSetting Up The Services
We can now start setting up the actual services.
The configuration files contain several secrets that must be randomly generated. As an hint, you can generate them by running this statement:
export LC_CTYPE=C; cat /dev/urandom | tr -dc 'a-zA-Z0-9' | fold -w 32 | head -n 1Just run the statement every time you need a new secret and copy its output.
Hydra
Hydra loads its configuration from the "config/hydra.yml" - create it with the following contents:
dsn: postgres://hydra:grimoire@pgsql-ca-up1a001.p1.carcano.corp:5432/hydra?sslmode=disable
serve:
  public:
    tls:
      enabled: true
      key:
        path: /etc/ssl/private/idm-ca-up1a001.key
      cert:
        path: /etc/config/hydra/idm-ca-up1a001.crt
  admin:
    tls:
      enabled: true
      key:
        path: /etc/ssl/private/idm-ca-up1a001.key
      cert:
        path: /etc/config/hydra/idm-ca-up1a001.crt
  cookies:
    same_site_mode: Lax

urls:
  self:
    issuer: https://idm-ca-up1a001.p1.carcano.corp:4444
  consent: https://idm-ca-up1a001.p1.carcano.corp:4455/consent
  login: https://idm-ca-up1a001.p1.carcano.corp:4455/login
  logout: https://idm-ca-up1a001.p1.carcano.corp:4455/logout
  identity_provider:
    publicUrl: https://idm-ca-up1a001.p1.carcano.corp:4433
    url: https://idm-ca-up1a001.p1.carcano.corp:4434

secrets:
  system:
    - IWwqbDU1Xapg2DJLJ42ZXgAbT7FPfpS3
  cookie:
    - w7fY22rK6FVNT5mgkVzrMboimHe7pX4S

oidc:
  subject_identifiers:
    supported_types:
      - pairwise
      - public
    pairwise:
      salt: H4yoClvEqwD8TQyJbG7P6eLkiSJHG7pl

log:
  leak_sensitive_values: false
  level: info
this file:
- configure the Data Source Name string (line 1)
- configure TLS on bot the public and admin endpoints (lines 3-16)
- configure cookies (line 17) - the relevant part in the official documentation is available here:
- set the SameSite cookie to "Lax" (line 18) - this enables setting cross-site cookies only for safe (e.g. GET or HEAD) top-level navigation requests
- configure the URLS (lines 20-28) of:
- the "issuer" endpoint for access and ID tokens (line 21-22) - since it provides sensitive data, it must be TLS protected (HTTPS)
- the following endpoints for the "User Login & Consent" flow:
- consent (line 23)
- login (line 24)
- logout (line 25)
- the location of the identity provider (Kratos in this scenario), providing both the:
- public URL (line 27)
- admin URL (line 28)
- configure the system's secrets (lines 31-32) used to encrypt sensitive data using AES-GCM (256 bit) and to validate HMAC signatures. The first item in the list is used for signing and encryption. The whole list is used for verifying signatures and decryption.
- configure the cookie's secret (lines 33-34)
- configure the OpenID connect features (lines 36-42):
- the Subject Identifier algorithm (line 37)
- list the enabled ones (pairwise, public) - lines 38-40
- set the pairwise's secret (lines 41-42)
- the Subject Identifier algorithm (line 37)
- configure logging (lines 44 - 46)
The most up to date reference for the Hydra's configuration YAML file is the one of the Hydra's project on GitHub available here.
Since we must add the self-signed certificate to the system-wide truststore of the Hydra container, we must override the default entrypoint with a custom shell script that installs the missing packages, put the certificate in the right spot and merge it within the truststore. This step is obviously necessary also if you are using a private CA, so to install the CA's certificate.
Create the "scripts/hydra.sh" script with the following contents:
#!/bin/sh
apk update
apk add ca-certificates
rm -rf /var/cache/apk/*
cp /etc/config/hydra/idm-ca-up1a001.crt /usr/local/share/ca-certificates/idm-ca-up1a001.crt
update-ca-certificates
cp /etc/config/hydra/idm-ca-up1a001.key /etc/ssl/private/idm-ca-up1a001.key
chown ory: /etc/ssl/private/idm-ca-up1a001.key
apk add --no-cache su-exec
exec su-exec ory hydra serve -c /etc/config/hydra/hydra.yml all
and of course mark it as executable:
chmod 755 scripts/hydra.shKratos
Kratos loads its configuration from the "config/kratos.yml" - create it with the following contents:
version: v1.1.0

dsn: postgres://kratos:grimoire@pgsql-ca-up1a001.p1.carcano.corp:5432/kratos?sslmode=disable

serve:
  public:
    base_url: https://idm-ca-up1a001.p1.carcano.corp:4433
    cors:
      enabled: true
    tls:
      key:
        path: /etc/ssl/private/idm-ca-up1a001.key
      cert:
        path: /etc/config/kratos/idm-ca-up1a001.crt
  admin:
    base_url: https://idm-ca-up1a001.p1.carcano.corp:4434
    tls:
      key:
        path: /etc/ssl/private/idm-ca-up1a001.key
      cert:
        path: /etc/config/kratos/idm-ca-up1a001.crt

selfservice:
  default_browser_return_url: https://idm-ca-up1a001.p1.carcano.corp:4455/
  allowed_return_urls:
    - https://idm-ca-up1a001.p1.carcano.corp:4455

  methods:
    password:
      enabled: true
      config:
        min_password_length: 6
        identifier_similarity_check_enabled: false
        haveibeenpwned_enabled: false

  flows:
    error:
      ui_url: https://idm-ca-up1a001.p1.carcano.corp:4455/error

    settings:
      ui_url: https://idm-ca-up1a001.p1.carcano.corp:4455/settings
      privileged_session_max_age: 15m
      required_aal: highest_available

    logout:
      after:
        default_browser_return_url: https://idm-ca-up1a001.p1.carcano.corp:4455/login

    login:
      ui_url: https://idm-ca-up1a001.p1.carcano.corp:4455/login

    registration:
      ui_url: https://idm-ca-up1a001.p1.carcano.corp:4455/registration
      after:
        password:
          hooks:
            - hook: session

log:
  format: text
  leak_sensitive_values: false

secrets:
  cookie:
    - gFRSmK0P0lsnqaLIqndChl8gMkjmwEZ4
  cipher:
    - rM9lU5N0w6iX6Kdrr2uU7uVC42IBRVHo

identity:
  default_schema_id: default
  schemas:
    - id: default
      url: file:///etc/config/kratos/identity.schema.json

courier:
  smtp:
    connection_uri: smtps://test:test@mailslurper:1025/?skip_ssl_verify=true

oauth2_provider:
  url: https://hydra:4445
this file:
- configure the Data Source Name string (line 3)
- configure the public URL (lines 6-14), enabling TLS and also cors (lines 5-8)
- configure the admin URL (lines 15-21)
- configure the URL of the demo application (lines 23-26) -
- default_browser_return_url
- list of allowed_return_urls
- enable password authentication and configure a password policy (lines 28-34)
- configure the Self Service flow flows dictionary (line 36-57)
- error (lines 37-38)
- user settings (lines 40-43)
- logout (lines 45-47)
- login (lines 49-50)
- registration (lines 52-57)
- configure logging (lines 59-61)
- configure the cookie's secret (lines 64-65)
- configure secret keys and their rotation as well as algorithms (lines 66-67)
- configure the link to the JSON file with the schema used to set up the identity (lines 69-73)
- configure the SMTP server for email notifications (lines 75-77)
- link to the Hydra instance ads the OAuth2 provider (lines 79-80)
The most up to date reference for the Kratos' configuration YAML file is the one of the Kratos project on GitHub available here.
we must of course create the JSON schema referenced in the previous file: create the "config/identity.schema.json" with the following contents:
{
  "$id": "https://schemas.ory.sh/presets/kratos/quickstart/email-password/identity.schema.json",
  "$schema": "http://json-schema.org/draft-07/schema#",
  "title": "Person",
  "type": "object",
  "properties": {
    "traits": {
      "type": "object",
      "properties": {
        "email": {
          "type": "string",
          "format": "email",
          "title": "E-Mail",
          "minLength": 3,
          "ory.sh/kratos": {
            "credentials": {
              "password": {
                "identifier": true
              }
            }
          }
        }
      },
      "required": [
        "email"
      ],
      "additionalProperties": false
    }
  }
}
Same way as for Hydra, we must add the self-signed certificate to the system-wide truststore of the Kratos container, we must override the default entrypoint with a custom shell script that installs the missing packages, put the certificate in the right spot and merge it within the truststore. This step is obviously necessary also if you are using a private CA, so to install the CA's certificate.
Create the "scripts/kratos.sh" script with the following contents:
#!/bin/sh
apk update
apk add ca-certificates
rm -rf /var/cache/apk/*
cp /etc/config/kratos/idm-ca-up1a001.crt /usr/local/share/ca-certificates/idm-ca-up1a001.crt
update-ca-certificates
cp /etc/config/kratos/idm-ca-up1a001.key /etc/ssl/private/idm-ca-up1a001.key
chown ory: /etc/ssl/private/idm-ca-up1a001.key
apk add --no-cache su-exec
exec su-exec ory kratos serve -c /etc/config/kratos/kratos.yml --watch-courier
and of course mark it as executable:
chmod 755 scripts/kratos.shDocker Compose Deployment File
The last piece to set up is the Docker compose deployment file: create the "compose.yml" with the following contents:
services:
  kratos:
    image: oryd/kratos:v1.1.0
    user: root
    ports:
      - '4433:4433' # Public port
      - '4434:4434' # Admin port
    extra_hosts:
      - 'pgsql-ca-up1a001.p1.carcano.corp:10.211.55.202'
    restart: unless-stopped
    environment:
      - LOG_LEVEL=info
    entrypoint: /usr/local/bin/kratos.sh
    volumes:
      - type: bind
        source: ./config
        target: /etc/config/kratos
      - type: bind
        source: scripts/kratos.sh
        target: /usr/local/bin/kratos.sh
    networks:
      - intranet
  kratos-selfservice-ui-node:
    image: oryd/kratos-selfservice-ui-node:v1.1.0
    ports:
      - '4455:4455'
    extra_hosts:
      - 'idm-ca-up1a001.p1.carcano.corp:192.168.1.226'
    environment:
      - PORT=4455
      - HYDRA_ADMIN_URL=https://hydra:4445
      - KRATOS_PUBLIC_URL=https://kratos:4433
      - KRATOS_BROWSER_URL=https://idm-ca-up1a001.p1.carcano.corp:4433
      - COOKIE_SECRET=wiUA9rqPH8JNcsCmmYlSc3wEAd6rHWF2
      - CSRF_COOKIE_NAME=idm-ca-up1a001.p1.carcano.corp
      - CSRF_COOKIE_SECRET=CnfPVommLVPEykoObctyBPvLwoFKVfd6
      - DANGEROUSLY_DISABLE_SECURE_CSRF_COOKIES=true
      - TLS_KEY_PATH=/etc/config/kratos-selfservice-ui-node/idm-ca-up1a001.key
      - TLS_CERT_PATH=/etc/config/kratos-selfservice-ui-node/idm-ca-up1a001.crt
      - NODE_EXTRA_CA_CERTS=/etc/config/kratos-selfservice-ui-node/idm-ca-up1a001.crt
    volumes:
      - type: bind
        source: ./config
        target: /etc/config/kratos-selfservice-ui-node
    networks:
      - intranet
    restart: on-failure
  hydra:
    image: oryd/hydra:v2.2.0
    user: root
    extra_hosts:
      - 'git0.p1.carcano.corp:10.211.55.200'
      - 'git-ca-up1a001.p1.carcano.corp:10.211.55.200'
      - 'pgsql-ca-up1a001.p1.carcano.corp:10.211.55.202'
    ports:
      - '4444:4444' # Public port
      - '4445:4445' # Admin port
      - '5555:5555' # Port for hydra token user
    entrypoint: /usr/local/bin/hydra.sh
    volumes:
      - type: bind
        source: ./config
        target: /etc/config/hydra
      - type: bind
        source: scripts/hydra.sh
        target: /usr/local/bin/hydra.sh
    restart: unless-stopped
    networks:
      - intranet

networks:
  intranet:
the above docker-compose file contains the definitions of the three containers.
This manifest:
- defines the "kratos" container (lines 2-22): the entrypoint is the "/usr/local/bin/kratos.sh" script (line 13) bind-mounted from the host (lines 18-20), started inside the container as the "root" user (line 4) with logging severity set to "info" (line 12). The Kratos configuration file is bind-mounted from the host (lines 15-17). The container is attached to the "intranet" network (line 21-22) , it exposes to the outside the ports 4433 and 4434 (lines 6-7) and it is automatically restarted unless it is stopped (line 10).
- defines the "kratos-selfservice-ui-node" container (lines 23-47). The application does not have a configuration file: it is configured by setting environment variables (lines 30-40). The container is attached to the "intranet" network (line 45-46) , it exposes to the outside the port 4455 (lines 26) and it is automatically restarted in case of failure (line 47).
- defines the "hydra" container (lines 48-69): the entrypoint is the "/usr/local/bin/hydra.sh" script (line 59) bind-mounted from the host (lines 64-66), started inside the container as the "root" user (line 50). The Hydra configuration file is bind-mounted from the host (lines 61-63). The container is attached to the "intranet" network (line 68-69) , it exposes to the outside the ports 4444, 4445 and 5555 (lines 56-58) and it is automatically restarted unless it is stopped (line 67).
- creates the "intranet" Docker internal network (lines 71-72)
The most up to date reference fir the Krato's Selfservice UI Node is available here.
Please mind that the "extra_hosts" directives are necessary only if the hosts are not registered in the DNS. In addition to that, don't worry that the Hydra and Kratos containers start their entrypoint as the "root" user: when it comes to launch them, the script starts them as the "ory" user (the statement inside the script starts by "exec su-exec ory").
All the above containers bind-mount the config directory because, besides the configuration files, it contains also the TLS certificate and private key files. By the way, since the user used to run the Kratos Selfservice UI Node container, we need to change the key permission in an unsecure way:
chmod 644 config/idm-ca-up1a001.keyDeploying The Solution
We are finally ready to deploy the solution - just run the following statement:
docker-compose up --buildAfter a while the Ory Hydra, Ory Kratos and the Ory Kratos Selfservice UI node container will be up and running.
Example Use Case: Gitea With OpenID Connect Authentication
And after the main course we finally got to the dessert: we are about to see a real use case with an application using OpenID Connect as an authentication source. In this post I decided to use Gitea, a a blazoned full featured Git Web UI supporting multiple organizations, providing authentication and authorization facilities enabling to protect repositories and branches, supporting Merge Requests and a lot of other advanced features, with of even a powerful and well standardized API that can be easily exploited by your automations. And, last but not least, ... it is even Java-free.
If you want to easily and quickly deploy Gitea, have a look at the post "Ansible Roles Best Practices - Practical Example Gitea Role".
In this scenario we use the OAUth2 Authorization Code flow: a user willing to use Gitea is able to self-register to it by granting access to his own profile data relevant for using Gitea to the Gitea OpenID Connect client - once done, Gitea will ask the user to choose a username and specify its email address so to create a Gitea account that can be accessed by using the OpenID Connect as the Authentication source.
Prerequisites:

Are you enjoying these high quality free contents on a blog without annoying banners? I like doing this for free, but I also have costs so, if you like these contents and you want to help keeping this website free as it is now, please put your tip in the cup below:
Even a small contribution is always welcome!
First, make sure your Gitea instance is configured to allow external registration - here is an example configuration snippet with the directive for the "service" stanza from the Gitea's configuration file ("app.ini", located into "/opt/gitea/custom/conf" if you deployed Gitea using the Ansible role shown in the "Ansible Roles Best Practices - Practical Example Gitea Role" post).
[service]
REGISTER_EMAIL_CONFIRM = false
ENABLE_NOTIFY_MAIL = false
DISABLE_REGISTRATION = false
ALLOW_ONLY_EXTERNAL_REGISTRATION = false
OpenID Connect is very strict about the "redirect_uris" value: it MUST match the value of the "ROOT_URL" directive - see the snipper below from the Gitea configuration file:.
[server]
ROOT_URL = https://git0.p1.carcano.corp
In addition to that, remember to add the self-signed certificate (or the CA's certificate, if using a private CA) to the trust-store of the host running Gitea. For more information on this, you can refer to the "X509 Certificates HowTo – A Public Key Infrastructure Tutorial" post.
Register The Gitea OAuth 2 Client
The obvious requirement for this setup is to register the Gitea's OAuth2 client application into Ory's Hydra.
This can be performed in several ways - here I want to show you how to make an API call made using the "curl" command line utility - this way you can use it as a reference to make the same call within a datacenter automation script or using tools such as Ansible.
Run the following statement:
curl --request POST \
  --url https://idm-ca-up1a001.p1.carcano.corp:4445/admin/clients \
  --header 'Content-Type: application/json' \
  --data '{
    "client_name": "hydra-client",
    "grant_types": [
        "authorization_code",
        "refresh_token"
    ],
    "redirect_uris": [
        "https://git0.p1.carcano.corp/user/oauth2/hydra-client/callback"
    ],
    "response_types": [
        "code"
    ],
    "scope": "openid offline",
    "token_endpoint_auth_method": "client_secret_basic",
    "subject_type": "public"
}' | jq![]()
Before running this statement you must add the self-signed certificate (or the CA's certificate, if using a private CA) to the trust-store of the host running Gitea. For more information on this, you can refer to the "X509 Certificates HowTo – A Public Key Infrastructure Tutorial" post. Aniway, if you are in a Lab, it is safe to use the curl's "-k" command line option and skip certificate validation.
On my system I got the following response:
{
  "client_id": "73212600-b450-4e11-8253-298267f6209f",
  "client_name": "hydra-client",
  "client_secret": "AuOFA2pvFlOC8PLp1mbf~80c25",
  "redirect_uris": [
    "https://git0.p1.carcano.corp/user/oauth2/hydra-client/callback"
  ],
  "grant_types": [
    "authorization_code",
    "refresh_token"
  ],
  "response_types": [
    "code"
  ],
  "scope": "openid offline",
  "audience": [],
  "owner": "",
  "policy_uri": "",
  "allowed_cors_origins": [],
  "tos_uri": "",
  "client_uri": "",
  "logo_uri": "",
  "contacts": null,
  "client_secret_expires_at": 0,
  "subject_type": "public",
  "jwks": {},
  "token_endpoint_auth_method": "client_secret_basic",
  "userinfo_signed_response_alg": "none",
  "created_at": "2024-07-26T15:25:23Z",
  "updated_at": "2024-07-26T15:25:23.188546Z",
  "metadata": {},
  "registration_access_token": "ory_at_xGFM_nX30phKfV1LucRhTHRObS9YzwIPC-wndoKkjXI.FHt2jo_1-lSqIaVpkBo-uEh-hPONMZy_xIA0lt64jtw",
  "registration_client_uri": "https://idm-ca-up1a001.p1.carcano.corp:4444/oauth2/register/",
  "skip_consent": false,
  "skip_logout_consent": null,
  "authorization_code_grant_access_token_lifespan": null,
  "authorization_code_grant_id_token_lifespan": null,
  "authorization_code_grant_refresh_token_lifespan": null,
  "client_credentials_grant_access_token_lifespan": null,
  "implicit_grant_access_token_lifespan": null,
  "implicit_grant_id_token_lifespan": null,
  "jwt_bearer_grant_access_token_lifespan": null,
  "refresh_token_grant_id_token_lifespan": null,
  "refresh_token_grant_access_token_lifespan": null,
  "refresh_token_grant_refresh_token_lifespan": null
}
![]()
If you fancy, you can save it into a file, but, since it contains sensitive data - the "client_id" and the "client_secret" attributes, you must encrypt it. If you are interested in this topic, you may like the "A Quick, Easy Yet Comprehensive GPG Tutorial" post.
Add OpenID Connect As An Authentication Source In Gitea
We are now ready to add the OAuth2 OpenID Connect based authentication source to the Gitea instance.
Login to the Gitea instance as a user with administrative privilege, then:
- click on "Profile and Settings" (top right of the page), then on "Site Administration"
- in the "Admin Settings" table on the left, click on "Identity & Access" and "Authentication Source"
- click on the "Add authentication source" button
Fill-in the form as by the following graphic:
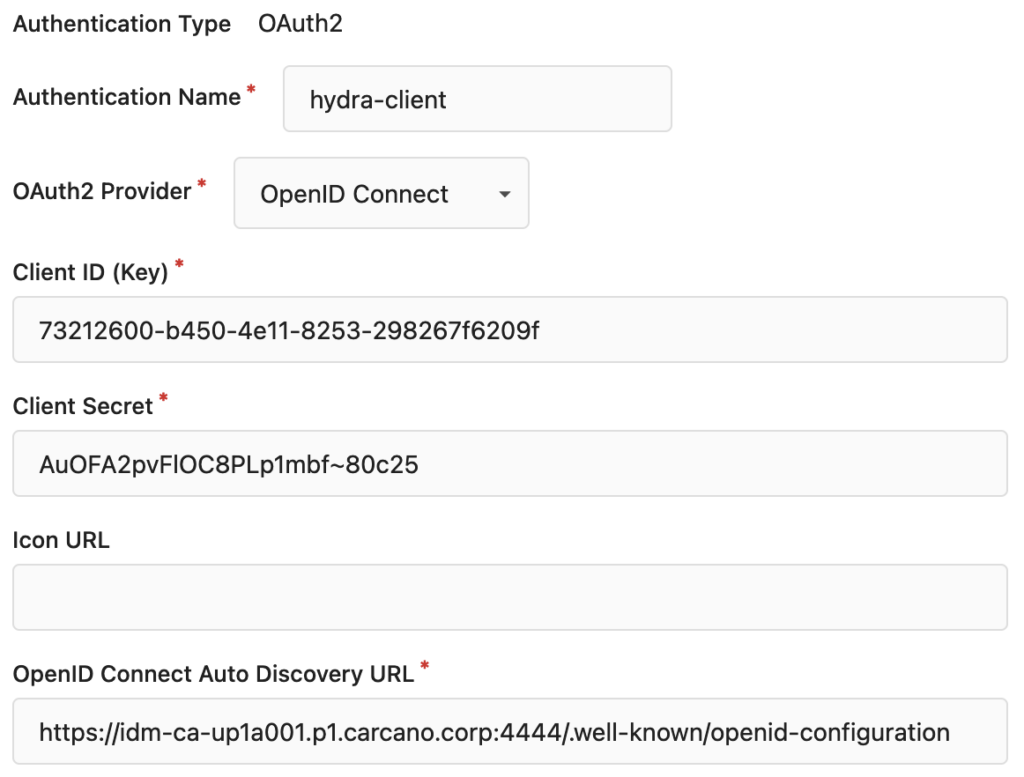
The data to use are the ones in the JSON file we got back from Ory Hydra when registering the Gitea OAuth 2 client. The only missing information in the JSON file is the OpenID Connect Auto Discovery URL, which can be easily inferred from the Ory Hydra public URL.
Once completed the form, save the authentication source and sign-out from Gitea,
We are now able to act as a user willing to register to Gitea using OpenID connect:
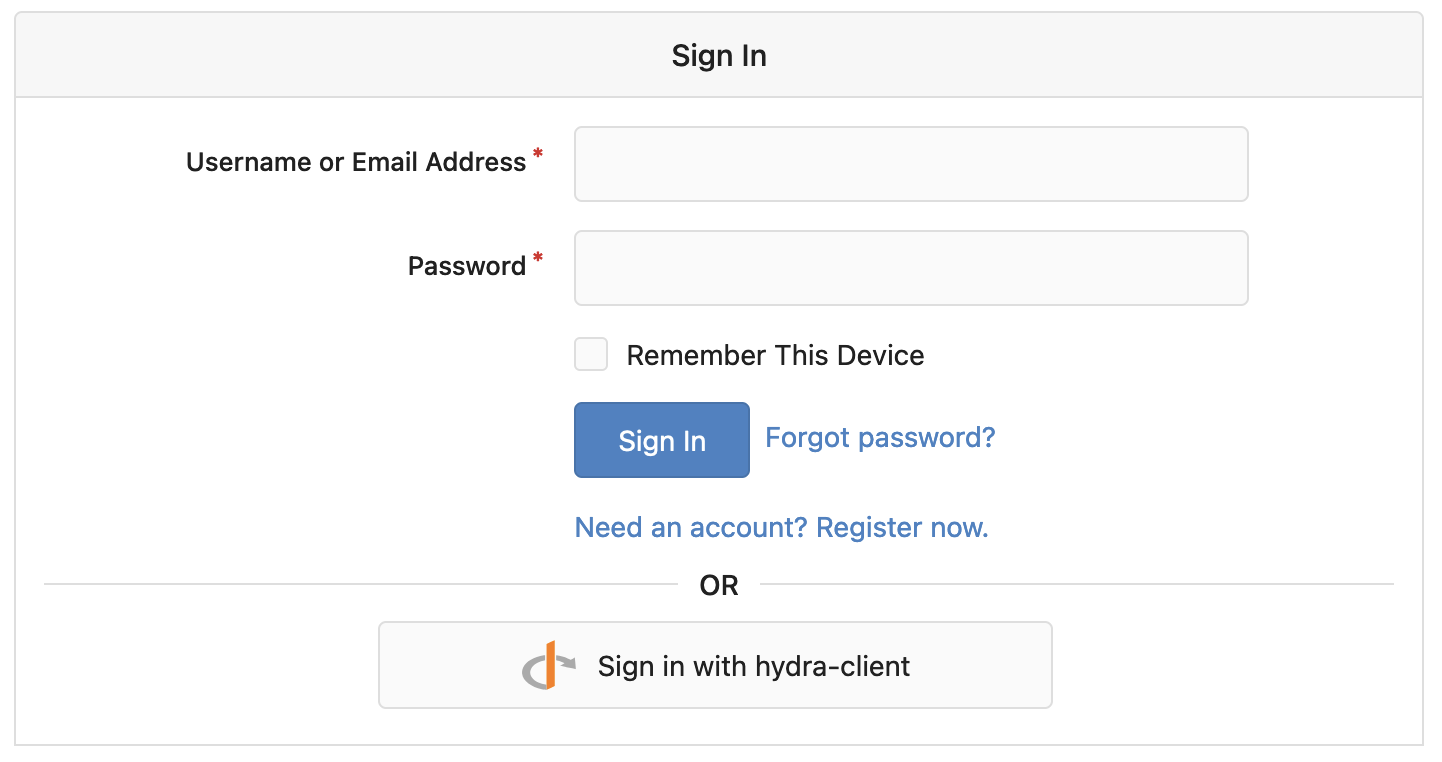
On the Gitea's splash page, click on "Sign-in" (top right of the page): after a while the Sign In form is shown, but this time it also shows the "Sign in with hydra-client" button with the OpenID Connect logo.
click on the "Sign in with hydra-client" button - the OAUth2 Authorization Code flow begin and after a while the following form is shown:
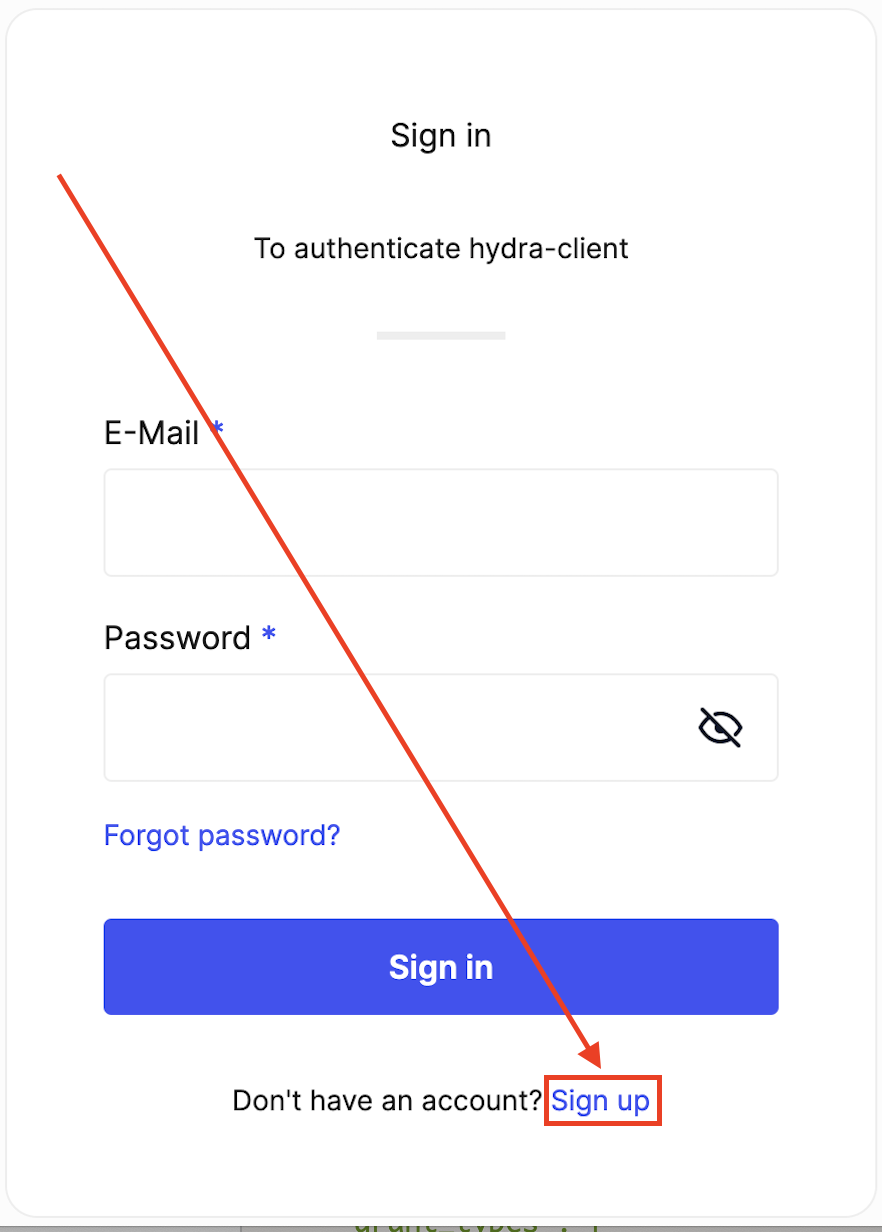
Since we still do not have a user account on Ory Kratos, click on the "Sign up" link, so to get to the Ory Kratos "Register an account" page - see below.
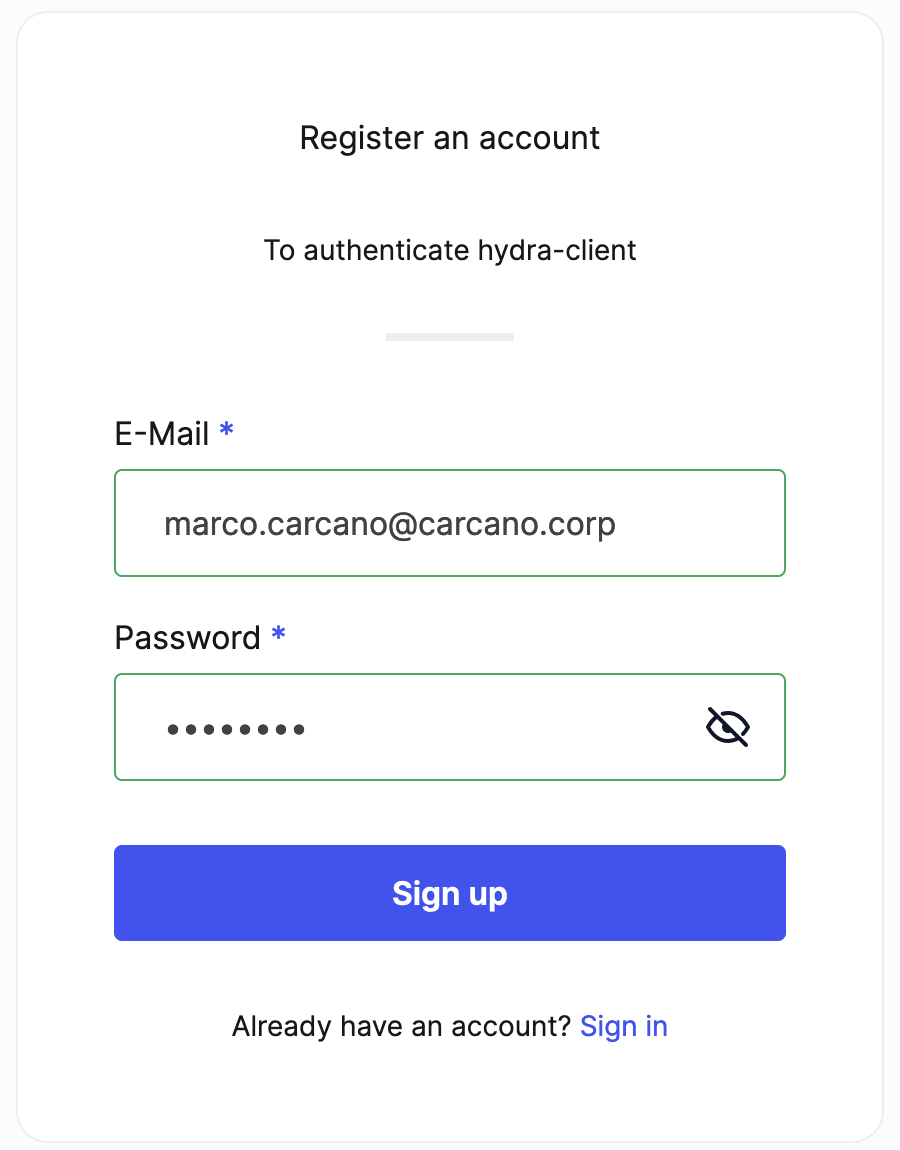
Since you are registering a new account on Ory Kratos, you can pick up any username (provided it does not already exists) and enter a valid email address: for the sake of keeping the blog post size small, we don't do that, but here you can have email address verification and other fancy things such as multi-factor authentication.
Click on the "Sign up" button: the OAUth2 Authorization Code flow continues and after a while the allow access form is shown:
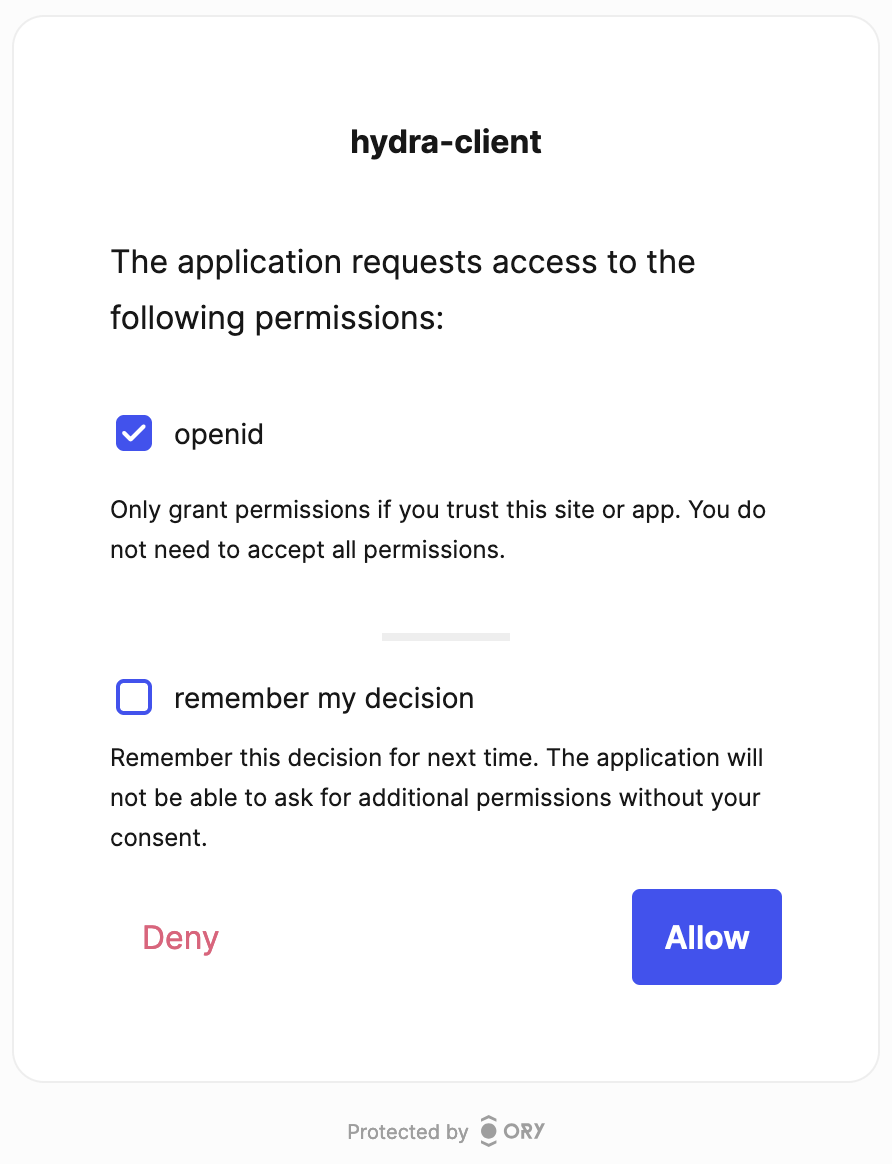
Just tick the "openid" option and click on the "Allow" button - if you want to permanently grant this access, you can tick the "remember my decision" option as well.
The OAUth2 Authorization Code flow continues again and you get redirected back to Gitea: the flow completed and you can now add an account to the Gitea local account database - just complete the following form:

Once filled the fields, just click on the "Complete Account" button.
Footnotes
OpenID Connect and OAuth2 are certainly two back beasts - they give you a standard way for federating authentication and delegating grants, but because of the complexity of the scenarios and use cases they are very complex and approaching them can be a frustrating experience.
Also Ory Hydra and Ory Kratos, despite being very good softwares, can look like a tough nut to crack, very difficult to both set up and understand.
I hope this hands-on post helped you to better focus how they work in practice, and that you can use it as a starting point for further investigations on this huge topic.
If you appreciate this strive please and if you like this post and any other ones, just share this and the others on Linkedin - sharing and comments are an inexpensive way to push me into going on writing - this blog makes sense only if it gets visited.
