Even just because of its very long service lifetime, it is certainly worth the effort to have a look at this amazing piece of software. It does not matter if we are about to switch to Wayland (that by the way cannot completely replace the whole X Window System - think for example to XDMCP): the truth is that systems running X Windows will stay here for 10 years more, so 'm sure it is still worth the effort to have a good understanding of it. The "X Window Tutorial - X Display Server HowTo And Cheatsheet" post provides you with all the necessary skills to become an expert on this amazing piece of software that really made the story of UNIX and Linux.
The X Window System
The X Window System is a seasoned (1984) windowing system, that is a system providing the basic framework for a GUI environment, initially developed as part of Project Athena at MIT.
The whole system relies on the "X" protocol, evolved through the years to version 11 (dated 1987!) - hence often people refer to X Window as "X11''.
As usual in my posts, before actually seeing a specific topic in action, we have a quick walkthrough of the theory that is necessary to understand the rest of the post.
The X Protocol (X11)
The X protocol provides a fairly primitive client/server framework for a graphical display: supported features are painting and moving windows on the display and interacting with hardware devices such as keyboards, mouse, tablets or even touchscreens. As you certainly expect, applications running this protocol do not directly write to the networking socket: they just make calls to functions exported by libraries such as Xlib or xcb.
The X Libraries
There are only two official C libraries implementing the X protocol: Xlib and XCB: Xlib is the most seasoned one (1985!) and it was the only official X client library until the introduction of XCB in 2001.
The key difference between them is essentially philosophical: conversely from Xlib, that hides (someone would say "makes transparent to the user", please forgive me the irony reminding the Orwell's book 1984 "new speak") the X protocol behind a friendly C API, XCB directly exposes it in a more visible way.
The main difference is one the management of the asynchronous nature of X client-server architecture, with Xlib striving to make it easy by hiding it. Besides performance improvements, one of the reasons that led to developing the XCB library was the Xlib isn’t really fully synchronous: it is rather a mixture of synchronous and asynchronous APIs.
This was a source of confusion and frustration to the newbies to X programming.
X Display Servers
An X Display Server is a machine running a Display Server software compatible with the X protocol: when dealing with the X Window System, the X Display Server is the X.org server running the X11 protocol on the user's workstation.
The Display Server, besides interacting with physical devices such as keyboard and mouse (its has - and needs - its own TTY), listens for incoming connections from client applications, providing them low-level drawing functions. Please mind that is the X Display Server and its clients run on the same computer, they can communicate via UNIX domain sockets, when instead they are on different machiones, they communicate through TCP/IP.
X Font Server
It is a TCP server (port 7100) that can be queried to retrieve server side rendered fonts that are then displayed on the Display Server.
X Display Managers
An X Display Manager is a process that starts an X Display and connects to it an X Window login application - often called greeter application: the user enters its credentials in the greeter application windows, and gets actually logged to the system.
The Display Manager process is started at boot time when the system has been configured to start in graphical mode - the good old run-level 5 when using sysinit, or the "graphical.target" when dealing with the modern systemd.
The initial Display Manager implementation (the XDM, developed by Keith Packard) was released in 1989 (X11R3): the aim was just to enable graphical login to standalone workstations, but just the next year (X11R4, 1989) they improved it adding the XDMCP protocol: this enable the  Display Manager for listening for incoming network connection from remote Display Servers: once connected, the greeter application is rendered on the remote Display Server, enabling the user to do a remote login.
This quickly led to creating X Terminals: thin clients with a very small and cheap hardware, they were sized to run just an X Display Server and the XDMCP chooser application that was used to specify the remote Display Manager to connect to. These thin clients were often even diskless: they downloaded the operating system to boot using PXE-boot.
NCD made several of these thin clients, like the NCD 19 in the picture.
Modern Display Managers often also enable the user to choose the Desktop Environment (more on this topic later on) to use during the session: it identifies the currently installed Desktop Environments by looking into "/usr/share/xsessions" directory. This directory contains several ".desktop" files, each one corresponding to one of the currently installed Desktop Environments.
The most popular modern Display Managers are:
- Gdm (the GNOME Desktop Environment's display manager).
- Kdm (the KDE Desktop Environment's display manager).
- LightDM
Windows
So Display Servers are used to render one or more Windows on a screen, ... but what is a Window. You may be tempted to answer this question by describing a Window you are used to seeing, but Windows are not like that, they don't really have title bars, menu bars, buttons and such (these are added by Windows Managers as we will see shortly).
A Window is just a region of the screen.
In the "The X.org Display Server" paragraph we will see in action how exactly a Window looks like.
All the fancy stuff we are used to seeing in Windows are just Widgets or Controls: these are UI elements such as buttons, scrollbars, text boxes and such - the Window is of course a container of Widgets and Controls.
Windows are organized into a tree hierarchy, with the ROOT window at the top: this is a special virtual invisible window with the same size of the screen: Top Level windows are the direct children of the ROOT window, and the UI elements within a Top Level window are descendants of that window.
It is also important to note that child Windows can be rendered only within the boundaries of their parent:
A child may be positioned partially or completely outside its parent window, but output to the child is displayed and input received only in the area where the child overlaps with the parent.
— Xlib Programming Manual §2.2.2
So, long story short, the parts of a children's window that are outside the parent's boundaries won't be displayed.
Windows Managers
The X Display Server, by the graphical perspective, is just the component that performs only the rendering: the actual management of the windows (opening, painting, iconifying, switching) is performed by a dedicated component: the Window Manager.
When dealing with X Window, the first (and also the fallback) Window Manager is "twm".
The Window Manager is just a regular X Client application: X makes sure that only the first X Client announcing Window Manager capabilities gets registered as Window Manager, denying any other registration attempt.
The Window Manager manages the Top Level windows (so direct children of the ROOT window); it manages them through two X mechanisms: properties and events.
When a X Client application registers for Substructure Redirection, requests for modifying coming from the other X Client applications are no longer executed by the X Server: they are instead redirected to the X Client application registered for the Substructure Redirection, that can do everything with that requests: this includes generating a rendered outcome different from the requested one, or even denying the request.
One of the values brought by a Window Manager is also decorating Windows (adding title bar with buttons, adding menu, ecc): this is achieved by adding on the fly a frame window that embed the actual application window.
This process involves the use of the Reparenting: once generated the Frame Window, the Application Window is re-parented as a child of the Frame Window.
Reparenting is the feature that enables Window Managers to provide a consistent look-and-feel across all the windows. Anyway, mind that it is not a mandatory feature: there are Windows Managers that do not decorate Windows, such as "dwm" and "xmonad", so they don't need this feature.
Window Managers are the Desktop Environment's cornerstone, since they provide a way of delivering a consistent environment. Over the years other specific Window Managers have been developed for the various Desktop Environments:
The most famous are certainly:
- Kwin (for the KDE desktop).
- Mutter (for the GNOME desktop).
- Xfwm (for the Xfce desktop).
- Muffin (a fork of Mutter for the Cinnamon desktop).
Currently there are three kind of Window Managers:
- Tiling Window Managers - the screen is split into tiles and write each tile windows are drawn into each tile separately
- Stacking Window Managers - they redraw all the windows when the window with focus changes or is moved, closed, or resized: this can of course result in multiple rewrites of various areas while whole Z-order is processed
- Compositing Window Managers - the window layout is actually composed by keeping a buffer of the contents of each window and merging or composing these into a single window. These are the most modern and interesting Window Managers nowadays, since they support effects such as transparency and shadows.
To say the least, Compositing Windows Managers do not really need Reparenting: Compiz for example does not use it at all, but there are of course Reparenting And Compositing Window Managers such as GNOME's Mutter.
Compositing Window Managers popped out around in 2004, after adding the "X Composite Extension":
Many user interface operations would benefit from having pixel contents of window hierarchies available without respect to sibling and antecedent clipping. In addition, placing control over the composition of these pixel contents into a final screen image in an external application will enable a flexible system for dynamic application content presentation.
— X Composite Extension
In the early days of the X Display Server the memory was few and very, very expensive: for this reason the X Display Server was designed to directly render to the hardware. The X Composite Extension provides a way to request the X Display Server to render a specific window and its descendants to a special buffer maintained by the X Display Server, instead of directly to hardware. This buffer is then available to the Window Manager, that can make any additional graphical workout such as adding transparency effects or use it to generate an overlay window to be used for example to render a workspace switcher animation, or to draw elements such as frame windows without the need of reparenting.
Using an external Windows Manager has of course drawbacks: besides complexity, the most evident one becomes clear when using a remote Display Server: since the Window Manager and the remote Application (the X Client) are on the same host, the peers are sending more traffic on the wire.
Session Managers
The Session Manager is the component aimed at saving the current state of the desktop or restoring when resuming a previously saved session: this component is automatically launched during the login process - for example the CDE Desktop Environment launches it through the XSession script
The current state of the desktop includes for example which windows are iconified, the size and position of the opened ones, which was the one with the focus and so on - as you can easily guess, the most of these data belong to the Windows Manager, but some of them are actually application specific: for this reason the XSMP protocol have been designed. This means that it is mandatory for an application to support XSMP so to have its sessions state managed by the Session Manager.
The Session Manager provides also a few other facilities, such as the confirmation window or session selection window when logged out.
The Session Manager enables the user to temporarily log out from the current interactive session - for example to switch to another user, and restore everything as when he left once logged in the next time.
The original X Window session manager is “xsm”, but of course Desktop Environments developed their own specific X Session Manager.
For example:
- dtsession for CDE
- xfce4-session for Xfce
- gnome-session for GNOME
- ksmserver for KDE
The Lab Layout
After this very short summary of the X Window System we can start playing with it: the examples in this post leverage on a lab with the following machines:
this simulates a workstation running an X Display Server. It must be installed minimally by choosing the "Minimal Install" installation class.
this simulates a server where the applications are installed. It must be installed using the "Server with GUI" installation class - you can of course use the "Server with GUI" DNF group to add all the required RPM packages to an already installed machine.
Only on the "app-ca-ut1a001" machine, install the "xclock" and "xmessage" applications as follows:
sudo dnf install -y xclock xmessageThe X.org Display Server
Let's start from learning how to install and launch an X Display Server at its bare minimum.
Connect to the "wks-ca-ut1a001" workstation and install the X.org Display Server using the "base-x" DNF package group:
sudo dnf groupinstall -y base-xThe above statement, which must be obviously run using a sudo enabled user, installs every RPM package needed to run the X Display Server, along with a set of default configuration files and wrappers.
Of course we need an X Client application to run - for this use case we install the most famous X Window application: the "x-term"':
sudo dnf install -y xtermwe are almost ready: we just still need to specify the applications we want to be automatically launched and displayed on the X Display Server.
This can be achieved by listing them in the "~/.xinitrc" file.
Add the following contents to the file:
xterm -geometry 40x10+0+40 &
xterm -geometry 40x10+270+40
In this 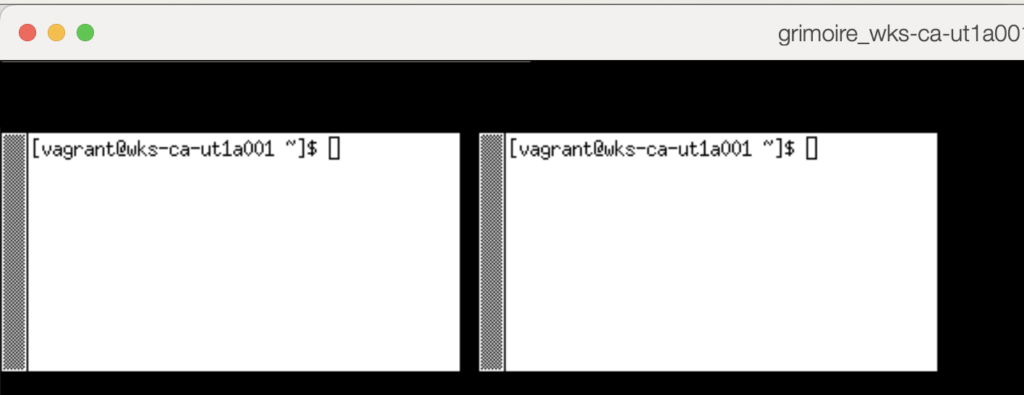 example, we are launching two xterm instances: please note how we are using the "&" character on the first one to send it to the background.
This is necessary to avoid the first instance preventing the second from starting until it is closed. This rule is valid for every X Client application, not only for xterm.
The last application of the list instead must stay in the foreground, to prevent the X Display Server from terminating immediately after launching it.
Now you can start your X Server by just running::
startxThe X Display Server gets started and the two xterm applications are displayed. This is how applications are displayed using only the Display Server: no title bar, no menu bar, you cannot resize them nor move them, they are just ... displayed. Even the right-click context menu is missing.
But at least you have a clipboard: if you select some text holding the left mouse button, you can then paste it by clicking the central mouse button.
We can now terminate the X Display Server: just send the "Ctrl+Alt+Backspace" key sequence.
Displaying a Remote Application
What we saw so far is starting the X Window Display Server on a host and running an X Window application (the x-term) on it. But the most amazing (and innovative, especially in the '80) X Window feature is being able to run X Window applications on a server, while rendering their GUI on another one.
This magic is possible thanks to a layered design: Display Servers can catually be bound to networking interfaces - users just have to connect the X Window applications to the endpoint running the Display Server connected to the screen they want to use.
The X Display Server by default creates and uses a UNIX domain socket: that means that to make it listen for network connections we must provide the "-listen tcp" command line switch while starting it.
Since the actual startup statement is wrapped by the "startx" script, we must patch it to pass that option.
On the "wks-ca-ut1a001" machine, just run:
sudo sed -i 's/^[ ]*defaultserverargs[ ]*=.*/defaultserverargs=" -listen tcp"/g' /usr/bin/startxThe last obvious task is to add the necessary firewall exception to enable connections to the X Display Server service.
First, on the "wks-ca-ut1a001" machine, we need to create the "x-display-server" Firewalld service as follows:
sudo firewall-cmd --permanent --new-service=x-display-server
sudo firewall-cmd --permanent --service=x-display-server \
--set-description="allow connection to the X Display Server instances"
sudo firewall-offline-cmd --service=x-display-server --add-port=6000-6009/tcp
we can now add the "x-display-server" service, limiting access only from the "app-ca-ut1a001" IP address ("192.168.254.12" in this example).
On the "wks-ca-ut1a001" machine, type:
sudo firewall-cmd --permanent \
--add-rich-rule='rule family=ipv4 source address=192.168.254.12/32 service name=x-display-server accept'
sudo firewall-cmd --reload
Host Access
The default X Display Server's authentication mechanism is Host Access: this is configured at startup by the "startx" wrapper initialising it so that X Window applications running on the local machine are authorized to connect to the Display Server. Additional hosts can be authorized by adding them to the "/etc/X<N>.hosts" where "N" is the Display Number used by the X Display Server - it defaults to 0.
On the "wks-ca-ut1a001" machine, just run:
sudo sed -i 's/^[ ]*enable_xauth[ ]*=.*/enable_xauth=0/' /usr/bin/startxOn the "wks-ca-ut1a001" machine, just add the "app-ca-ut1a001" to the "/etc/X0.hosts" file (the file must be of course created):
app-ca-ut1a001.mgmt.carcano.localNow, on the "wks-ca-ut1a001" machine's text based console, start the X Display Server again.
startxNow we have a running X Display Server on the "wks-ca-ut1a001" machine, listening to incoming connections on TCP76000, with a firewall rule granting access from the "app-ca-ut1a001" host.
We now want to simulate another user on the "app-ca-ut1a001" host: login to the "app-ca-ut1a001" console (don't connect using SSH).
Once connected, we want to launch the "xclock" application on the "app-ca-ut1a001" machine itself, but display it on the "wks-ca-ut1a001" workstation.
Since X Windows application guesses the X Display Server to use from the "DISPLAY" environment variable, we must first set it to the X Display Server 0 running on the "wks-ca-ut1a001" host - export the variable as follows:
export DISPLAY wks-ca-ut1a001.mgmt.carcano.local:0Now launch the "xclock" application as follows:
xclock -digital -update 1the clock will be immediately rendered on the screen of the "wks-ca-ut1a001" machine.
For the sake of completeness, the syntax of the DISPLAY variable is:
hostname_or_fqdn:display_number:visual_number
mind that you can omit:
- hostname_or_fqdn – if omitted, it means that connection should be to localhost
- visual_number – visuals are virtual displays. If omitted it means to use the first screen number – by the way, it is quite unusual to have to connect to a different visual
You are certainly thinking that relying on the Host Access authentication is not secure: anybody from an authorized machine can run an application and connect to the X Display Server.
For example, SSH login to the"app-ca-ut1a001" machine switchas the badguy user:
ssh badguy@app-ca-ut1a001Then, export the Display Server as we did before:
export DISPLAY wks-ca-ut1a001.mgmt.carcano.local:0Now launch the "xmessage" application:
xmessage -timeout 10 "Hi sweaty, I'm here to kill your X Display Server, .... woohahaha. Just give me 1 bitcoin"And voila', ... scary pop up window with a scam message (with a completely nonsense request in the '80 and in the '90 by the way).
So, long story short, ok, Host Access is a handy feature, but it can be very easily exploited to commit abuses.
Before going on with the tutorial, we must now put things back:
on the "wks-ca-ut1a001" machine, first kill the running X Display Server - just send the "Ctrl+Alt+Backspace" key sequence.
then, remove the Host Access file "/etc/X0.hosts" we just created:
sudo rm -f /etc/X0.hostsAnd of course restore the X-Auth authentication mechanism in the "/usr/bin/startx" wrapper:
sudo sed -i 's/^[ ]*enable_xauth[ ]*=.*/enable_xauth=1/' /usr/bin/startxTo prepare for the nex example, we must also configure the "wks-ca-ut1a001" to start just a single xterm instance when starting the X Display Server:
modify the "~/.xinitrc" file so that it contains just the xterm statement.
xterm
It is possible to temporarily alter the Host Access ACLs entries by using the xhost command followed by a
- + (plus) sign to add an entry
- - (minus) sign to remove an entry
If you omit the parameter after the plus or minus it is as if you were saying “any”. For example:
- "xhost +" grants access to anybody from everywhere
- "xhost -" revokes any kind of access grants to anybody from everywhere
- "xhost + local" Grants access to any local user
- "xhost + si:local:marco" Server interpreted entry that grants access to a local user with username "marco"
- "xhost + nis:marco@carcano" Secure RPC entry that grants access to a user belonging to NIS+ domain "carcano" with username "marco"
Is system display engineering just about chaining X11 auth tokens? Successfully computing MIT-MAGIC-COOKIE-1 values, configuring localized firewall rules, and shifting active environment variables across terminal subshells is an elite systems administration milestone.
However, manually synchronizing user credentials and desktop environment profiles host-by-host creates an invisible infrastructure drift over time. Modern corporate data centers demand that you abstract these workstation configurations, governing your system environments through robust, cloud-agnostic Ansible blueprints.
If you want to evaluate whether your practical DevSecOps skills are ready to scale past manual shell interventions, jump directly to the Apress Blueprint Box below to discover how to boost and evolve your career using a self-paced learning path.
X-Auth
X-Auth authentication addresses the Host Auth shortcoming of being not granular enough by enabling to grant access to the X Display server on a per user basis: the authentication token is provided by using an XAuthority credential file: the client application looks for that file in the default path or in the path defined by the "XAUTHORITY" variable.
Let's see it in action by retrying sending a scam message from the "app-ca-ut1a001".
Before that it is of course necessary to start again an X Display Server on the "wks-ca-ut1a001" workstation, so log on the "wks-ca-ut1a001" machine's text based console and start the X Display Server again:
startxSince it is listed in the "~/.xinitrc" file, the x-term application is automatically loaded.
Same way as we did before, connect to the "app-ca-ut1a001" console and, once logged in, export the Display Server:
export DISPLAY wks-ca-ut1a001.mgmt.carcano.local:0Now launch, as we already did, try another scam using the "xmessage" application:
xmessage -timeout 10 "Hi sweaty, I'm here to kill your X Display Server, .... woohahaha. Just give me 1 bitcoin"And voila', ... this time no scary pop up window with a scam message.
Instead we get the error message:
No protocol specified
Error: couldn't open display wks-ca-ut1a001.mgmt.carcano.local:0
This is because of the enabled XAuth - we restored it at the end of the previous paragraph.
So let's have a look to the "wks-ca-ut1a001" XAuthority User's Database - on the xterm of the X Display Server running on the "wks-ca-ut1a001" machine, type:
xauth liston my system, the output is:
wks-ca-ut1a001.mgmt.carcano.local/unix:0  MIT-MAGIC-COOKIE-1  d3a50c3d2f8466f5d763abc3d6147e75
wks-ca-ut1a001.mgmt.carcano.local:0  MIT-MAGIC-COOKIE-1  d3a50c3d2f8466f5d763abc3d6147e75
it contains just two entries, both for accessing the Display Server from the local machine: the first is the one for using the Unix domain socket, whereas the last is for using the TCP socket.
When connecting to a specific X Display Server, if an XAuthority file is found, X Client applications look for a MIT Magic Cookie entry matching that X Display Server: if they find it, they use it for authenticating to the X Display Server.
So, to enable access X Client application to access to the X Display Server 0 running on the "app-ca-ut1a001" host, we must create a personal (it is user specific) XAuthority file on thee "app-ca-ut1a001" host, and add to it a valid MIT Magic Cookie.
The easiest way for doing it is generating it directly from the machine where the X Display Server is running - so "wks-ca-ut1a001" in our example, delivering it to the "app-ca-ut1a001" by running an SSH statement.
First, on the "wks-ca-ut1a001" machine, we store that secret into the MAGIC_COOKIE environment variable as follows:
MAGIC_COOKIE=$(xauth list :0 | cut -f 2 -d ':' | awk '{print $1" . "$3}')In this example the user logged in to the "app-ca-ut1a001" text console, willing to display something on the "wks-ca-ut1a001" X Display Server is the "vagrant" user: directly from the "wks-ca-ut1a001" machine, we can deliver the MIT Magic Cookie to its personal XAuthority file as follows:
ssh vagrant@app-ca-ut1a001 "xauth add ${HOSTNAME}:$MAGIC_COOKIE"you may of course be prompted for accepting the host's SSH key and the vagrant user's password if not using SSH public key authentication.
Now that the "vagrant" user has a valid MIT MAgic Cookie in its personal XAuthority file on the "app-ca-ut1a001" machine, we can run the "xmessage" application again:
xmessage -timeout 10 "Hi sweaty, I'm here to kill your X Display Server, .... woohahaha. Just give me 1 bitcoin"this time the message gets rendered to the"wks-ca-ut1a001" screen as expected.
If instead you get:
invalid mit-magic-cookie-1 keyerror can't open display: wks-ca-ut1a001.mgmt.carcano.local:0it means that the XAuthority User Database has a MIT Magic cookie for the display, but it is not valid.
This is the list of the X Display Server's supported User Authentication mechanisms:
- SUN-DES-1: a public key based RPC developed by SUN
- MIT-KERBEROS-5: kerberized authentication
- MIT-MAGIC-COOKIE-1: a 128 bit plaintext cookie
- XDM-AUTHORIZATION-1: a message med by a 56 bit DES encrypted key and 64 bits of random data
- Server Interpreted: server dependent methods of access controls
Explaining all of them is out of the scope of this post: I will limit to MIT-MAGIC-COOKIE-1 since it is the most likely you'll find in your daily work.
Before going on with the lab, we must cleanup the leftovers - just remove the file as follows:
rm ~/.xinitrcThe Window Manager
After experiencing the joy of running applications without a Window Manager, let's try how things change after installing one. Since this is a learning exercise and we are going on step by step, we install the only available very minimal Window Manager still available: "Motif".
sudo dnf install -y motifSince the fallback Window Manager is still "twm", and as already said it is no longer available as a package, we can just create a symlink for it to the "mwm" file - the Motif's binary package.
sudo ln -s /usr/bin/mwm /usr/bin/twmnow launch the X Server again:
startx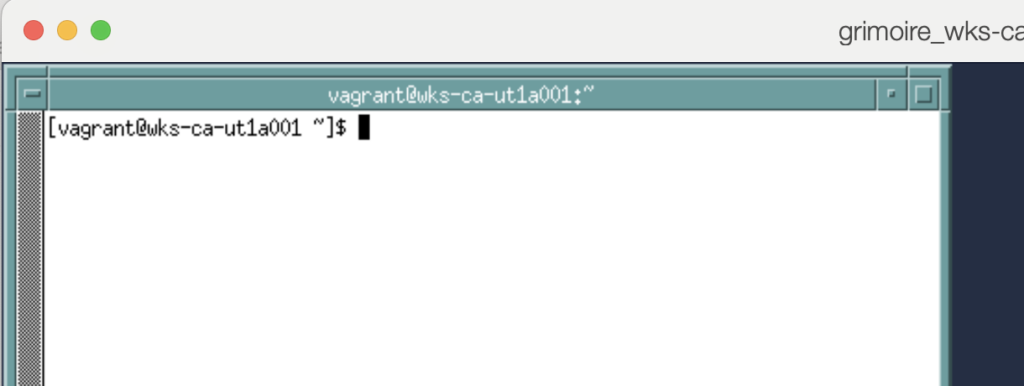 this time the x-term is displayed
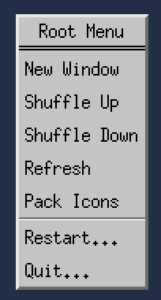 with a title bar, it has buttons to minimize and maximize it (top right buttons) and a button to display a menu (top left button).
The Window can now be resized and dragged.
Even the Desktop now has the right-click context menu.
Even the Desktop now has the right-click context menu - that means it is no longer needed to kill the X Display Server using the "Ctrl+Alt+Backspace" key sequence: we can now just right click and, in the context menu just appeared, click on "Quit...".
Tada! Back to the late '80 initial '90. Good music, a lot of fun and a running X Window. What more from your life? You can celebrate this amazing moment by reviving "Everyone wants to rule the world" from Tears for Fears, or if you prefer something hard Yngwie Malmsteen's "I ll' see the light tonight". Ah, what a time!
The Desktop Environment
It has come the time to raise the stick a little bit, introducing a full Desktop Environment. A Desktop Environment is a set of applications and tools that gives a consistent layout to every window.
The most popular Desktop Environments nowadays are certainly
- GNOME
- KDE
- Xfce
- Mate
- Cinnamon
But since this is a didactical exercise, I want to give you the opportunity to play the same way we did in the '90, and install a Desktop Environment that really made the story: the Common Desktop Environment (CDE).
The Common Desktop Environment
We are about to install the most old fashioned still available Desktop Environment: the "Common Desktop Environment" (the project started in 1993! Linux was born no longer than 1 year before).
AFAIK there are no longer RPM packages providing it on Red Hat family distributions, but since we are just playing, as a learning exercise we do it the same way we were used to doing things in those times: configure, make, make install - hoping that nothing breaks in the middle.
Install The Required Development Tools
First we need to install the "Development Tools" DNF package group - it provides the most used development tools:
sudo dnf group install -y "Development Tools"Then we need to install the libraries and tools specifically required for building the "Common Desktop Environment" applications.
Since a lot of these packages are provided by the EPEL repository, we must enable it as follows:
sudo dnf install -y epel-releaseFirst we install the packages provided by the distribution:
sudo dnf install -y libtirpc libtirpc-devel libXdmcp-devel libutempter-devel sessreg
If you are running OracleLinux, mind that Oracle is missing some packages that are instead available on the CentOS stream repo.
In such a scenario you can anyway install them using DNF by using their direct URL as follows:
sudo dnf install -y \
https://mirror.stream.centos.org/9-stream/CRB/aarch64/os/Packages/libtirpc-devel-1.3.3-6.el9.$(uname -i).rpm \
https://mirror.stream.centos.org/9-stream/BaseOS/aarch64/os/Packages/libtirpc-1.3.3-6.el9.$(uname -i).rpm \
https://mirror.stream.centos.org/9-stream/CRB/aarch64/os/Packages/libXdmcp-devel-1.1.3-8.el9.$(uname -i).rpm \
https://mirror.stream.centos.org/9-stream/CRB/aarch64/os/Packages/libutempter-devel-1.2.1-6.el9.$(uname -i).rpm \
https://dl.fedoraproject.org/pub/fedora/linux/releases/39/Everything/aarch64/os/Packages/s/sessreg-1.1.2-7.fc39.$(uname -i).rpm
The "opensp" package seems to be missing also from the CentOS repository - we can anyway install it from the Almalinux repository as follows:
sudo dnf install -y https://repo.almalinux.org/almalinux/9/CRB/aarch64/os/Packages/opensp-1.5.2-38.el9.$(uname -i).rpmWe can then install the remaining require RPM packages as follows:
sudo dnf install -y pam-devel libXp-devel libXt-devel libXmu-devel libXft-devel libXinerama-devel \
libXpm-devel motif motif-devel libXaw-devel libX11-devel libXScrnSaver  xset xrdb libjpeg-turbo-devel \
freetype-devel openssl-devel tcl-devel ksh m4 ncompress patch rpcbind bison xorg-x11-xbitmaps \
xorg-x11-proto-devel flex libXrender-devel xorg-x11-fonts-100dpi rpcgen bdftopcf libXScrnSaver-devel
Download The Sources
Now, as a regular user, download the "Common Desktop Environment" gzipped tarball from Sourceforge and extract it - at the time of writing this post, the current version is 2.5.1.
Build The Sources
Once extracted, change directory into it:
cd cde-2.5.1We are working the old way, so first we must generate the automatic configuration environment suitable for our platform / architecture using the "autogen.sh" tool:
./autogen.sh
now we can run the automatic configuration suite "configure" generated by it:
./configureIf everything went well so far, we can start to build the whole "Common Desktop Environment" as follows:
makeIt takes some time to complete.
Install
Once built, we must install it as follows:
sudo make installAdd The CDE Desktop To The List Of Available Desktops
we must then copy the "cde.desktop" settings file to the "/usr/share/xsessions" directory, so to make the "Common Desktop Environment" available as an X Window session:
sudo cp contrib/desktopentry/cde.desktop /usr/share/xsessions/Since the "Common Desktop Environment" requires the "rpcbind" service, we enable it to be load at boot and start it:
sudo systemctl enable --now rpcbindWe are still missing one thing: telling the X Server we want to run a "Common Desktop Environment" session.
Configure CDE As The Default XSession
To do so, just add the following line to the "~/.xinitrc" configuration file - in this case we must also create the file:
exec /usr/dt/bin/XsessionWe are finally ready for launching the X Display Server again:
startxAnd voilà! From 1987 to 1993 in less than an hour.
Are you enjoying these high quality free contents on a blog without annoying banners? I like doing this for free, but I also have costs so, if you like these contents and you want to help keeping this website free as it is now, please put your tip in the cup below:
Even a small contribution is always welcome!
The "Common Desktop Environment" looks like the below screenshot.

The XFCE Desktop Environment
Of course legacy stuff is always fashionable, but I think you may prefer to work with something more modern.
Since X Window supports even installing multiple Desktop Environments, letting the user choose the one he prefers, we can have a look at the Xfce Desktop Environment: this project, derived from the CDE Desktop Environment, but with a rather more modern look, was developed with the aim to bring something like the CDE on Linux, since in these years CDE was available only on the UNIX.
RPM packages of this Desktop Environment are available in the EPEL repository, so we don't need to build it from sources as we did with CDE.
On the "wks-ca-ut1a001" workstation, install the Xfce RPM package group as follows:
sudo dnf groupinstall -y XfceConfigure Xcfe As The Default XSession
The "startx" script gets which Desktop Environment (often called "xsession") to use from the "~/.xinitrc" file - modify it so that it has just the following contents:
exec /usr/bin/xfce4-sessionwe are finally ready to run an Xfce X Window session - just type "startx" as usual:
startx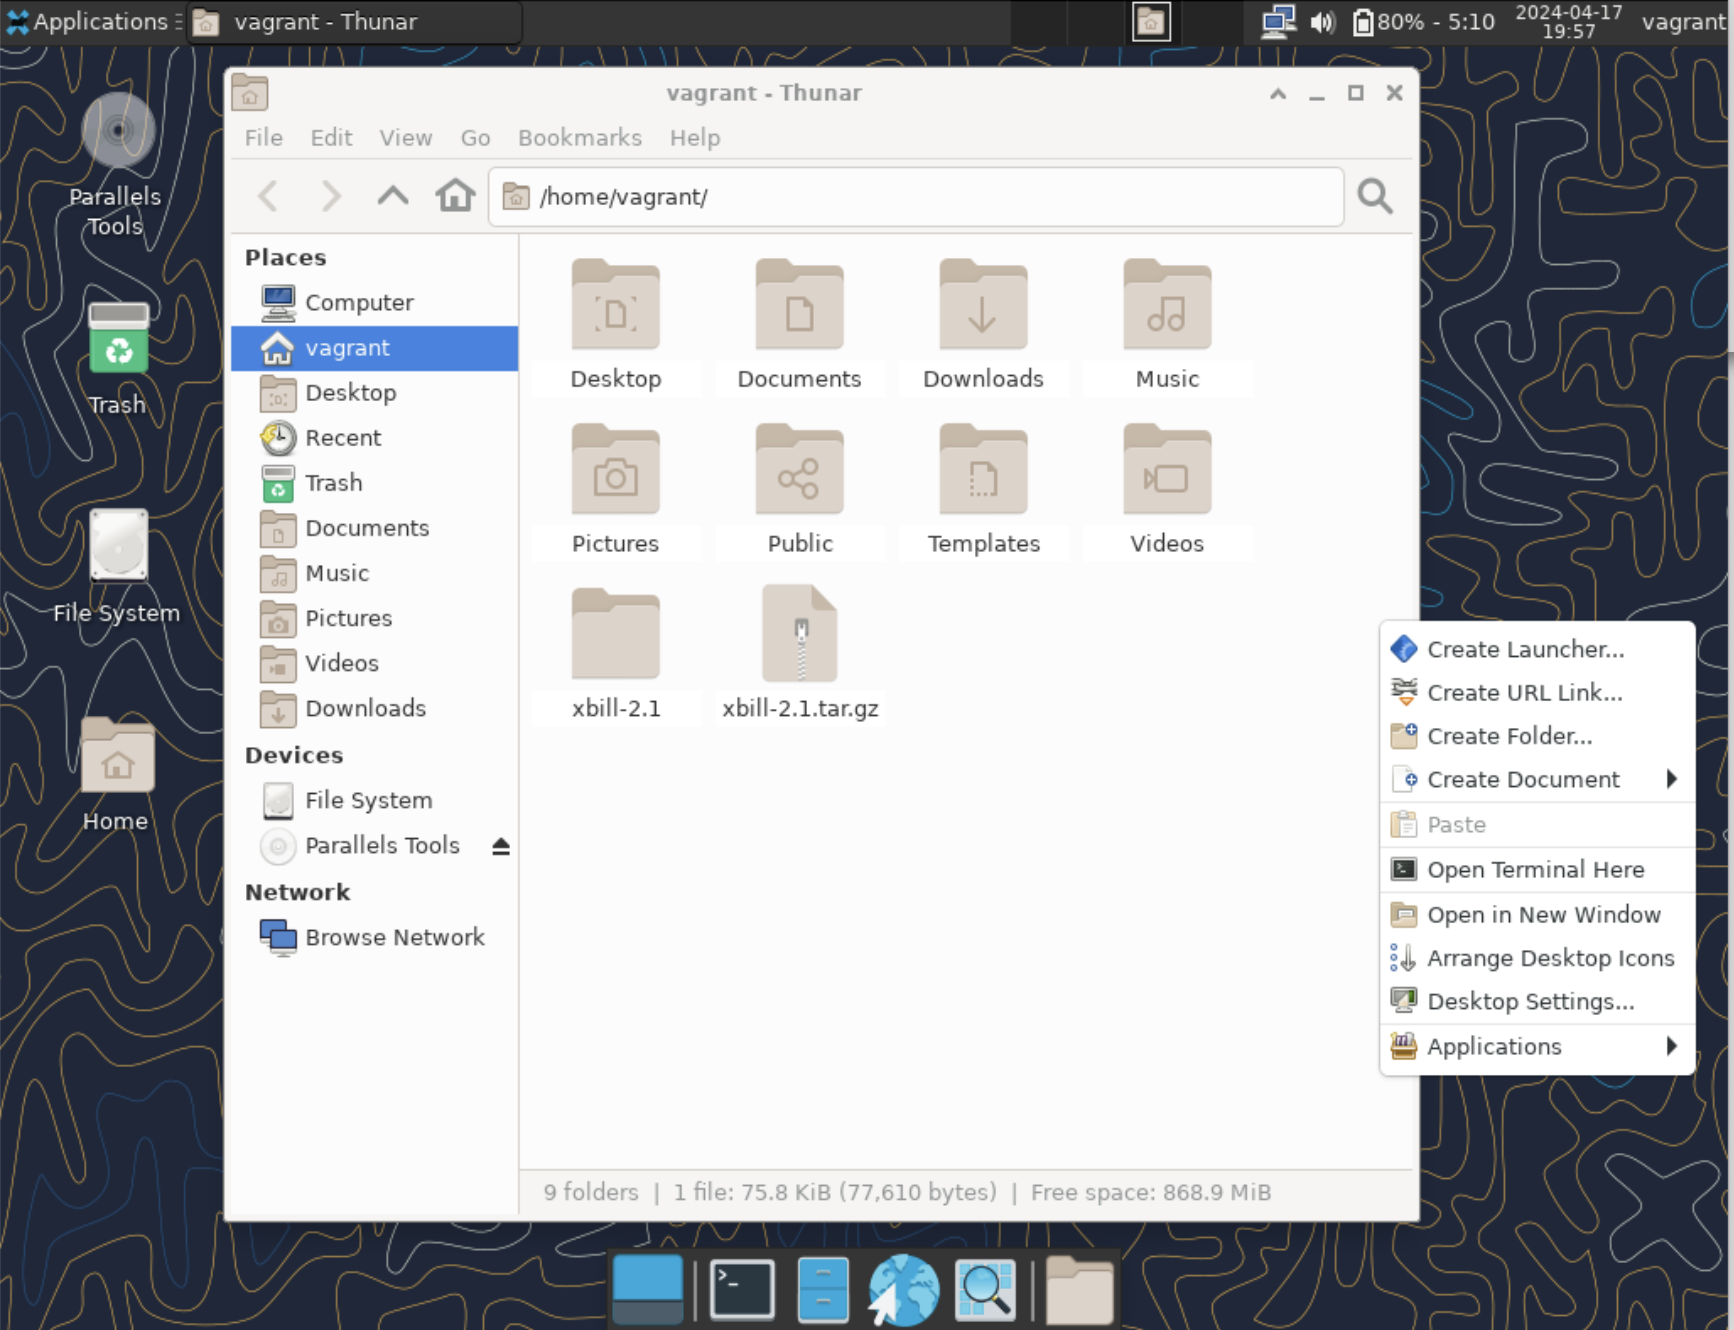
The Display Manager
So far we run the X Display server by interactively launching it within a multi user text based console login - the system was booted reaching the multi-user systemd target (runlevel 3).
It has come the time to see how to start the X Display Server at boot and run the greeter (login) application: in other words it has come the time to see how to start an X Display Manager at boot.
The obvious mandatory requirement is to switch the systemd's boot target from "multi-user" to the "graphical" systemd's target:
sudo systemctl set-default graphicalThe dtlogin Display Manager
We start by trying the "dtlogin" Display Manager - the one provided by the CDE Desktop Environment.
Just to be sure, first disable the Display Manager service that was maybe already configured by the Linux distribution
sudo systemctl disable display-manager.serviceThen, create the "/usr/lib/systemd/system/dtlogin.service" Systemd unit file with the following contents:
[Unit]
Description=CDE Display Manager
Conflicts=getty@tty1.service
After=getty@tty1.service

Conflicts=plymouth-quit.service
After=plymouth-quit.service
After=rc-local.service plymouth-start.service rpcbind.service systemd-user-sessions.service
Requires=rpcbind.service
OnFailure=plymouth-quit.service

[Service]
Type=simple
ExecStart=/usr/dt/bin/dtlogin
KillMode=mixed
Restart=always
IgnoreSIGPIPE=no
BusName=org.gnome.DisplayManager
EnvironmentFile=-/etc/locale.conf
ExecReload=/bin/kill -SIGHUP $MAINPID
KeyringMode=shared

[Install]
Alias=display-manager.service
and of course reload Systemd:
sudo systemctl daemon-reload enable the "dtlogin" service to be automatically stared at boot time:
sudo systemctl enable dtlogin.servicewe are done: just restart the system:
sudo shutdown -r nowOnce restarted, you must have the X Display Server automatically started and see the shiny CDE greeter application asking your credentials to login.

The LightDM Display Manager
Since you probably will find the "dtlogin" Display Manager too old fashioned for you, you may consider using the LightDM display manager.
First, disable the current Display Manager service:
sudo systemctl disable display-manager.serviceThen, install the LightDM RPM package as follows:
sudo dnf install -y lightdmLastly, enable the "lightdm" service to be automatically stared at boot time:
sudo systemctl enable lightdmand restart the system to have a go with it:
sudo shutdown -r nowConfigure The Default Desktop Environment (Default Session)
As we said it is possible to install more Desktop Environment (Sessions): the available Desktop Environments (X Sessions) must then be configured by creating a ".desktop" file beneath the "/usr/share/xsessions" directory.
We can list the currently available ones as follows:
ls -1 /usr/share/xsessionson my machine they:
cde.desktop
gnome-custom-session.desktop
gnome.desktop
gnome-xorg.desktop
xfce.desktop
xinit-compat.desktop
You can now assign a custom X Window session on a per user basis by modifying the user's specific settings file beneath the "/var/lib/AccountsService/users" directory.
For example, if you want to provide the GNOME Desktop Environment, set the "XSession" and "Session" keys in the "[User]" stanza to "gnome".
It is of course possible to configure the default Desktop Environment (X Session) for the users at their first login: this can be easily achieved by copying the stock "/usr/share/accountsservice/user-templates/standard" as follows:
sudo cp /usr/share/accountsservice/user-templates/standard \
/etc/accountsservice/user-templates/standard
Since it is installed on the system, we can set the GNOME Desktop Environment as the default one: modify the "/etc/accountsservice/user-templates/standard" file as follows:
[User]
Session=gnome
XSession=gnome
Icon=${HOME}/.face
This is the GNOME environment available on the system, ... it looks a little bit empty, doesn't it? It is just waiting to be filled with applications.
![]()
SSH With X Forwarding
One of the X Window System shortcomings is certainly that it's communicating unencrypted on the wire - that should not be surprising, since X11 is a really aged protocol.
To overcome it, it is possible to tunnel the X Window's traffic within an SSH connection: despite this can be achieved as any regular SSH tunnel, SSH provides a very handy feature, called X Forwarding that, besides automatically creating a SSH tunnel for forwarding the X traffic, it also takes care of exporting the DISPLAY variable accordingly to the tunnel's edge on the remote server and of generating a personal XAuthority credentials file.
This feature is enabled by providing the "-X" command line option of the "ssh" command.
Let's see it in action
For example, from the console "wks-ca-ut1a001" workstation, se can SSH connect to the "app-ca-ut1a001" server enabling X Forwarding as follows:
ssh -X vagrant@app-ca-ut1a001once connected, we can launch the "xclock" application:
xclockas you see, the clock is automatically rendered on the "wks-ca-ut1a001" workstation, no matter we haven't exported the DISPLAY variable nor added the MIT Magic Cookie to the XAuthority file.
Now close the "xclock" application.
X Forwarding can be set also by specifying the -Y option: the difference between -X and -Y is that with -X the remote machine is considered "untrusted", whereas with "-Y" it is considered "trusted". You must avoid using the "-Y" option, since it creates a weaker set up that can be exploited. One of the differences between "-X" and "-Y" options is also that "-X" set connection timeouts that may interfere with some applications: you can overcome this by setting the "ForwardX11Timeout" in the "ssh_config" file or provide it as a command line option.
Let's have a quick look at the set up the SSH client made for us.
The "DISPLAY" variable is already set and exported:
echo $DISPLAYthe output is:
localhost:10.0as you see, it points to the tunnel's edge on the "app-ca-ut1a001", on display 10, visual 0.
if we install the "lsof" and "netstat" utilities:
sudo dnf install -y lsof net-toolswe can verify that the "sshd" process actually created the tunnel endpoint for the X 11 Forwarding:
sudo lsof -i -n | grep 'x11-ssh-offset'the output on my system is:
sshd       9861 vagrant    8u  IPv6  33875      0t0  TCP [::1]:x11-ssh-offset (LISTEN)
sshd       9861 vagrant    9u  IPv4  33876      0t0  TCP 127.0.0.1:x11-ssh-offset (LISTEN)
and we can also see that it is bound on the loopback interface, port TCP 6010:
sudo netstat -tupan | grep sshd| grep -v ':22'the output is:
tcp        0      0 127.0.0.1:6010          0.0.0.0:*               LISTEN      9861/sshd: vagrant@
tcp6       0      0 ::1:6010                :::*                    LISTEN      9861/sshd: vagrant@
lastly, let's check what SSH did with to the XAuthority file:
xauth listthe output is:
wks-ca-ut1a001.mgmt.carcano.local:0  MIT-MAGIC-COOKIE-1  def2de139a2746d11e9060787f6ab988
app-ca-ut1a001.mgmt.carcano.local/unix:10  MIT-MAGIC-COOKIE-1  bd95b2cc2d5f59edf0612785208a17bc
it contains the MIT Magic Cookie to connect to:
- the Display Server 10 on the "app-ca-ut1a001" host using the Unix Domain Socket
- the Display Server 0 on the actual "wks-ca-ut1a001" host.
Switching User
The X Forwarding option is very handy, but it still has a shortcoming when it comes to switching the user logged in to the remote system to another one.
This is a typical scenario for an Oracle DBA when it comes to run the X Window utility for creating or configuring databases: the DBA user right after connecting to the Oracle Database server using its personal account must switch to "oracle" user to launch the configuration utility.
Let's simulate the use case.
First, on the "app-ca-ut1a001" server, add the "oracle" user as follows:
sudo adduser oraclethen, from the console "wks-ca-ut1a001" workstation, SSH connect to the "app-ca-ut1a001" server enabling X Forwarding as we did before:
ssh -X vagrant@app-ca-ut1a001once connected, switch to the "oracle" user:
sudo -E su oraclemind the "-E" command line switch: thanks to it the whole session environment is exported to the new session for oracle user – this means that also the DISPLAY environment variable is exported:
echo $DISPLAYthe output indeed is:
localhost:10.0but, since the XAuthority is a personal file, the "oracle" user still does not have its own:
xauth listthe output indeed is:
xauth: file /home/oracle/.Xauthority does not exist let's exit the sudo shell of the "oracle" user, back to the "vagrant" user:
exitThe obvious solution is to generate the "/home/oracle/.Xauthority" file before switching to the "oracle" user.
As we did already, first retrieve the MIT Magic Cookie and store it in the "MAGIC_COOKIE" variable as follows:
MAGIC_COOKIE=$(xauth list $HOSTNAME/unix:10| cut -f 2 -d ':' | awk '{print $1" . "$3}')Then, generate the "oracle" user's personal ".XAuthority" file and add the MIT Magic Cookie to it:
sudo -u oracle xauth -f /home/oracle/.Xauthority add ${HOSTNAME}/unix:$MAGIC_COOKIEnow we can switch to the "oracle" user again:
sudo -E su oracleand run any X application displaying it on our workstation - for example "xclock":
xclockBeyond Windowing Protocols: Building the DevOps and DevSecOps Foundations
Successfully fine-tuning local socket line extensions, compiling custom compilation scripts for source-built desktop managers, and handling complex cross-user session configurations via secure tokens are premier technical milestones. Yet, managing legacy display infrastructures represents just one single operational brick in the massive wall of modern DevOps and DevSecOps engineering on Linux. In complex enterprise networks, an expert must look past raw terminal utilities: you need to possess the deep practical engineering required to bind core system configurations with low-level kernel defenses, automated package compliance, secure container delivery, and native cloud CD pipelines without vendor lock-in.
When you look closely at your daily infrastructure deployment and design tasks, are you fully confident you master the holistic engineering layer running under the hood of your automation nodes? Or are you simply connecting separate open-source tools via interactive configurations without a comprehensive architectural blueprint?
My book, "DevSecOps and DevOps for Linux: The Foundations", published by Apress, was written specifically to drive this professional reflection. It is a comprehensive, lab-driven blueprint tailored for both students and experienced engineers to systematically identify and eliminate their technical gaps. Through intensive, hands-on enterprise exercises built entirely on open-source, cloud-agnostic architectures, you will discover how to turn solid host-management capabilities into secure, automated, and scalable deployment frameworks hosted natively on enterprise Kubernetes.
Key insights covered in this volume:
- The Holistic Skills Set Brick: Bridge technical engineering with team management frameworks. Master
Scrum,Kanban, andLeanmethodologies to design system architectures aligned with real corporate workflows. - The Shell Scripting & Unix Tools Brick: Build rigorous operational foundations. Master advanced
Bashshell scripting architecture while learning how to combine core Unix tools into robust, repeatable, and enterprise-ready host automations. - The Version Control Engineering Brick: Move past basic commits. Dive deep into
Gitversion control, mastering feature-branch workflows, repository lifecycle management, and complex conflict resolution. - The Data & Core Automation Brick: Build bulletproof data processing setups. Learn advanced
RegEx, how to operate using evergreen tools such asGrep,Sed, andAWK, and how to master structured data parsing (XML,JSON,YAML) usingPythonand tools likexmlstarlet,jq, andyq. - The Modern Python & Automation Brick: Develop a modern Python project using
pyproject.tomlwithpytest-based unit tests, governing the project withGNU Makefor testing, building, and digitally signingRPMpackages. The project is presented in an evolving fashion, showing how features are added step by step, highlighting how a properly structured Python project can be improved and evolved with minimal or no rework at all. - The Linux OS Hardening & PKI Brick: Learn the real mechanics of security. Implement
X.509/PKIarchitectures,TLSconfigurations, andGPGencryption and signing, while mastering low-level kernel defenses likeSELinuxandLinux Capabilities. - The Compliance Check and Shift-Left Security Brick: Learn how to leverage the
pre-commitframework to automate compliance checks withPylintandFlake8, and perform security scans withBanditandSafety, extending the security audit to the full software supply chain. - The Application Integration Brick: Master the foundational protocols used to securely interconnect enterprise microservices, including
HTTP,REST,OpenAPI,SOAP, andLDAP/LDAPS. - The Infrastructure Delivery Brick: Put theory into practice with vertical, real-world labs. Move from basic scripts to engineering
Ansiblearchitectures, rootlessPodmansetups, image creation viaBuildah, and completePulp3deployments usingDocker Compose. - The Enterprise GitOps Pipeline Brick: Tie everything together by automating your software supply chain. Build complete continuous deployment workflows using
Gitea CIpipelines hosted natively onKubernetes(RKE2).
Footnotes
Here it ends our walkthrough on the X Window System - this is certainly one of the most time consuming post I wrote so far (it took almost 80 hours!) but I think it worth the effort: it's my personal tribute to a long lasting old fashioned (40 years this year!) piece of software that really made the history of the UNIX, and of course of Linux, ... and as a professional it is certainly part of my life, since I'm using it since I was a boy.
I think that a Linux professional must still be skilled on it, even if they say they are about to replace it with Wayland - although I'm not sure that at its current project status, Wayland can replace the whole X Window system - the X Window System is here to stay at least for other 10 years on the currently installed systems.

daniel says:
very comprehensive on X11
Marco Antonio Carcano says:
I did my best to put everything I think is worth the effort to mention – I’m pleased to read your feedback. Thanks.