Red Hat Network Satellite Server 6, as well as its upstream project Katello, enables you to easily manage the registered client hosts using Ansible.
Conversely from Puppet, that requires the client to install the agent package and to be registered to the Puppet master running on the Satellite or Capsule, Ansible does not require installing anything client side, since it relies on SSH or, to tell it in Red Hat Network Satellite 6 terms, it relies on remote execution with SSH. The only thing that is required to manage the client hosts of the Satellite using Ansible is enable and configure remote execution and the Ansible plugin on the Satellite itself and on any Capsule you want to use.
This post shows you how to enable both remote execution with SSH and the Ansible plugin on the Satellite. To ensure that everything is properly working, we also run the ansible ping module.
The Linux distribution used in the examples is CentOS 7, but you can of course easily adapt it to any other Red Hat and derived Linux distribution.
Prerequisites
The only requisite to go on with this post is having the client already registered on the Red Hat Network Satellite Server 6 or Katello. If you do not know how to do this, or simply want to learn more on this topic, please read Register Clients To Satellite Server 6 Or Katello before going on with this post.
Required Satellite Plugins
As we told, conversely from Puppet, Ansible does not require having an agent installed on the client hosts: Ansible relies on SSH, and this makes it seen as a remote execution by the Satellite perspective.
So the very first thing to do is enabling the remote execution feature on the Satellite along with the SSH plugin.
Remote Execution With SSH
Please note that this feature is most of the time enabled by default on the Satellite server: it is usually needed enabling it only on the Capsules. As you probably already know, the Satellite is installed and configured using the foreman-installer command line utility.
The options necessary to enable it are:
- --enable-foreman-plugin-remote-execution
- --enable-foreman-proxy-plugin-remote-execution-ssh
- --foreman-proxy-plugin-remote-execution-ssh-install-key=true
Please note that the SSH connections to the remote client hosts perform the authentication using the private key of the foreman-proxy user: this key gets generated during the installation of the SSH plugin beneath the "/usr/share/foreman-proxy/.ssh" directory.
The Ansible Plugin
This feature too is most of the times enabled by default on the Satellite server: it is usually needed enabling it only on capsules.
The foreman-installer options necessary to enable it are:
- --enable-foreman-plugin-ansible
- --enable-foreman-proxy-plugin-ansible
Please note that since Ansible relies on SSH, as we already saw it is mandatory to configure the Remote Execution SSH plugin first so to leverage on its configuration when connecting to the target client hosts.
Installing The Plugins
Login to the Satellite or the Capsules where there plugins are not already enabled and type the following command:
sudo foreman-installer \
--enable-foreman-plugin-{remote-execution,ansible} \
--enable-foreman-proxy-plugin-{remote-execution-ssh,ansible} \
--foreman-proxy-plugin-remote-execution-ssh-install-key=true
the Satellite/Capsule configuration (or reconfiguration) starts as follows:
Installing Package[ca-certificates] [13%] [......... ]in the end you should get something like in the following snippet:
Installing             Done                                               [100%] [...........................................................................]
  Success!
  * Katello is running at https://sat-ci-up3a002.mgmt.carcano.local
  * To install an additional Foreman proxy on separate machine continue by running:

      foreman-proxy-certs-generate --foreman-proxy-fqdn "$FOREMAN_PROXY" --certs-tar "/root/$FOREMAN_PROXY-certs.tar"
The full log is at /var/log/foreman-installer/katello.logGrant SSH Login To The Clients
Since when performing remote executions the Satellite by default connects to the client hosts as the root user, the Ansible plugin behaves the same way too. This means that to get access to the clients, it is enough to install on the client hosts the public key of the foreman-proxy user of the Satellite among the authorized keys of the root user.
Login to the client host and switch to the root user:
sudo su -create the ".ssh" directory (if it does not already exist):
[ -d .ssh ] || mkdir -m 700 .sshfetch the public key of the foreman-proxy user from the Satellite, and append it to the the ".ssh/authorized_keys" file:
curl https://sat-ci-up3a002.mgmt.carcano.local:9090/ssh/pubkey >> ~/.ssh/authorized_keysif the authorized_key file was not existent and it has just been created, fix its permissions as follows:
chmod 0600 ~/.ssh/authorized_keysTesting The Whole Setup
Although this is an optional step, it is always wise to immediately test that everything is properly setup.
Login to the Satellite and switch to the foreman-proxy user - note how we need to spawn the shell since the user default shell is the "no-login":
sudo -u foreman-proxy -s /bin/bashwe want to run an Ansible ad hoc command to ensure that the client host can actually be accessed: since this requires an Ansible inventory, we create a temporary one containing just the client host on which we have just authorized the SSH key of the foreman-proxy user to login as root:
cat << EOF > /tmp/inventory
srv-ci-up3a002.mgmt.carcano.local
EOF
we can now have a go with Ansible, typing any ad-hoc command we wish: to test the configuration, the ping module is more than enough:
ansible -i /tmp/inventory -u root --private-key ~/.ssh/id_rsa_foreman_proxy all -m pingthe output must be as follows:
srv-ci-up3a002.mgmt.carcano.local | SUCCESS => {
    "ansible_facts": {
        "discovered_interpreter_python": "/usr/bin/python"
    },
    "changed": false,
    "ping": "pong"
}
this outcome means not only that the client host is reachable, but also that we succeeded in SSH logging in.
Ansible - Acquainting To It
Now we have the Satellite properly setup to use Ansible, but we are still missing the Ansible code to run on it. Before showing you how to import Ansible roles, I think that we must have a quick walk-through of the Ansible terms just to avoid confusion.
Playbook
Ansible can play a list of "tasks" that are specified into a manifest file called playbook: it can also contain "handlers", that are special tasks that run only at a specific moment of the play and only if they have been notified. Each task describes how to invoke an Ansible "module" (that is Python code), passing the necessary parameters to it.
It happens very often that among the various tasks there are some that make use of Ansible modules that copy files from the filesystem to the managed client hosts: these files can also be JINJA templates that are rendered only when generating the actual file on the managed client host.
Role
Ansible promotes code re-usability by the means of the so called roles: they provide a convenient way to bundle tasks files, handlers, resource files, templates and even custom modules within a single delivery unit that can be imported by a playbook, or even by another role.
Red Hat System Roles
Red Hat packaged the rhel-system-roles RPM with a set of Ansible roles specifically developed by Red Hat to configure its systems.
We can easily install them as follows on the Satellite (or either on any Capsule, if necessary)
sudo yum install rhel-system-rolesthey are installed into "/usr/share/ansible/roles" directory, so we can easily list them as follows:
ls /usr/share/ansible/rolesJob Templates
Satellite lets define Job Templates: these are Embedded Ruby (ERB) template files that are processed to generate a "Job" containing with the actual logic to run. 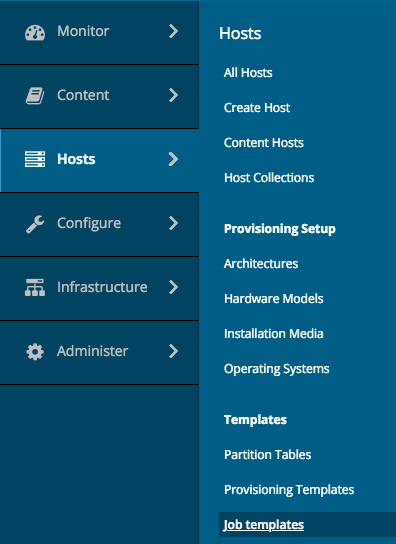 This enables you to derive from a Job Template almost any kind of statement files, such as shell scripts or even Ansible playbooks indeed: it is the Satellite that takes care of generating and running the resulting statement file on the client hosts.
They are a very handy and powerful tool, since we can even define input parameters such as textboxes, drop-downs, checkboxes and such: they are rendered by the Satellite Web UI while their values are stored within ERB variables.
When connected to the Satellite Web UI as a user with administrative, we can can easily list the existing Job Templates of the currently selected Organization by clicking onto:
- "Hosts"
- "Job Templates"
as shown by the screenshot on the right.
The Satellite provides a small set of pre-configured Job Templates for common tasks such as installing RPM packages or errata, puppet modules, enabling or disabling services and so on.
Generating An Ansible Playbook From A Job Template
It has come the time to show you how it is easy to create a very simple Job Template that generates and run an Ansible playbook with the following contents:
---
- hosts: all
  tasks:
    - name: ping the host
      ping: {}
this very simple playbook specifies a single play of one task only, that runs the Ansible ping module. The purpose of this module, as we already saw, is to perform a "SSH ping" that does not check only the reachability of the targets at the networking level, but also attempts an SSH login.

Are you enjoying these high quality free contents on a blog without annoying banners? I like doing this for free, but I also have costs so, if you like these contents and you want to help keeping this website free as it is now, please put your tip in the cup below:
Even a small contribution is always welcome!
Please note how this playbook has been coded so to run on every hosts of the Ansible inventory (line 1): when dealing with Satellite, you must always specify "all" as target, since it is the Satellite itself that takes care to limit the execution of the playbook only to the selected host(s) mimicking the --limit clause of Ansible.
So let's start the creation of the new Job Template by clicking on the "New Job Template" button and filling in the form as depicted by the following screenshot:
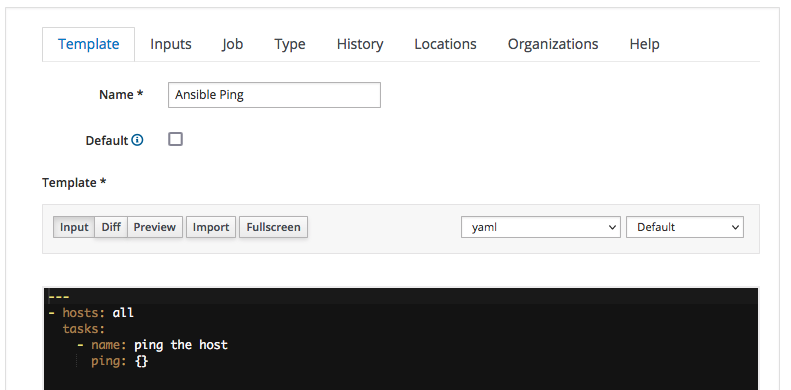
we:
- assign "Ansible Ping" as name of the Job Template
- select the "yaml" code syntax-highlighting - this is not mandatory, it but can be convenient when dealing with playbooks more complex than this
- type the actual YAML code of the playbook into the textbox
We must now classify the Job Template we are creating: switch to the "Job" tab and fill it as by the following screenshot:
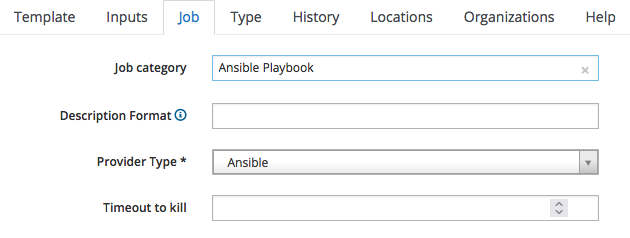
Since it is a Playbook, we assign it to the Ansible Playbook job category, and we specify "Ansible" as the provider.
We are finished: just click on "Submit" to save the Job Template.
Running A Job Template On A Client Host
It has come the time to run the "Ansible Ping" job template we just created on a client host: within the Satellite  Web UI, switch to the "All Hosts" listing page as follows:
- "Hosts"
- "All Hosts"
This page lists every client host you have registered on the Satellite providing an overview of the installed operating system, the host group they belong to, the Puppet Environment and the last time the client host has submitted a report with its facts.
If you have many hosts, it is convenient to learn how to filter them so to get a shorter list: you can even select just one client host, as by shown in the following screenshot:

click on the host FQDN - in this example I click on "srv-ci-up3a002.mgmt.carcano.local": a page like the following thumbnails is shown:
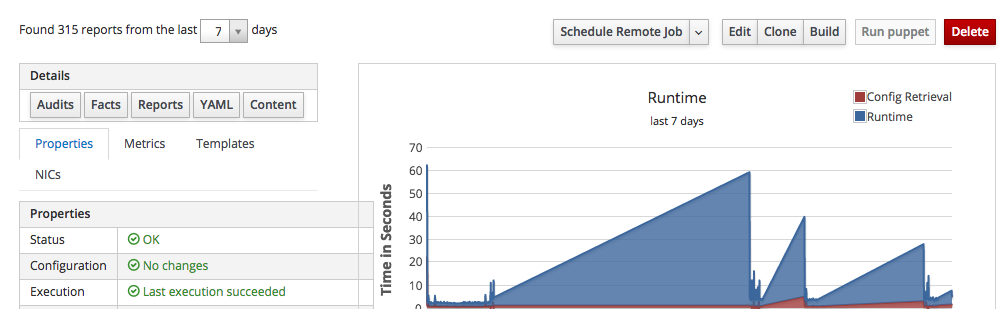
as you see it provides a summary of some of the most interesting collected metrics along with several buttons to perform actions on this client host.
Click on the "Schedule Remote Job" button:
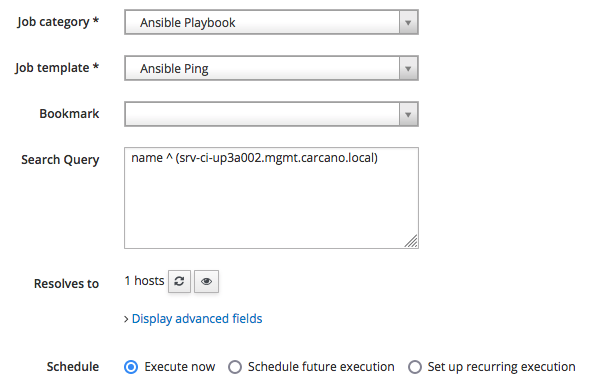
Select the category "Ansible Playbook" so to get listed only the Job Templates that belongs to it, then pick "Ansible Ping" and click on "Submit" to schedule the job for immediate execution.
The job is queued, started. The following screenshot show the outcome of a successfully terminated job:
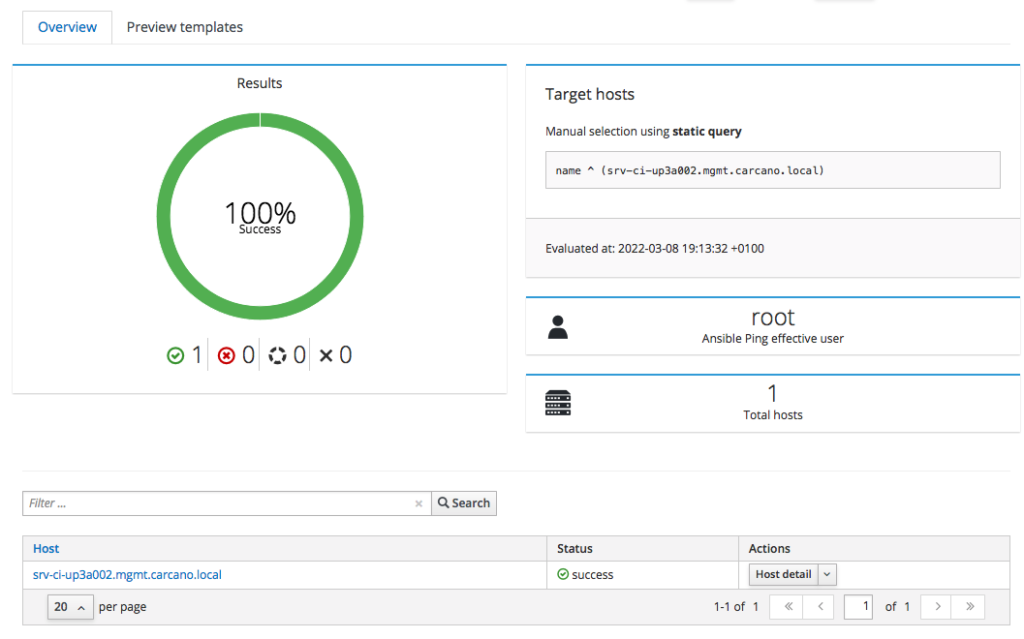
you may want to see the console output: you have just to click on the FQDN - in this case "srv-ci-up3a002.mgmt.carcano.local".
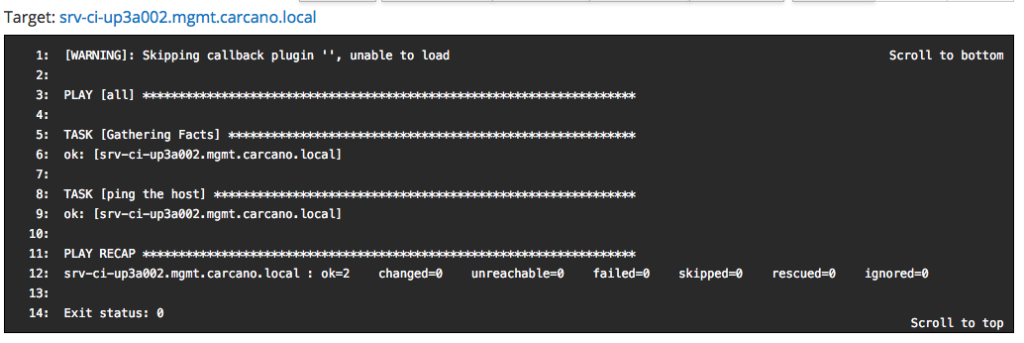
This is the output of a successful execution of the playbook generated by the "Ansible Ping" Job Template.
Is automation management just about enabling the Ansible plugin? Reconfiguring your Katello architecture with the Ansible plugin and testing your first ad-hoc module is a major operational milestone.
However, setting up the platform to support Ansible is only the technical entry point. A true enterprise automation framework requires you to know how to design the underlying code architecture, structure reusable task lists, and govern your project lifecycles.
If you want to check whether your engineering foundations are ready to produce the advanced Ansible content that will run through this newly enabled setup, jump directly to the Apress Blueprint Box below to discover how to boost and evolve your career using a self-paced learning path.
Import Ansible Roles On The Satellite
Playbooks alone are suitable for quite trivial needs: when you have to deal with complex scenarios, it is mandatory to use Ansible roles in your playbooks. The Satellite can handle roles too, provided that you import them first from the filesystem of the Satellite or of a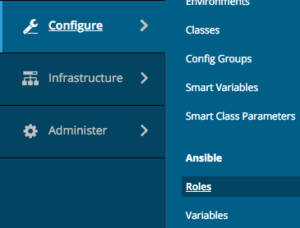 Capsule.
By using the Satellite Web UI as a user with administrative rights, we can easily list the Ansible roles that are available for the selected Organization - simply click onto:
- "Configure"
- "Roles"
If you prefer to use the hammer command line utility, you must perform a SSH login to the Satellite and switch to the user you specifically created to work with this tool so not to have to manually provide the mandatory settings that are specific to your environment. In this post the user is "katello", so let's switch to it:
su - katellothen type:
hammer ansible roles list --organization "Carcano CH" in both ways the outcome is the list of already imported roles.
If you are using the Web UI, and you have not imported any role yet, you get the following message:

Click on the "Import from ..." button with the name of the Satellite (or of the Capsule) you want to import the roles from. Clicking the button causes the Satellite to create a list with every Ansible role found beneath the "/usr/share/ansible/roles'' path of the Satellite (or of the Capsule).
The outcome is as follows:
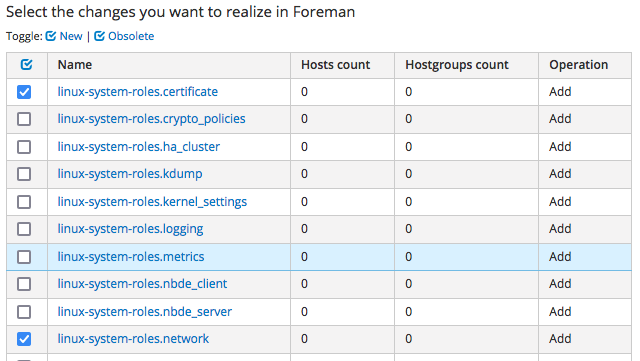
a list of the roles available on the proxy is shown: pick the ones you are interested into (of course you can select them all) and click on the "Update" button - in this example as you see we are importing only "linux-system-roles.certificate" and "linux-system-roles.network".
Once imported, the list looks like as follows:

Import Ansible Variables On The Satellite
Ansible Roles are configured using variables: this means that we still need to import the Ansible variables that are necessary to configure the role we imported.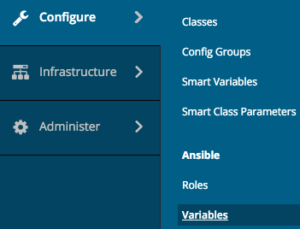 This can be easily accomplished using the Web UI:
click on
- "Configure"
- "Variables"
If you prefer to use the hammer command line utility, as the user you specifically created to work with this tool, simply type:
hammer ansible variables list --organization "Carcano CH" in both ways the outcome is the list of already imported variables.
If you are using the web UI, and you have not imported any variable yet, you get the following message:

click on the "Import from ..." button with the name of the Satellite or Capsule you want to import the variables from: they are guessed from the variables defined in the "defaults/main.yml" file of each of the already imported roles.
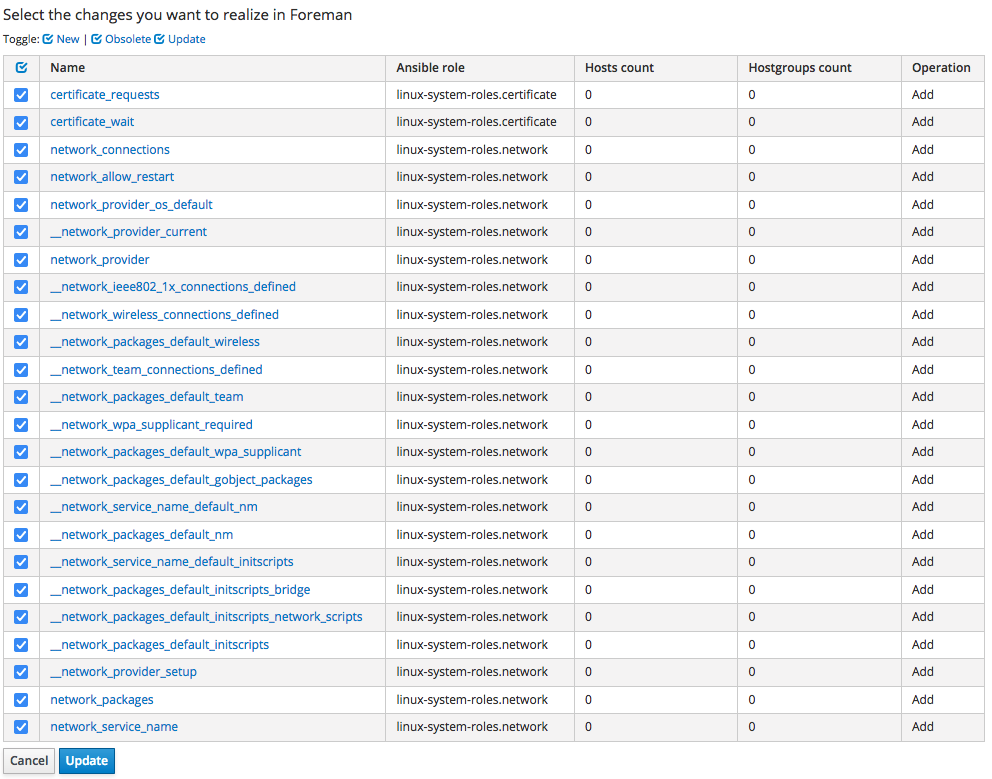
as you see I'm importing them all, but you can of course import only a subset of the list.
Just click on "Update" to complete the import.
Once imported, the variables are shown as by the following screenshot:
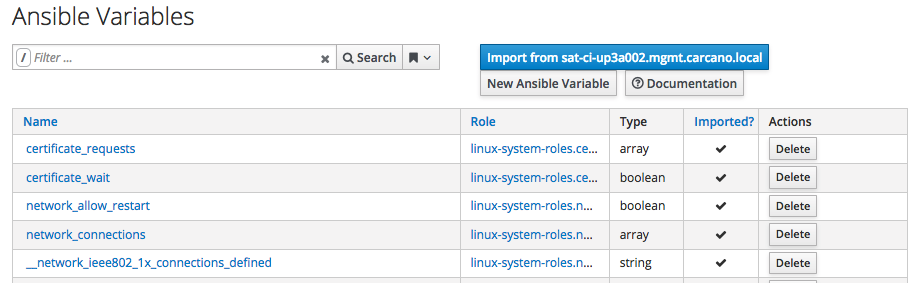
We are now ready to use Ansible to manage the client hosts of the Satellite: we can either directly assign Ansible roles to host groups or create Job Templates that exploit them.
Thoroughly explaining this topic certainly deserves a whole post, ... so, if you want to know more on this topic too, don't miss Managing Red Hat Network Satellie Clients With Ansible Roles And Playbooks.
Beyond Ansible Activation: Building the DevOps and DevSecOps Foundations
Successfully running the foreman-installer to bridge Katello with the Ansible automation proxy and verifying the setup via ad-hoc ping statements is an essential architectural milestone. Yet, activating the Ansible engine on your central infrastructure management hub represents just one single brick in the massive wall of modern DevOps and DevSecOps engineering on Linux. A professional cannot just manage the enablement layer of the platform: you must master the upstream methodology required to design, test, and package your custom Ansible automation frameworks before they are assigned to your corporate hostgroups.
When you evaluate your daily systems engineering tasks, are you completely confident you master the underlying host automation layers, advanced scripting architectures, and compliance gates running under the hood? Or are you simply enabling configuration plugins without mastering the core technical frameworks underneath?
My book, "DevSecOps and DevOps for Linux: The Foundations", published by Apress, was specifically designed to address this critical gap between automation platform tools and rigorous systems engineering. Through an intensive, lab-driven blueprint, the volume guides you step-by-step through the mechanics of robust shell automation, structured data parsing, and modern project design governed by strict automated pre-commit compliance linters and unit testing. Built entirely on cloud-agnostic, open-source principles, this practical learning path ensures you systematically identify and fill your knowledge gaps, allowing you to transform basic platform plugin integrations into a fully secure, scalable, and automated infrastructure framework.
Key insights covered in this volume:
- The Holistic Skills Set Brick: Bridge technical engineering with team management frameworks. Master
Scrum,Kanban, andLeanmethodologies to design system architectures aligned with real corporate workflows. - The Shell Scripting & Unix Tools Brick: Build rigorous operational foundations. Master advanced
Bashshell scripting architecture while learning how to combine core Unix tools into robust, repeatable, and enterprise-ready host automations. - The Version Control Engineering Brick: Move past basic commits. Dive deep into
Gitversion control, mastering feature-branch workflows, repository lifecycle management, and complex conflict resolution. - The Data & Core Automation Brick: Build bulletproof data processing setups. Learn advanced
RegEx, how to operate using evergreen tools such asGrep,Sed, andAWK, and how to master structured data parsing (XML,JSON,YAML) usingPythonand tools likexmlstarlet,jq, andyq. - The Modern Python & Automation Brick: Develop a modern Python project using
pyproject.tomlwithpytest-based unit tests, governing the project withGNU Makefor testing, building, and digitally signingRPMpackages. The project is presented in an evolving fashion, showing how features are added step by step, highlighting how a properly structured Python project can be improved and evolved with minimal or no rework at all. - The Linux OS Hardening & PKI Brick: Learn the real mechanics of security. Implement
X.509/PKIarchitectures,TLSconfigurations, andGPGencryption and signing, while mastering low-level kernel defenses likeSELinuxandLinux Capabilities. - The Compliance Check and Shift-Left Security Brick: Learn how to leverage the
pre-commitframework to automate compliance checks withPylintandFlake8, and perform security scans withBanditandSafety, extending the security audit to the full software supply chain. - The Application Integration Brick: Master the foundational protocols used to securely interconnect enterprise microservices, including
HTTP,REST,OpenAPI,SOAP, andLDAP/LDAPS. - The Infrastructure Delivery Brick: Put theory into practice with vertical, real-world labs. Move from basic scripts to engineering
Ansiblearchitectures, rootlessPodmansetups, image creation viaBuildah, and completePulp3deployments usingDocker Compose. - The Enterprise GitOps Pipeline Brick: Tie everything together by automating your software supply chain. Build complete continuous deployment workflows using
Gitea CIpipelines hosted natively onKubernetes(RKE2).
Footnotes
Here it ends this tutorial on enabling and configuring Ansible on Red Hat Network Satellite Server or Katello. We saw how to enable the necessary plugin and how to authorize the access to a client host, testing the setup with the Ansible ping module. I hope you enjoyed it.

4 thoughts on “Enable And Configure Ansible On Red Hat Network Satellite”