Red Hat Network Satellite Server 6, as well as its upstream project Katello, has been developed to provide software to client hosts, as well as manage their configuration sending SSH remote commands or leveraging on Puppet or Ansible.
The published packages are provided by the means of content views with frozen packages versions.
The obvious requirement to benefit from the provided services is registering client hosts. This post shows how to register clients on Red Hat Network Satellite Server 6 or Katello, providing all the necessary information to be skilled enough on subscription-manager to be able not only to operate it, but to successfully troubleshoot when it is not working as expected.
In addition to that, we also see how to enable and configure SSH based remote actions and how to run an existing Job Template..
Overview Of Registering The Client
Registering the client host means basically two things:
- securely identify it
- grant it the right to download the software it needs
since the adoption of subscription-manager, all of the above is performed in a secure and easy way leveraging three kind of X.509 certificates
it is a certificate that clearly identifies an installed product, its version, the family architecture it can run on and a few tags that can be exploited to group products by affinity.
it is a TLS client certificate, signed by the Satellite 6, that is used by the client as the credential token to securely communicate with the Satellite.
it is a certificate that leverages on the same key of the consumer certificate and is used to provide information about the available software repositories along with their URL
the consumer certificate is generated at registration time: registering the client host means providing a security token (can either be a username/password pair or an activation key) that creates a Content Host object related to the client into the Satellite.

Key Topics
My goal in this post is much more ambitious than simply providing the commands to blindly register the client host: I want to give you a quick overview of the key topics with the minimum notions about their internals that are necessary to know how to survive when things go wrong.
Consumer
The consumer is the one that consumes the software provided by the Satellite, ... so it is the client host. The Satellite validates its identity at each check-in, asking the client host to provide the consumer certificate.
Generating The Consumer Certificate
This certificate is generated at client host registration time: the client host generates a private key and sends a Certificate Signing Request to the Satellite that signs it, generating a client certificate with the client UUID listed into the Common Name. The UUID is also included in the Subject Alternative Names too, along with the FQDN of the client host.
The certificate is then sent back to the client host, which stores both certificate ("cert.pem") and the private key ("key.pem") files beneath the "/etc/pki/consumer" directory.
Displaying The Contents Of The Consumer Certificate
We can see the contents of a consumer certificate using the rct command line tool as follows:
rct cat-cert /etc/pki/consumer/cert.pemthe outcome is as follows:
+-------------------------------------------+
	Identity Certificate
+-------------------------------------------+

Certificate:
	Path: /etc/pki/consumer/cert.pem
	Version: 1.0
	Serial: 3915644524775027711
	Start Date: 2022-02-03 20:42:16+00:00
	End Date: 2038-02-03 21:42:16+00:00
	Alt Name: DirName:/CN=8cc00be6-7128-401b-968a-5564714ce53d, DirName:/CN=srv-ci-up3a002.prod.carcano.local

Subject:
	CN: 8cc00be6-7128-401b-968a-5564714ce53d

Issuer:
	C: US
	CN: sat-ci-up3a002.mgmt.carcano.local
	L: Raleigh
	O: Katello
	OU: SomeOrgUnit
	ST: North Carolina
Of course the necessary requisite to have these files on the host is having already registered it to the Satellite - we'll see how to do this shortly.
Subscription
A subscription is the agreement that grants the right to install a given number of instances of a product from the start date until the expiration date of the subscription: once expired, the subscription is no longer valid and you must obtain a new subscription.
When you are dealing with Red Hat products, the subscription also contains commercial metadata such as the Contract Number or the Account Number, or the Service Level Agreement (SLA) with Red Hat. At the time of writing this post, the available SLA are "Premium", "Standard" and "Self Support".
You can entitle an host to use a given subscription, or have it automatically entitled to use the relevant subscriptions by specifying one or more activation keys at registration time.
Entitlement
An entitlement is the claim of the right of being attached to a subscription that grants to the client the right to download a certain product. If the subscription provides a limited number of product instances, attaching to a subscription decreases the number of available instances of that product and increases the number of assigned instances in that subscription.
The manifest of an entitlement is an X509 certificate: it contains several metadata: besides information such as the ID and name of the product, the entitlement certificate provides a lot of additional information, such as the list of repositories (that are called Contents URL) from where the various versions of the product can be downloaded.
Generating The Entitlement Certificate
This certificate is signed by the Satellite and is recreated each time something is modified in the subscription to which the entitlement relates: each time the client needs to download packages, it provides this certificate as an authentication token.
Displaying The Contents Of The Entitlement Certificate
Same way as with consumer certificates, we can use the rct command line tool to have a look to an entitlement certificate:
rct cat-cert /etc/pki/entitlement/6557567279976834240.pem Of course the necessary requisite to have this file on the host is having already registered it to the Satellite - we'll see how to do this shortly.
Product
As the name does suggest the product is just a product, such as "Red Hat Enterprise Linux", or "CentOS Linux", "PostgreSQL"; a product can even be anything developed by your Corporate.

Product Certificate
The manifest file that describes the product is the product certificate: it is a certificate with custom metadata that can be exploited by the auto-attach feature of subscription-manager to guess what products are compatible with the operating system version and so can be installed, or when providing a criteria to automatically attach the matching products.
The product certificate is provided by an RPM package that installs it beneath the "/etc/pki/product" directory, into a PEM file with the numeric ID of the product as name. For example "69.pem" is the name of the file with the product certificate of "Red Hat Enterprise Linux".
A product certificate contains metadata stored as children the "1.3.6.1.4.1.2312.9.1" OID namespace: the first children number of the namespace is the numeric ID of the product (that marks the beginning of the product namespace). For example, since "Red Hat Enterprise Linux" has been assigned the ID 69, its OID namespace is "1.3.6.1.4.1.2312.9.1.69".
Beneath the product namespace there are the following attributes:
- Name: the name of the product, for example "Red Hat Enterprise Linux"
- Version: the version of the product, for example "7.9"
- Arch: the architecture family of the product, for example "x86_64"
- Tags: a comma-separated list of tags assigned to the product. These are often used to express affinities. For example "rhel-7,rhel-7-server"
- Brand Type: an optional attribute with the brand type
- Brand Name: an optional attribute with the brand name
Creating A Product Certificate
Let's see now how to generate a product certificate for a product published on Satellite.
In our example, the Product ID of the CentOS Server product guessed from Satellite is "656104112056".
Since every custom attribute we are about to add has its own OID, it is straightforward that to generate such a kind of certificate we need a dedicated openssl config file that lists them all and instructs openssl on how to add them to the Certificate Signing Request (CSR), so that the signing Certification Authority can then copy them to the actual certificate.
As an example, let's create the "products.conf" file with the following contents:
id_section = contents_oid

[ contents_oid ]
Name=1.3.6.1.4.1.2312.9.1.656104112056.1
Version=1.3.6.1.4.1.2312.9.1.656104112056.2
Arch=1.3.6.1.4.1.2312.9.1.656104112056.3
Tags=1.3.6.1.4.1.2312.9.1.656104112056.4

[ req ]
distinguished_name  = req_distinguished_name
req_extensions      = centos85-x86_64

[ req_distinguished_name ]
commonName                      = Common Name

[ centos85-x86_64 ]
basicConstraints = CA:FALSE
1.3.6.1.4.1.2312.9.1.656104112056.1 = ASN1:UTF8String:CentOS Server
1.3.6.1.4.1.2312.9.1.656104112056.2 = ASN1:UTF8String:8.5
1.3.6.1.4.1.2312.9.1.656104112056.3 = ASN1:UTF8String:x86_64
1.3.6.1.4.1.2312.9.1.656104112056.4 = ASN1:UTF8String:centos-8,centos-8-server
Are you enjoying these high quality free contents on a blog without annoying banners? I like doing this for free, but I also have costs so, if you like these contents and you want to help keeping this website free as it is now, please put your tip in the cup below:
Even a small contribution is always welcome!
then we can work as we would do as usual: generate the RSA key we use for any product certificate:
openssl genrsa -aes256 -out corporate.key 4096then create the Certificate Signing Request (CSR) for the "CentOS Server" Product, version "8.5" for "x86_64" architecture:
openssl req -config products.conf -key corporate.key -new -sha256 -out centos85-x86_64.csrin this example, I specify "CN=Carcano SA [1dse-34221-frrg-1111]" as the Common Name.
We can now submit the CSR to the Corporate CA to get the certificate.
Just as an example, if the corporate CA would be made using openssl, the certificate generation command would be:
openssl ca -config openssl.conf -days 7000 -in centos85-x86_64.csr -out 656104112056.pemthe certificate must then be packaged within an RPM and installed on the client.
Installing The Product Certificate
Once you get the product certificate, install it beneath the "/etc/pki/product" directory manually, or have it done by the package management software.
Displaying The Contents Of A Product Certificate
Same way as with consumer and entitlement certificates, we can have a look to any product certificate using the rct command line tool as follows:
rct cat-cert 656104112056.pemthe output is as follows:
+-------------------------------------------+
	Product Certificate
+-------------------------------------------+

Certificate:
	Path: /etc/pki/product/656104112056.pem
	Version: 1.0
	Serial: 4096
	Start Date: 2022-02-07 20:34:12+00:00
	End Date: 2038-07-13 20:34:12+00:00

Subject:
	CN: CN=Carcano SA [1dse-34221-frrg-1111]

Issuer:
	C: CH
	CN: Intermediate CA
	O: Carcano SA
	ST: Tessin

Product:
	ID: 656104112056
	Name: CentOS Server
	Version: 8.5
	Arch: x86_64
	Tags: centos-8,centos-8-server
	Brand Type:
	Brand Name:
Listing Installed Products
Subscription-manager relates the product certificates to the entitlement of having them installed.
In this example we installed the product certificate "656104112056.pem" into the "/etc/pki/product" directory: this means that the subscription-manager can see it and relate it to the attached subscriptions.
To see the list of installed products, along with the status of their related subscriptions, type:
sudo subscription-manager list --installedthe outcome is as follows:
+-------------------------------------------+
Installed Product Status
+-------------------------------------------+
Product Name: CentOS Server
Product ID: 656104112056
Version: 8.5
Arch: x86_64
Status: Unknown
Status Details:
Starts:
Ends:
as you see the status of the attached subscription is Unknown: this is right - we have only created and installed the product certificate, but we have not attached the client host to a subscription that provides the product yet.
The Registration Process
Now that we have clarified enough all the concepts that are necessary to know, we can go on and see how to deal with the registration process itself.
Everything can be made using subscription-manager, after configuring it to connect to your Satellite.
The katello-ca-consumer RPM Package
Manually configuring subscription-manager and in general the system is a repetitive and time-consuming task - so it is the perfect candidate for an automated procedure.
Indeed the Satellite provides the katello-ca-consumer RPM package that automatically configures the consumer (the client host) and installs subscription-manager along with its dependencies if they are missing.
We can easily download the katello-ca-consumer RPM package right from the Satellite simply using curl as follows (in this post the Satellite FQDN is "sat-ci-up3a002.mgmt.carcano.local"):
curl -k -O https://sat-ci-up3a002.mgmt.carcano.local/pub/katello-ca-consumer-sat-ci-up3a002.mgmt.carcano.local-1.0-1.noarch.rpmthen we can install it as follows:
sudo dnf localinstall -y \
katello-ca-consumer-sat-ci-up3a002.mgmt.carcano.local-1.0-1.noarch.rpm
now the consumer has been properly set up with everything needed to register the client host on the Satellite.
We can have a look to the configuration settings with the following command:
sudo subscription-manager configthe outcome is as follows:
[server]
   hostname = sat-ci-up3a002.mgmt.carcano.local
   insecure = [0]
   no_proxy = []
   port = [443]
   prefix = /rhsm
   proxy_hostname = []
   proxy_password = []
   proxy_port = []
   proxy_scheme = [http]
   proxy_user = []
   server_timeout = [180]
   ssl_verify_depth = [3]

[rhsm]
   auto_enable_yum_plugins = [1]
   baseurl = https://sat-ci-up3a002.mgmt.carcano.local/pulp/repos
   ca_cert_dir = [/etc/rhsm/ca/]
   consumercertdir = [/etc/pki/consumer]
   entitlementcertdir = [/etc/pki/entitlement]
   full_refresh_on_yum = 1
   inotify = [1]
   manage_repos = [1]
   package_profile_on_trans = 1
   pluginconfdir = [/etc/rhsm/pluginconf.d]
   plugindir = [/usr/share/rhsm-plugins]
   productcertdir = [/etc/pki/product]
   repo_ca_cert = /etc/rhsm/ca/katello-server-ca.pem
   repomd_gpg_url = []
   report_package_profile = [1]

[rhsmcertd]
   auto_registration = [0]
   auto_registration_interval = [60]
   autoattachinterval = [1440]
   certcheckinterval = [240]
   disable = [0]
   splay = [1]

[logging]
   default_log_level = [INFO]

[] - Default value in use
you can alter this configuration using the relevant options of the subscription-manager config command: you can easily get the syntax by typing:
sudo subscription-manager config --helpRegistering The Client Host
We are finally ready to proceed registering the client host to the Satellite.
Besides authenticating to the Satellite, this operation requires at least to specify the Organization to whom the client host belongs to..
Listing the Organizations
It may happen not to exactly remember how it is written the name that have been assigned to the Organization: if this happens you can get the list with all the Organizations configured on the Satellite by typing:
sudo subscription-manager orgs --username mcarcanothe outcome is a list like the following one:
+-------------------------------------------+
          mcarcano Organizations
+-------------------------------------------+

Name: Carcano CH
Key:  Carcano_CH

Name: Default Organization
Key:  Default_Organization
Of course it displays only the Organization the username you supply has access to.
Listing the Environments
Since the Satellite provides the software by publishing the repositories into distinguished environments, we may need to get the list of the environments configured for the Organization we want to assign the host to. This can be easily accomplished using subscription-manager as follows:
sudo subscription-manager environments --org="Carcano CH" \
--username mcarcano
the outcome is a list like the following one:
+-------------------------------------------+
          Environments
+-------------------------------------------+
Name:        Lab/CentOS_8
Description:

Name:        Library/CentOS_8
Description:

Name:        Lab/CentOS_7
Description:

Name:        Library/CentOS_7
Description:

Name:        Library
Description:
Mine is short, since this is only a Lab, but in the real world the list is usually much more long.
Registering With Username And Password
This is the most intuitive (but also the most cumbersome) method for registering the client host: Satellite authenticates the user by checking the supplied username and password. The user must of course have at least the rights to register a client host to the Satellite.
Once registered the client host can attach to any of the available subscriptions and enable any of the repositories that are available in the environment it has been assigned to.
This means that when registering the client host, besides the Organization it is also necessary to specify the environment you want to put it into.
For example, to register the client host using username and password:
sudo subscription-manager register --org="Carcano CH" --environment=Lab/CentOS_8 \
--username mcarcano
the password is interactively asked (but you can also provide it on the command line using the --password parameter). If you omit the --environment parameter, also the environment is interactively asked.
Once the command returns successfully, the consumer certificate has just been created and stored into the "/etc/pki/consumer" directory.
In addition to that, the client host pushes to the Satellite a set of facts that describes it, such as the number of CPUs, the amount of RAM, the networking configuration and so on.
You can see these facts guessed by subscription-manager by typing:
sudo subscription-manager factsthis is a snippet of the output on my system:
cpu.core(s)_per_socket: 2
cpu.cpu(s): 2
...
distribution.id: 8
distribution.name: CentOS Linux
distribution.version: 8
distribution.version.modifier: Unknown
dmi.baseboard.manufacturer: Oracle Corporation
dmi.baseboard.product_name: VirtualBox
...
last_boot: 2022-02-10 07:02:13
lscpu.architecture: x86_64
lscpu.bogomips: 7199.99
...
lscpu.vendor_id: GenuineIntel
lscpu.virtualization_type: full
memory.memtotal: 992252
memory.swaptotal: 2097148
net.interface.eth0.ipv4_address: 10.1.0.4
...
network.fqdn: srv-ci-up3a002.prod.carcano.local
network.hostname: srv-ci-up3a002.prod.carcano.local
network.ipv4_address: 10.1.0.4
network.ipv6_address: fe80::20b6:8b15:326e:fb8, fe80::bd6a:47db:6368:75d6
...
proc_cpuinfo.common.cpu_family: 6
...
proc_cpuinfo.common.vendor_id: GenuineIntel
...
system.certificate_version: 3.2
system.default_locale: en_US.UTF-8
uname.machine: x86_64
uname.nodename: srv-ci-up3a002.prod.carcano.local
uname.release: 4.18.0-240.1.1.el8_3.x86_64
uname.sysname: Linux
uname.version: #1 SMP Thu Nov 19 17:20:08 UTC 2020
virt.host_type: virtualbox, kvm
virt.is_guest: True
virt.uuid: 96e15246-3da1-ca4d-ba6f-e290052b35cc
This set of facts is periodically pushed to the satellite each time the rhsmcertd daemon checks-in.
Be wary that the registration command registers the client, but unless you provide the --auto parameter it does not attached it to any available subscription - try typing:
sudo subscription-manager list --consumedthe outcome is:
No consumed subscription pools were found.If you want to have your own products recognized by subscription-manager so that the auto attach feature works with them, you must generate a product certificate for each of them as described before and install them into the "/etc/pki/product" directory.
We'll see an example of this shortly, for the "CentOS Server" product we created the certificate before, when demonstrating how to register using an activation key.
At the moment I'm writing this post, the signature of the product certificate is not checked, so you can generate it with whatever certificate authority you wish.
Registering Using An Activation Key
This is certainly the most popular method for registering client hosts: Satellite verifies the right of adding a client host by checking the supplied activation key.
The activation key is a multi-purpose authentication token that:
- lets Satellite check that the user issuing the registration command actually have right to register a client host
- relates the host to the desired Content View of a given environment
- only when dealing with Red Hat products, binds the host to the proper Service Level Agreement (SLA) and Release Version
- attaches the host to one or more subscriptions, and enable or disable some or all the repositories the attached subscriptions grants access to
- assign the host to the desired host collection. An host collection is a named group of hosts you can use as a target to perform actions as a whole.
Be wary that when registering the client, it is possible to specify more than one activation key by separating them using commas.
A broadly used strategy is to have:
- an activation key that registers the client host and connects it to the right Content View of the desired environment, assigns it to the right host collection and attach the subscription of the version of the Linux distribution in use, enabling only the desired repositories
- additional activation keys dedicated to subscriptions of specific products that enabled only desired repositories
Just to show you an example, let's unregister the client host we just registered:
sudo subscription-manager unregisterthis causes the removal of the consumer certificate from the "/etc/pki/consumer" directory.
Now register it again, this time using the activation keys "CentOS8-Lab" and "PostgreSQL10-for-CentOS8" as member of the "Carcano CH" organization.
sudo subscription-manager register --org="Carcano CH" \
--activationkey="CentOS8-Lab,PostgreSQL10-for-CentOS8"Again, once the command returns successfully, the consumer certificate has just been created and stored into the "/etc/pki/consumer" directory.
Let's verify the entitlements:
sudo subscription-manager list --consumedthe outcome is:
+-------------------------------------------+
Consumed Subscriptions
+-------------------------------------------+
Subscription Name: CentOS Server
Provides: CentOS Server
SKU: 656104112056
Contract:
Account:
Serial: 8897560660188851257
Pool ID: 8a8180827e777cec017e7787dfaf0012
Provides Management: No
Active: True
Quantity Used: 1
Service Type:
Service Level:
Status Details: Subscription is current
Subscription Type: Standard
Starts: 01/20/22
Ends: 01/18/32
System Type: Physical
This means that as expected, we can install and update both CentOS and PostgreSQL Server at wish.
Now that we have the entitlement to install the "CentOS Server" product , let's see if anything changed about how subscription-manager relates the status of the attached subscription with the product certificate of the "CentOS Server" product we created and installed before:
sudo subscription-manager list --installedthis time the outcome is:
+-------------------------------------------+
Installed Product Status
+-------------------------------------------+
Product Name: CentOS Server
Product ID: 656104112056
Version: 7.9
Arch: x86_64
Status: Subscribed
Status Details:
Starts: 01/20/2022
Ends: 01/18/2032
it seems that our trick to create a product certificate does work: we have the right to install the product that is marked as subscribed and the attached subscription is valid until 01/18/2032.
Is infrastructure registration just about binding activation keys? Successfully installing the katello-ca-consumer profile, automating client registrations, and matching subscription statuses is an essential operational milestone.
However, a central distribution environment is only as effective as the payloads passing through its channels. Enterprise DevSecOps frameworks require you to look past raw server connections: you must know how to design secure custom code, enforce strict pre-commit linters, and natively engineer your own system units.
If you want to check whether your development foundations are ready to build the secure enterprise-grade software that will travel through these channels, jump directly to the Apress Blueprint Box below to discover how to boost and evolve your career using a self-paced learning path.
Ensure Rhsmcertd Service Is Running
Entitlements (the subscriptions a client host is attached to) can either be managed issuing attach commands on the client host, or operating on the Satellite server: if the attached subscriptions are changed on the Satellite, the client host must be notified, so that it downloads the new entitlement certificates.
This synchronization is made by the rhsmcertd service, that periodically checks-in to the Satellite. We must start it if it is not already started.
sudo systemctl start rhsmcertdWorking With Subscriptions
Registering the client host is only the prerequisite to access the software repositories: as we saw it is necessary that the client host also is attached to the subscriptions that provide access to the desired software repositories.
List Attached Subscriptions (The Entitlements)
Of course the very first thing to know is how to list the subscriptions the client has been already attached - the so called entitlements:
sudo subscription-manager list --consumedfor example, if the output is like the following:
+-------------------------------------------+
Consumed Subscriptions
+-------------------------------------------+
Subscription Name: CentOS Server
Provides: CentOS Server
SKU: 656104112056
Contract:
Account:
Serial: 8897560660188851257
Pool ID: 8a8180827e777cec017e7787dfaf0012
Provides Management: No
Active: True
Quantity Used: 1
Service Type:
Service Level:
Status Details: Subscription is current
Subscription Type: Standard
Starts: 01/20/22
Ends: 01/18/32
System Type: Physical
it means that the client is currently attached to the "CentOS Server" subscription that provides the "CentOS Server" product, and so the client host has the entitlement to install and update the product.
This means also that there is the related entitlement certificate into the "/etc/pki/entitlements" directory.
List Available Subscriptions
We can have a look to the available subscriptions: since these are bound to products, we can know the products we can install by attaching to them:
sudo subscription-manager list --availablethe output looks like as follows:
+-------------------------------------------+
Available Subscriptions
+-------------------------------------------+
Subscription Name: PostgreSQL
Provides:
SKU: 369190582741
Contract:
Pool ID: 8a8180827e828d29017e829ba4070027
Provides Management: No
Available: Unlimited
Suggested: 1
Service Type:
Roles:
Service Level:
Usage:
Add-ons:
Subscription Type: Standard
Starts: 01/22/22
Ends: 12/01/49
Entitlement Type: Physical
as you see, if we need to install the "PostgreSQL" product we just have to attach to the "PostgreSQL" subscription so to get the entitlement to install and update it.
Attaching To A Subscription
Attaching the client host to a subscription requires just to provide its "Pool ID".
For example, to attach the client host to the "PostgreSQL" subscription of the previous example:
sudo subscription-manager attach --pool=8a8180827e828d29017e829ba4070027the output must be as follows:
Successfully attached a subscription for: PostgreSQLthis means that as by now the client host has an entitlement certificate for the attached subscription stored into the "/etc/pki/entitlement" directory.
Detaching From A Subscription
Same way as we can attach the client host to a subscription, we can remove it right after uninstalling a product or even simply if for any reason we need to attach the client host to another subscription that provides the same product. We can simply do this providing its "Pool ID" as follows:
sudo subscription-manager remove --pool=8a8180827e828d29017e829ba4070027the output must be as follows:
The entitlement server successfully removed these pools:
8a8180827e828d29017e829ba4070027
The entitlement server successfully removed these serial numbers:
2298128950294303483
This obviously causes the removal of the related entitlement certificate from the "/etc/pki/entitlement" directory.
Working With Repositories
Once attached to a subscription, the client host gets access to every repository of the subscription that have been published to the Content View of the environment the client host belongs to.
List Enabled Repositories
You can list the repositories that are already enabled as follows:
sudo subscription-manager repos --list-enabledyou can install or update the software provided by the enabled repositories using yum or dnf.
List Disabled Repositories
The software you need sometimes is provided by disabled repositories: this means that unless you enable them you cannot install it using yum or dnf.
As an example, let's pretend that we need to install the "katello-agent" RPM package but yum or dnf complains that the package does not exists: let's get the list of the disabled repositories:
sudo subscription-manager repos --list-disabledthe output is as follows:
+----------------------------------------------------------+
Available Repositories in /etc/yum.repos.d/redhat.repo
+----------------------------------------------------------+
Repo ID: Carcano_CH_CentOS_Server_Katello_Tools_6_6_for_CentOS8_Server_RPMs_x86_64
Repo Name: Katello Tools 6.6 for CentOS8 Server RPMs x86_64
Repo URL: https://sat-ci-up3a002.mgmt.carcano.local/pulp/repos/Carcano_CH/Lab/CentOS_8/custom/CentOS_Server/Katello_Tools_6_6_for_CentOS8_Server_RPMs_x86_64
Enabled: 0
From the name of the repository we can guess that it is very likely that it is the one that provides the "katello-agent" RPM package. We just need to enable it.
Enable A Repository
Let's enable the repository as follows:
sudo subscription-manager repos \
--enable Carcano_CH_CentOS_Server_Katello_Tools_6_6_for_CentOS8_Server_RPMs_x86_64
we can now install the "katello-agent" RPM package using yum or dnf.
Disable A Repository
Same way, we can easily disable a repository:
sudo subscription-manager repos \
--disable Carcano_CH_CentOS_Server_Katello_Tools_6_6_for_CentOS8_Server_RPMs_x86_64
this causes the software provided by that repository not to be installable either updatable using yum or dnf until we enable the repository again.
Disable The Old Online YUM Repositories
Once attached to subscriptions provided by the Satellite, when dealing with non Red-Hat distributions, such as CentOS, you wind up with duplicated repositories: the online ones and the ones from the Satellite.
Since the online ones are not needed anymore, you can easily disable them using yum-config-manager.
if you are using CentOS7 or older, type the following command::
sudo yum-config-manager --disable base updates extrasotherwise, type this command:
sudo yum-config-manager --disable appstream baseos extrasRemote Execution
As we have already seen, subscription-manager can only send information about installed packages to the Satellite or pull the client profile to see if there are any modification to the subscriptions, but besides this it cannot do anything else: subscription-manager cannot execute even simple commands such as the ones necessary to install, update or remove packages.
Executing commands can be done basically on two different models:
- push-based: the Satellite connects to the client host and executes commands
- pull-based: the client host connects to the Satellite looking for pending commands to execute
On Foreman, remote execution is provided by the remote execution plugin that is generally enabled by default, so usually it is necessary to enable it only on capsule servers.
If you want to enable it, either on a capsule server or on the Satellite itself if for any reason it is still disabled, simply login to the capsule or to the Satellite server that needs to be reconfigured and reconfigure foreman with the following command:
sudo foreman-installer --enable-foreman-plugin-remote-executionthe Satellite or capsule configuration (or reconfiguration) starts as follows:
Installing Package[ca-certificates] [13%] [......... ]in the end you should get something as in the following snippet:
Installing             Done                                               [100%] [...........................................................................]
  Success!
  * Katello is running at https://sat-ci-up3a002.mgmt.carcano.local
  * To install an additional Foreman proxy on separate machine continue by running:

      foreman-proxy-certs-generate --foreman-proxy-fqdn "$FOREMAN_PROXY" --certs-tar "/root/$FOREMAN_PROXY-certs.tar"
  The full log is at /var/log/foreman-installer/katello.log
Katello Agent (Deprecated)
Katello initially (a euphemism - it has been like this for many years) provided only the pull-based model through the katello-agent RPM package: this package installs and sets-up goferd (the pulp2 agent) on the client host.
The agent is then exploited to enable package actions such as install, update or remove in a pull-based model.
Although this is not necessary neither fostered, for the sake of completeness this is the command to use if you want to install it:
sudo yum install -y katello-agentRemote Execution With SSH
As you can easily infer, conversely from katello-agent, remote execution using SSH does not require having any agent installed on the client host, since the Satellite simply connects via SSH and executes the remote commands.
Remote execution with SSH provided by the remote execution ssh plugin.
Installing the plugin
The foreman-installer options necessary to enable it are:
- --enable-foreman-proxy-plugin-remote-execution-ssh
- --foreman-proxy-plugin-remote-execution-ssh-install-key=true
If the remote execution plugin have already been configured, the command to enable the remote execution ssh plugin too is as follows:
sudo foreman-installer --enable-foreman-proxy-plugin-remote-execution-ssh \
--foreman-proxy-plugin-remote-execution-ssh-install-key=true
the Satellite or capsule configuration (or reconfiguration) starts as follows:
Installing Package[ca-certificates] [13%] [......... ]in the end you should get something as in the following snippet:
Installing             Done                                               [100%] [...........................................................................]
  Success!
  * Katello is running at https://sat-ci-up3a002.mgmt.carcano.local
  * To install an additional Foreman proxy on separate machine continue by running:

      foreman-proxy-certs-generate --foreman-proxy-fqdn "$FOREMAN_PROXY" --certs-tar "/root/$FOREMAN_PROXY-certs.tar"
The full log is at /var/log/foreman-installer/katello.logGranting SSH Login To The Clients
By default Satellite executes remote commands connecting to the client hosts as the root user. This means that it is necessary to install the public key of the foreman-proxy user of the Satellite server among the authorized keys of the root user on the client host.
To do so, login to the client and switch to the root user:
sudo su -create the ".ssh" directory (if it does not already exist):
[ -d .ssh ] || mkdir -m 700 .sshadd the public key to the list of the authorized keys - we can directly fetch it from the Satellite using curl as follows:
curl https://sat-ci-up3a002.mgmt.carcano.local:9090/ssh/pubkey >> ~/.ssh/authorized_keysif the authorized_key file has just been created, fix its permissions as follows:
chmod 0600 ~/.ssh/authorized_keysTesting the Remote SSH Execution
We should of course test that everything is properly set up as follows.
Login to the Satellite server and open a shell as foreman-proxy user:
sudo -u foreman-proxy -s /bin/bashtry to SSH connect to the client host:
ssh -i ~/.ssh/id_rsa_foreman_proxy -o StrictHostKeyChecking=no root@srv-ci-up3a002.prod.carcano.localif everything is properly working, we must be able to connect.
Job Templates
Satellite lets define Job Templates: these are Embedded Ruby (ERB) template files that are processed to generate a "Job" containing the actual logic to run. This enables you to derive from a Job Template almost any kind of statement files, such as shell scripts or even Ansible playbooks indeed: it is the Satellite that takes care of generating and running the resulting statement file on the client hosts.
They are a very handy and powerful tool, since we can even define input parameters such as textboxes, drop-downs, checkboxes and such: they are rendered by the Satellite Web UI while their values are stored within ERB variables.
When connected to the Satellite Web UI as a user with administrative rights, we can can easily list the existing Job Templates of the currently selected Organization by clicking onto:
- "Hosts"
- "Job Templates"
A table with the list of the available Job Templates is shown:
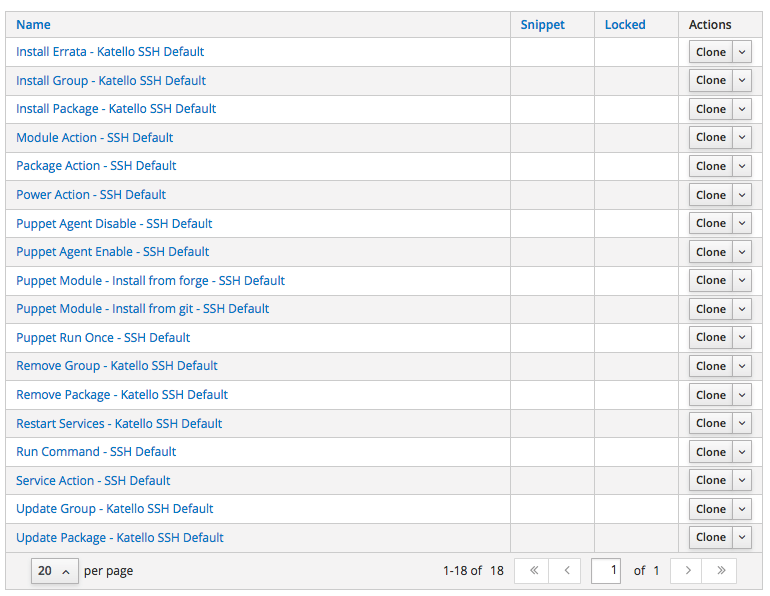
As you can see from the above list, the Satellite provides a small set of pre-configured Job Templates for common tasks such as installing RPM packages or errata, puppet modules, enabling or disabling services and so on.
Running A Job Template On A Client Host
Let's see how easy is running Job Templates on client hosts using the Satellite Web UI: in this example we run the "Package Action - SSH Default" Job template to install the "rng-tools" RPM package:  just switch to the "All Hosts" listing page as follows:
- "Hosts"
- "All Hosts"
This page lists every client host you have registered on the Satellite providing an overview of the installed operating system, the host group they belong to, the Puppet Environment and the last time the client host has submitted a report with its facts.
If you have many hosts, it is useful to learn how to filter them so to get a shorter list: you can even select just one client host, as by shown in the following screenshot:

click on the FQDN of the host - in this example I click on "srv-ci-up3a002.mgmt.carcano.local": a page like the following thumbnails is shown:

as you see it provides a summary of some of the most interesting collected metrics along with several buttons to perform actions on this client host.
Note how the Status is "Warning" because of "Non-security errata applicable".
Click on the "Schedule Remote Job" button and fill-in the form as follows:
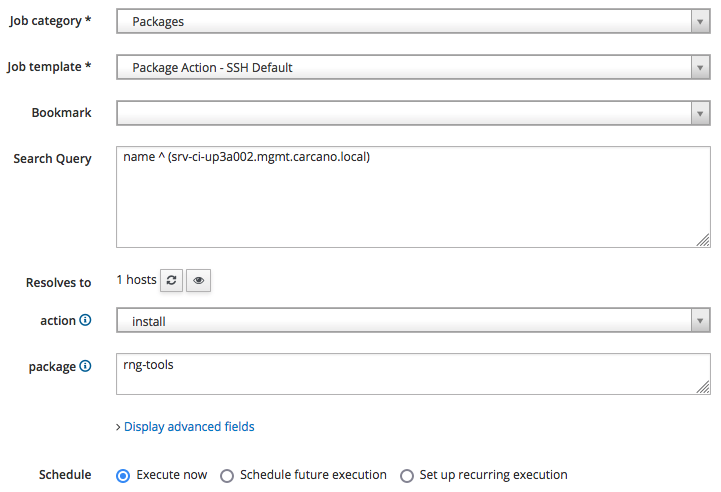
select "Packages" as the Job category and the "Package Action - SSH Default" Job Template". Type "rng-tools" in the package, and choose "install" as action, then click on "Submit" to schedule the job for immediate execution.
The job is queued, started and the execution summary is shown: the following screenshot show the outcome of the successfully terminated job:
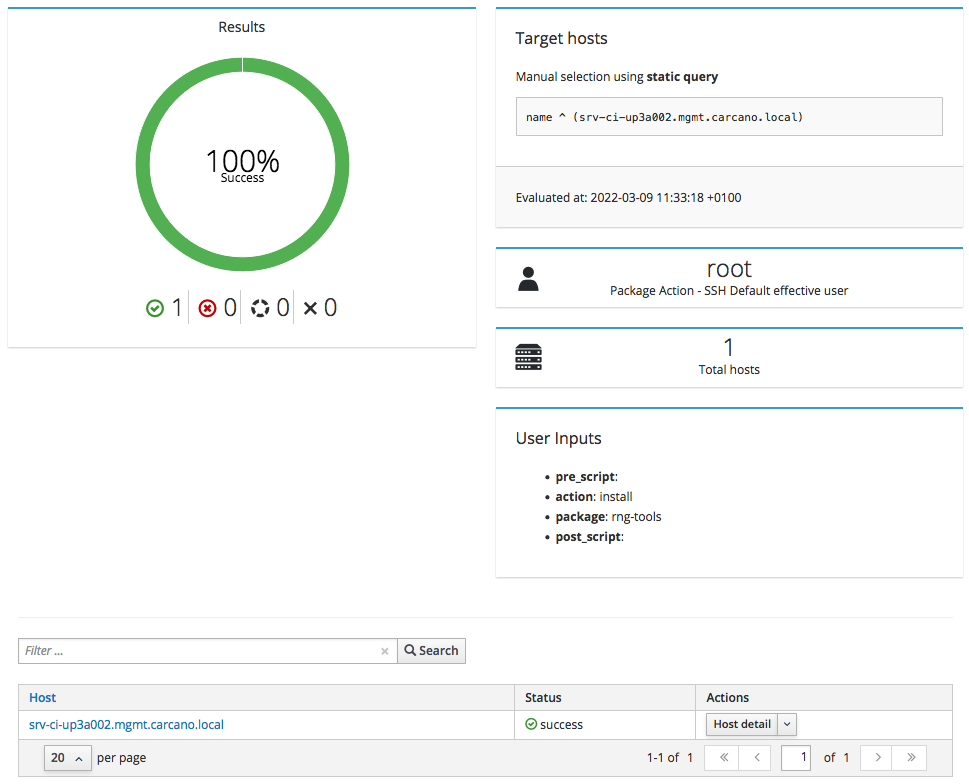
you may want to see the console output: just click on the FQDN - in this case "srv-ci-up3a002.mgmt.carcano.local".
This is the output of a successful execution of the yum install command triggered by the "Package Action - SSH Default" Job Template on the client host.

Beyond Client Registrations: Building the DevOps and DevSecOps Foundations
Successfully tracking entitlement certificate boundaries, extracting local consumer tokens, and forcing server-side package actions via synchronized repositories are vital platform management activities. Yet, registering a standalone host to a central lifecyle hub represents just one single technical brick in the massive wall of modern DevOps and DevSecOps engineering on Linux. In complex corporate networks, you cannot operate within fragmented tool boxes: you must master the upstream methodology required to develop, validate, and wrap your custom software applications into robust, digitally signed deployment packages without vendor lock-in.
When you evaluate your daily deployment tasks, are you completely confident in your ability to build rock-solid software supply chains from the first line of code? Or are you simply configuring communication plugins and activation keys without mastering the core host automation frameworks underneath?
My book, "DevSecOps and DevOps for Linux: The Foundations", published by Apress, was specifically designed to address this critical boundary. Through a comprehensive, lab-driven blueprint, the volume guides you step-by-step through the mechanics of advanced shell scripting architectures, structured data parsing, and modern project design governed by strict automated pre-commit compliance linters and unit testing. Built entirely on cloud-agnostic, open-source principles, this practical learning path ensures you systematically identify and fill your knowledge gaps, allowing you to create your fully secure, scalable, and automated infrastructure framework.
Key insights covered in this volume:
- The Holistic Skills Set Brick: Bridge technical engineering with team management frameworks. Master
Scrum,Kanban, andLeanmethodologies to design system architectures aligned with real corporate workflows. - The Shell Scripting & Unix Tools Brick: Build rigorous operational foundations. Master advanced
Bashshell scripting architecture while learning how to combine core Unix tools into robust, repeatable, and enterprise-ready host automations. - The Version Control Engineering Brick: Move past basic commits. Dive deep into
Gitversion control, mastering feature-branch workflows, repository lifecycle management, and complex conflict resolution. - The Data & Core Automation Brick: Build bulletproof data processing setups. Learn advanced
RegEx, how to operate using evergreen tools such asGrep,Sed, andAWK, and how to master structured data parsing (XML,JSON,YAML) usingPythonand tools likexmlstarlet,jq, andyq. - The Modern Python & Automation Brick: Develop a modern Python project using
pyproject.tomlwithpytest-based unit tests, governing the project withGNU Makefor testing, building, and digitally signingRPMpackages. The project is presented in an evolving fashion, showing how features are added step by step, highlighting how a properly structured Python project can be improved and evolved with minimal or no rework at all. - The Linux OS Hardening & PKI Brick: Learn the real mechanics of security. Implement
X.509/PKIarchitectures,TLSconfigurations, andGPGencryption and signing, while mastering low-level kernel defenses likeSELinuxandLinux Capabilities. - The Compliance Check and Shift-Left Security Brick: Learn how to leverage the
pre-commitframework to automate compliance checks withPylintandFlake8, and perform security scans withBanditandSafety, extending the security audit to the full software supply chain. - The Application Integration Brick: Master the foundational protocols used to securely interconnect enterprise microservices, including
HTTP,REST,OpenAPI,SOAP, andLDAP/LDAPS. - The Infrastructure Delivery Brick: Put theory into practice with vertical, real-world labs. Move from basic scripts to engineering
Ansiblearchitectures, rootlessPodmansetups, image creation viaBuildah, and completePulp3deployments usingDocker Compose. - The Enterprise GitOps Pipeline Brick: Tie everything together by automating your software supply chain. Build complete continuous deployment workflows using
Gitea CIpipelines hosted natively onKubernetes(RKE2).
Footnotes
Here it ends this tutorial on registering a client host to Red Hat Network Satellite Server 6 or Katello. We learned together how to operate a subscription-manager and all the things that are necessary to know to troubleshoot if anything would go wrong. We also learned how to create product certificates for our own products and how the Satellite implements remote execution on the client hosts. In addition to that, we learned how to enable and configure SSH remote actions that can be exploited to manage the client hosts.
Satellite Server 6 and Katello are a huge step onward from Satellite Server 5 and Spacewalk, ... I think that using them is really worth the effort.

Scott Packard says:
A rather beautiful writeup of Satellite!
I’m working with Simple Content Access now, so once registered a client can access all repos.
I have a guy asking about the katello-ca-consumer .rpm. RedHat KB isn’t helpful.
Your blog is.
Marco Antonio Carcano says:
Glad to know you find the post useful Scott. I really appreciate feedbacks since they let me know how useful a post is and help me into deciding the topics for the next posts.
lgrullon says:
Hi @Marco,
Please elaborate further on the following area: “CREATING A PRODUCT CERTIFICATE”
I got lost and unable to find my OIDs, I think that particular area needs a bit more clarification. I am using Foreman/Katello 3.7.
PS. Your write up is very good and detail to help understadn the workflow.
Marco Antonio Carcano says:
Hello Lisandro, glad to know you liked the post. As far as I know, products’ OIDs MUST be children of the 1.3.6.1.4.1.2312.9.1 OID: for example, the Product ID of Red Hat Enterprise Linux is 69, and so its OID is 1.3.6.1.4.1.2312.9.1.69 (mind that 1.3.6.1.4.1.2312 is the OID assigned to Red Hat). Katello automatically assigns the product number to the products you create on it: you can retrieve the Product ID by navigating the “Contents / Subscription”, then clicking on the product you created – in the post the name of the product is “CentOS Server”, but you can actually use the name you wish. Then look at the “Subscription Info” page and there you will find the “Product ID”: just append it to 1.3.6.1.4.1.2312.9.1 and you get the OID number of your product – yes, it looks like the product belongs to Red Hat, … as I said in the post, what is actually missing is a way to manually set the product OID in Katello, hopefully a child of your own corporate OID: that would be a great feature.
If you want more information on this topic, you may read also https://grimoire.carcano.ch/blog/full-featured-c-project-managed-by-make-and-packaged-as-rpm/ – here I provide a practical example on how to create a product certificate and add it to an RPM package.
Hope this can help to better understand the concept.
LGrullon says:
Hi @Marco,
Thank you for the input.
I was able to follow thru using that article “https://grimoire.carcano.ch/blog/full-featured-c-project-managed-by-make-and-packaged-as-rpm/” and thanks to your make file, the config and keys get generated. I validate the content on the generated files and it seems to match this article. Now I am stuck in the part wehre I need to create the crt using the CA.
Specifically I am stuck on this step:
Once generated, the Certificate Signing Request file must be sent to the Corporate’s Certification Authority to have then returned the signed X.509 certificate.
Just as an example, if the Corporate’s CA relies on openssl and the Product ID is “656104112056”, the certificate generation command is:
I though since Foreman/Katello is hosting the certs we can leverage its CA capability to generate the crt, any clues on how or what we need to do to get the cert leveraging Foreman/Katello or do I need to spin up another instance and configure as a dedicated CA for this purpose. Sorry I am a bit lost on the CA signing topic 🙂
Marco Antonio Carcano says:
Hello Lisandro, I don’t think you can use Katello as the CA. There are some open source CA out there you can use, such as OpenxPKI, Cloudflare PKI and TLS toolkit, or the old fashioned openssl. If you need some guidelines on using openssl, you can refer to this post: https://grimoire.carcano.ch/blog/openssl-ca-tutorial-a-full-featured-openssl-pki. If you are not familiar with certificates and PKI, the post provides links to other posts explaining the underlying theory.