Red Hat Network Satellite Server 6, as well as its upstream project Katello, enables you to easily manage the registered client hosts using Puppet: Managing Red Hat Network Satellite clients with puppet is certainly smarter, especially if compared to the way of doing configuration management of Satellite 5 (and so of Spacewalk).
The Satellite 6 is capable of handling multiple Puppet environments saving you from having to bother to manually configure and maintain them.
This post shows you how easy is creating a Puppet environment with Red Hat Network Satellite Server 6, and how to assign client hosts to it.
It shows:
- how to create a Puppet repository that mirrors the online Puppetforge repository
- how to publish some modules into a specific Environment of a selected Content View
- how to assign Puppet modules to an host group, so that every client host belonging to it inherit them
- how to customize the parameters of the modules assigning values only to client hosts that belongs to a host group that matches the assignment criteria.
The Linux distribution used in the examples is CentOS 7, but you can of course easily adapt it to any other Red Hat and derived Linux distribution.
Prerequisites
The straightforward requisite is having the client already registered on the Red Hat Network Satellite Server 6 or Katello. If you do not know how to do this, or simply want to learn more on this topic, please read Register Clients To Satellite Server 6 Or Katello before going on with this post.
Puppet Repositories
Puppet modules are stored in the Satellite within Puppet repositories bound to specific Products, so the very first thing to do is create at least a repository of Puppet modules and populate it with some Puppet modules.
In this post we are assuming that the "Puppet" product does already exist into the selected Organization on the Satellite, and that its RPM repositories providing the Puppet packages are already published into the environments of one or more Content Views.
In addition to that, besides assuming that our client hosts have already been registered to the Satellite, we also assume that the Puppet Agent has already been configured. If you need a guided walk-through on this topic too, please read Puppet agent on Red Hat Network Satellite Clients before going on with this post.
We begin by adding a Puppet repository with the Puppet modules to the Puppet product.
While connected to the Satellite Web UI as a user with administrative, click onto:
- "Content"
- "Products"
the list of the products available for the selected Organization is shown, as depicted by the following screenshot:

let's have a look to the repositories that are already defined for the "Puppet" product - click on the "Puppet" word:

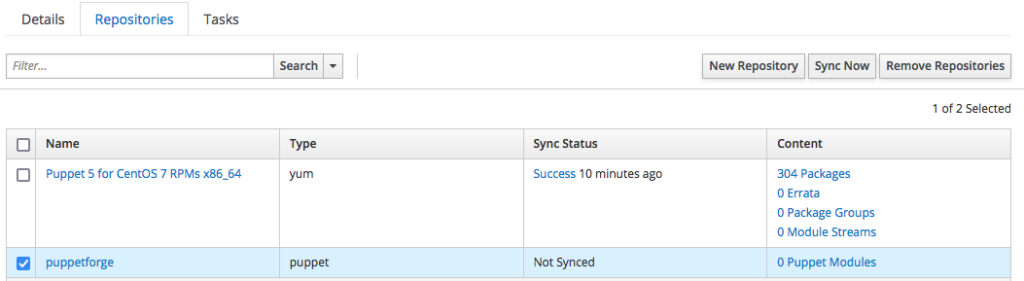
as you see from the above screenshot, the "Puppet" product does only have the repository that provides the RPM packages of the Puppet 5 for the CentOS 7 x86_64 family, but we do not have any repository that provides the Puppet modules yet.
Mirroring The Puppetforge Online Repository
We can create an on-premise repository that mirrors the whole online Puppetforge: be wary that this is a massive task that consumes almost 1.1GiB of disk space beneath "/var/lib/pulp" and that takes almost 10 hours of synchronization time.
Most of the time it is more convenient just to create an empty Puppet modules repository and then manually upload to it only the modules that we want it to provide.
Click on the "New Repository" button, and fill-in the module as shown in the following screenshot:
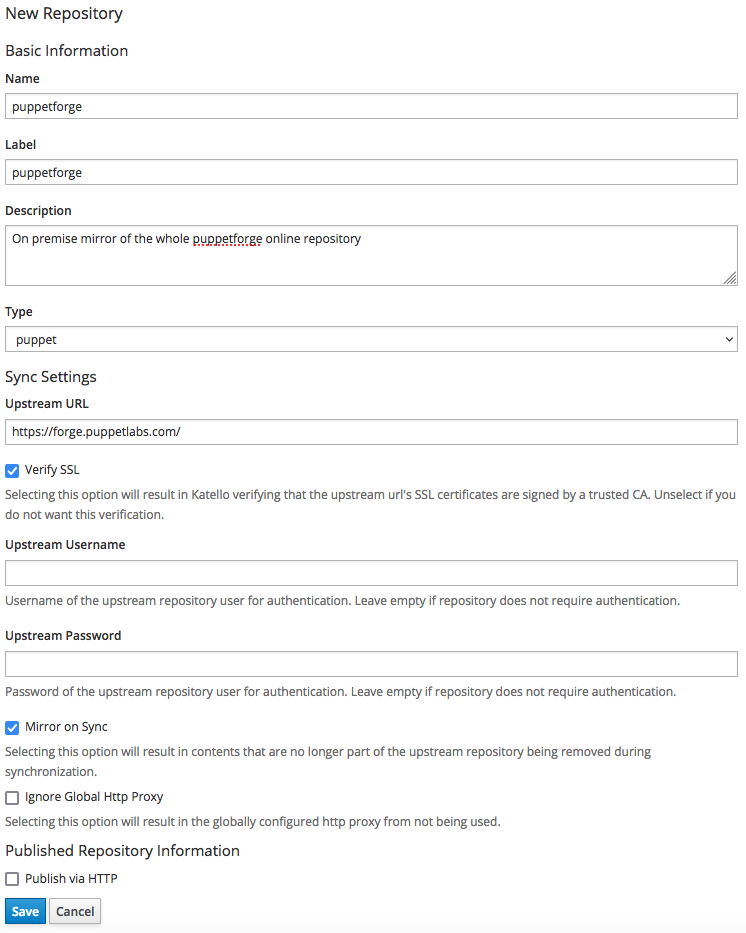
Once finished filling-in the above form, click on the "Save" button: the new repository is now listed among the repositories of the "Puppet" product.
We are now ready to synchronize it with its upstream online repository, downloading every available Puppet modules; just select the "puppetforge" repository and click on the "Sync Now" button to begin the synchronization process:
the outcome is as by the following screenshot:

don't be afraid that something got stuck: it may look like so, but as I told you this is a massive task that takes almost 10 hours to complete, and it may look like stuck for the first 10 minutes.
When the synchronization completes, you can have a look to the downloaded Puppet modules by clicking on the "puppetforge" repository: the list with all the available puppet modules is shown:

Create The Puppet Environment
As you probably already know, Puppet modules along with their parameters are published to client hosts by the means of Puppet environments: within a Puppet environment we list the Puppet modules the client hosts must run and their specific parameters.
The Satellite publishes Puppet environments within the life cycle environments of the Content Views: that means that besides software packages, the life cycle environments of the Content Views do also provide Puppet modules and settings specific to the particular Puppet environment.
Add Puppet Modules To A Content View
As you probably already know, the Satellite publishes its contents to the client hosts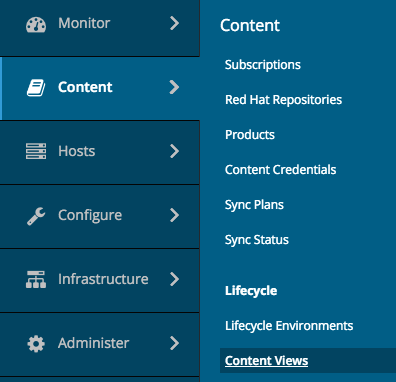 by the means of Content Views: these provide a convenient way to handle the software lifecycle publishing versioned contents into a "Library" and promoting these versioned views to the environments that are part of the life cycle.
The contents of the Content Views are repositories, either providing software packages or automation modules such as Puppet modules: software repositories must be consistent from the operating system family perspective.
In this example, we are going to modify the existing content view "CentOS 7" adding some Puppet modules from the "puppetforge" repository. It is not convenient to add every Puppet modules as a whole indeed: it is not necessary, and it would wind up into a mess - just select the modules you actually do need.
In this example, we only want to publish the puppetlabs motd Puppet module: after a quick look on the Puppetforge website, we see that this module has a dependency on the puppetlabs stdlib Puppet module: this means that we must add both.
While connected to the Satellite Web UI as a user with administrative, click onto:
- "Content"
- "Content Views"
to get a list of the existing content views of the currently selected Organization.
Click on the "CentOS 7" Content View and then select the "Puppet Modules" tab:
![]()
the list of modules is empty - this is expected, since we have not added any module yet to the Content View yet.
Click on the "Add New Module" button: the whole list of available modules is shown - since they are really a lot, we can take advantage of the filter textbox to get a list of the modules that are relevant to the "motd" search criteria:

click on the "Select a Version" button of the row of the "motd" puppet module; a list with all the "motd" Puppet modules available is shown.
Now filter the list so to get only modules of the author "puppetlabs" shown and click on the "Select Version" button of the row of the "puppetlabs" version "6.1.0" module:

the motd module gets added to the list we want to publish in the Content View.
Repeat the previous steps, but this time for the stdlib module.
When done, the outcome should be as follows:

Is infrastructure enforcement just about cataloging Puppet classes? Successfully mirroring upstream forge modules, nesting environmental lifecycle views, and mapping localized Smart Class parameters is an elite configuration milestone.
However, maintaining individual manifest trees and scaling agent dependencies server-by-server turns into an unsustainable architectural liability as infrastructure standards shift. Modern production environments demand a more cohesive strategy, abstracting your system environments through robust, cloud-agnostic Ansible blueprints and unified delivery models.
If you want to check whether your global DevOps and DevSecOps foundations are ready to migrate toward modern, agentless automation chains, jump directly to the Apress Blueprint Box below to discover how to boost and evolve your career using a self-paced learning path.
Publish A New Version Of The Content View
click on the "Publish New Version" button to type a description for the new version of the "CentOS 7" content view.
Fill-in the form as follows, and click on the "Save" button:
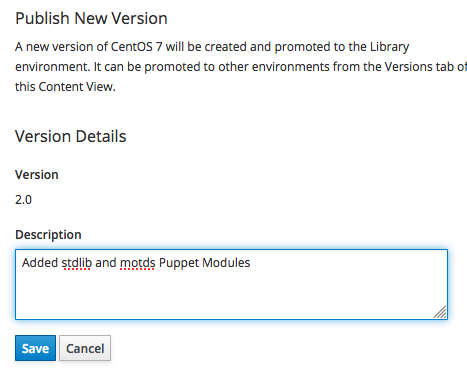
the publishing process of the "Version 2.0" of the Content View begins:

Promoting The Version Into An Environment
The versions of a Content View get always published to the "Library": since the client hosts are members of one of the life cycle environments of the Content View, we must promote the version to the life cycle environment the clients we want to use the modules do belong to.
In our example, the clients are in the "Lab" environment, so let's promote it to the "Lab": click on the "Promote" button and fill-in the form as follows:
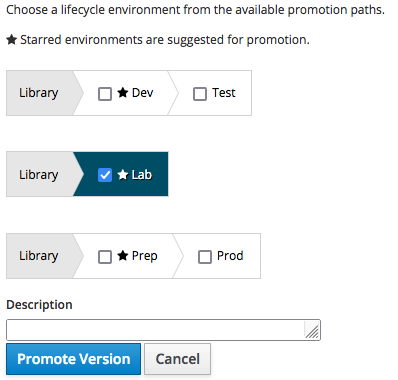
in real life you are of course encouraged to add a meaningful description before clicking on the "Promote Version" button to start the promotion process.
The outcome is as shown in the following screenshot:

Providing Configurations Using Host Groups
The most convenient way of assigning 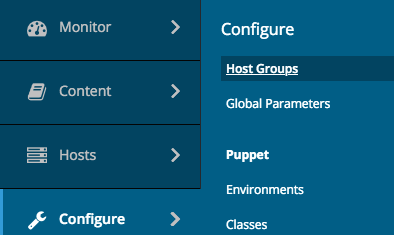 configurations on Satellite is by the means of Host Groups: an Host Group is just a container object for client hosts you can relate to Puppet modules, Ansible roles and such.
You can of course create nested Host Groups that inherit the properties from their parents.
While connected to the Satellite Web UI as a user with administrative, to operate on the Host Groups of the selected Organization, click onto:
- "Configure"
- "Host Groups"
the list of the existing Host Groups of the currently selected Organization gets displayed, as shown by the following screenshot:

In this example we have the following nested Host Groups structure:
- Carcano CH S1
- Lab
- CentoOS 7
- Lab
Assign The Puppet Environment To An Host Group
On Satellite, the Puppet environment is part of the Content Views; the Host Group that logically matches the "CentOS 7" Content View (that as we saw do contain the Puppet environment) is the one at the level of the operating system architecture family: this means that the Puppet modules can be assigned from this level downward.

Are you enjoying these high quality free contents on a blog without annoying banners? I like doing this for free, but I also have costs so, if you like these contents and you want to help keeping this website free as it is now, please put your tip in the cup below:
Even a small contribution is always welcome!
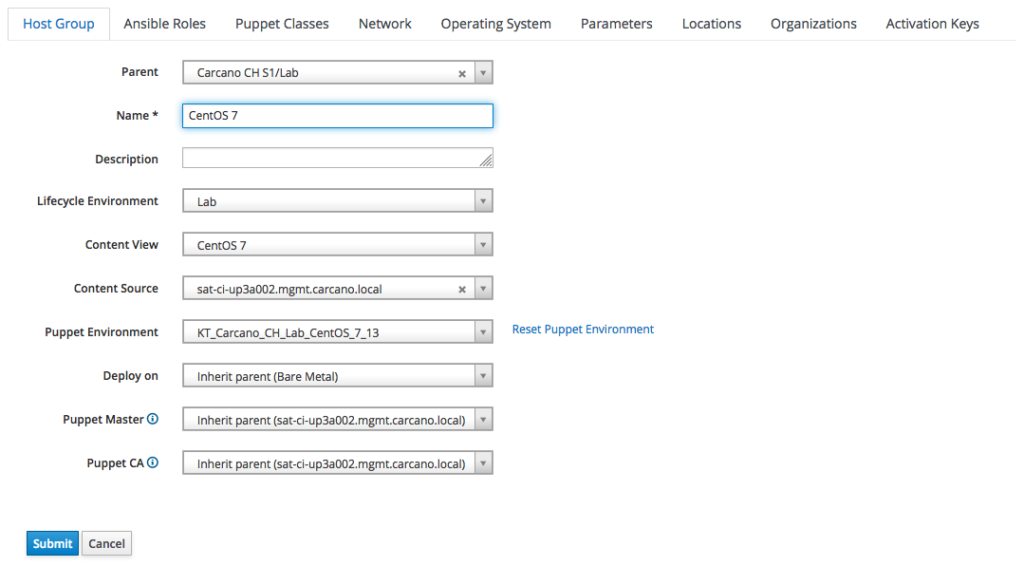
please note how the settings of the "Puppet Master" and of the "Puppet CA" are inherited from the parent Host Group.
We are ready to assign the Puppet modules to the Host Group: switch to the "Puppet Classes" tab and select the classes we want to add.
In this example, add the "motd" module by clicking on the "motd" word to display its classes, then click on the "plus" button next to the "motd" class.

Then repeat the step for the "stdlib" module, adding the "stdlib" and "stdlib:stages" classes.
The outcome must look like as follows:

Click the "Submit" button to save the changes.
Configure Smartclass Parameters For Matching Host Groups
We are almost done: we only need to set a convenient  message to the "content" parameter of the "motd" Puppet class.
Puppet parameters in Satellite terms are called Smart Class Parameters: when you import a Puppet module into a Puppet repository, it is scanned to extract the names of its parameters to let you easily configure them. These parameters get added to the list of the "Smart Class Parameters".
While connected to the Satellite Web UI as a user with administrative, we can list the Smart Class Parameters of the currently selected Organization by clicking onto:
- "Configure"
- "Smart Class Parameters"
Let's filter by the "motd" word as shown in the following screenshot:

since we want to set a value to the "content" Smart Class Parameter, click on it:

within the "Default Behavior" section, tick the "Override" checkbox.
We are ready to set a value using the Host Group as the matching criteria: since the MOTD is an organization wide setting, we bind it to the "Carcano CH S1" Host Group: click on the "+ Add Matcher" button, then select "hostgroup" and then type the name of the "Carcano CH S1" Host Group.
Type the following message:
This is a private system: by using it all users acknowledge notice of, and agree to comply with, the Acceptable Use of Information Technology Resources Policy (AUP). Unauthorized or improper use of this system may result in administrative disciplinary action, civil charges/criminal penalties, and/or other sanctions. By continuing to use this system you indicate your awareness of and consent to these terms and conditions of use.
the outcome must be as shown in the following screenshot:

Click on "Submit" to save the changes.
Assigning Hosts To The Right Host Group
It has come the time to assign some client hosts to the Puppet environment we have just created - since the Puppet environment has been bound to a Host Group, this in turn means assign the client hosts to the Host Group that is bound to the Puppet environment we want to assign them to.
Within the Satellite Web UI, switch to the "All Hosts" listing page as follows:
- "Hosts"
- "All Hosts"
This page lists every client host we have registered on the Satellite for the currently selected Organization, providing an overview of the installed operating system, showing the Host Group they belong to, the Puppet Environment and the last time the client host has submitted a report with its facts.
Since the number of the hosts can be huge, it is convenient to learn how to filter them so to get a shorter list to work on. You can select them by Host Group, or you can even select just one client host, as by shown in the following screenshot:

tick the checkboxes of the row of the hosts you want to reassign the Puppet environment, then click on the "Select Action" button and chose "Change Environment": a summary like in the following screenshot is displayed:

just select "*Inherit from hostgroup*" in the "Environment" combo box, and click on the "Submit" button: you'll get back to the list of client hosts.
Verify the Puppet Environment Of Client Hosts
Let's see how to check that the Puppet environment of the "Carcano CH S1/Lab/CentOS 7" Host Group is actually applied to the client hosts belonging to it: we can see every settings of a client host simply by clicking on its FQDN.
In this example I clicked on "srv-ci-up3a002.mgmt.carcano.local", getting to the page with the summary of the client host like in the following thumbnail:
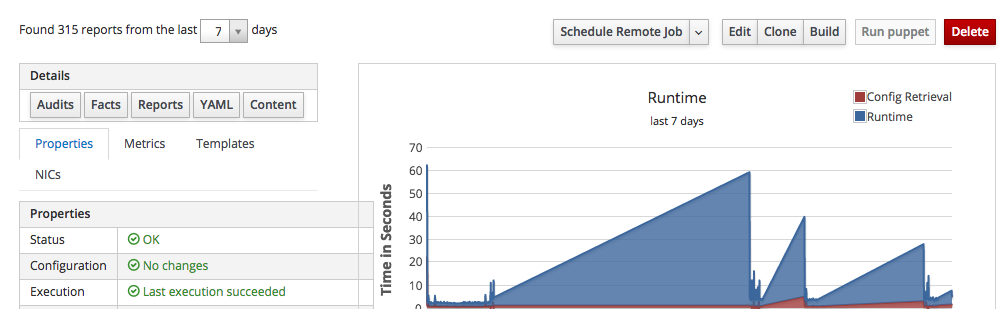
this summary page provides some of the most interesting collected metrics along with several buttons to perform actions on this client host.
Satellite provides every setting of a client host through a YAML manifest: click on the "YAML" button to get it shown.
The last lines of this manifest must be similar to the following ones:
    ...
  remote_execution_ssh_user: root
  remote_execution_effective_user_method: sudo
  remote_execution_connect_by_ip: false
classes:
  motd:
    content: "This is a private system: by using it all users acknowledge notice of, and agree to comply with, the Acceptable Use of Information Technology Resources Policy (AUP). Unauthorized or improper use of this system may result in administrative disciplinary action, civil charges/criminal penalties, and/or other sanctions. By continuing to use this system you indicate your awareness of and consent to these terms and conditions of use.\r\n"
  stdlib:
  stdlib::stages:
environment: KT_Carcano_CH_Lab_CentOS_7_13
the host actually got the Puppet environment: as you see the last lines are the list of Puppet classes along with the values of their parameters, and we can see that the "content" parameter got the right value too.
Apply The Puppet State To A Client Host
We are eventually come to the time to have a go and test everything: login to the client host and launch the Puppet agent - this causes it to connect to the Puppet master to see if there's a mismatch between the current state of the host and the one expected by the Puppet master:
sudo /opt/puppetlabs/bin/puppet agent -tthe outcome should look like the following snippet:
Notice: Local environment: 'production' doesn't match server specified node environment 'KT_Carcano_CH_Lab_CentOS_7_13', switching agent to 'KT_Carcano_CH_Lab_CentOS_7_13'.
Info: Retrieving pluginfacts
Info: Retrieving plugin
Info: Retrieving locales
Info: Loading facts
Info: Caching catalog for srv-ci-up3a002.mgmt.carcano.local
Info: Applying configuration version '1646927909'
Notice: /Stage[main]/Motd/File[/etc/motd]/content:
--- /etc/motd	2022-03-10 16:57:43.017814624 +0100
+++ /tmp/puppet-file20220310-15550-2ocqhk	2022-03-10 16:58:29.763271194 +0100
@@ -0,0 +1 @@
+This is a private system: by using it all users acknowledge notice of, and agree to comply with, the Acceptable Use of Information Technology Resources Policy (AUP). Unauthorized or improper use of this system may result in administrative disciplinary action, civil charges/criminal penalties, and/or other sanctions. By continuing to use this system you indicate your awareness of and consent to these terms and conditions of use.

Notice: /Stage[main]/Motd/File[/etc/motd]/content:

Notice: /Stage[main]/Motd/File[/etc/motd]/content: content changed '{md5}d41d8cd98f00b204e9800998ecf8427e' to '{md5}ce4e10da3511ac50b332e3213dd53dc2' (corrective)
Notice: Applied catalog in 0.03 seconds
as you can see from the output, Puppet found a mismatched state for the "/etc/motd" file and remediated it, bringing it to the expected state.
Let's check the outcome:
cat /etc/motdthe output indeed is:
This is a private system: by using it all users acknowledge notice of, and agree to comply with, the Acceptable Use of Information Technology Resources Policy (AUP). Unauthorized or improper use of this system may result in administrative disciplinary action, civil charges/criminal penalties, and/or other sanctions. By continuing to use this system you indicate your awareness of and consent to these terms and conditions of use.that ie exactly the content we expected to find.
Beyond Dedicated Agents: Building the DevOps and DevSecOps Foundations
Successfully tracking state compliance, binding variable matchers to organizational definitions, and forcing remediation handshakes across decoupled target networks are great systems engineering achievements. Yet, managing standalone Puppet environments represents just one single technical brick in the massive wall of modern DevOps and DevSecOps engineering on Linux. In complex corporate data centers, an expert cannot rely on fragmented, legacy configuration patterns: you must know how to translate your systems engineering into advanced shell automation architectures, low-level kernel protection lines, automated software packaging, and native CD pipelines without vendor lock-in.
When you evaluate your daily orchestration and system hardening workflows, are you completely confident you master the holistic engineering layer running under the hood of your server clusters? Or are you simply connecting separate open-source components via isolated panel states without a comprehensive architectural strategy?
My book, "DevSecOps and DevOps for Linux: The Foundations", published by Apress, was written specifically to address this technical evolution. It is a comprehensive, lab-driven blueprint tailored for both students and experienced engineers to systematically identify and eliminate their technical gaps. Through intensive, hands-on enterprise exercises built entirely on open-source, cloud-agnostic architectures, you will develop a solid theoretical foundation backed by deep practical engineering.
Key insights covered in this volume:
- The Holistic Skills Set Brick: Bridge technical engineering with team management frameworks. Master
Scrum,Kanban, andLeanmethodologies to design system architectures aligned with real corporate workflows. - The Shell Scripting & Unix Tools Brick: Build rigorous operational foundations. Master advanced
Bashshell scripting architecture while learning how to combine core Unix tools into robust, repeatable, and enterprise-ready host automations. - The Version Control Engineering Brick: Move past basic commits. Dive deep into
Gitversion control, mastering feature-branch workflows, repository lifecycle management, and complex conflict resolution. - The Data & Core Automation Brick: Build bulletproof data processing setups. Learn advanced
RegEx, how to operate using evergreen tools such asGrep,Sed, andAWK, and how to master structured data parsing (XML,JSON,YAML) usingPythonand tools likexmlstarlet,jq, andyq. - The Modern Python & Automation Brick: Develop a modern Python project using
pyproject.tomlwithpytest-based unit tests, governing the project withGNU Makefor testing, building, and digitally signingRPMpackages. The project is presented in an evolving fashion, showing how features are added step by step, highlighting how a properly structured Python project can be improved and evolved with minimal or no rework at all. - The Linux OS Hardening & PKI Brick: Learn the real mechanics of security. Implement
X.509/PKIarchitectures,TLSconfigurations, andGPGencryption and signing, while mastering low-level kernel defenses likeSELinuxandLinux Capabilities. - The Compliance Check and Shift-Left Security Brick: Learn how to leverage the
pre-commitframework to automate compliance checks withPylintandFlake8, and perform security scans withBanditandSafety, extending the security audit to the full software supply chain. - The Application Integration Brick: Master the foundational protocols used to securely interconnect enterprise microservices, including
HTTP,REST,OpenAPI,SOAP, andLDAP/LDAPS. - The Infrastructure Delivery Brick: Put theory into practice with vertical, real-world labs. Move from basic scripts to engineering
Ansiblearchitectures, rootlessPodmansetups, image creation viaBuildah, and completePulp3deployments usingDocker Compose. - The Enterprise GitOps Pipeline Brick: Tie everything together by automating your software supply chain. Build complete continuous deployment workflows using
Gitea CIpipelines hosted natively onKubernetes(RKE2).
Footnotes
Here it ends this tutorial on managing Red Hat Network Satellite clients with Puppet: I hope after reading it you agree that Red Hat Network Satellite 6 is really a step onward from Red Hat Network Satellite 5 (and so Spacewalk).
Configuration management using Puppet is certainly a smarter way of doing things, but be wary that Satellite is going to deprecate Puppet in favor of Ansible (Red Hat announced Puppet deprecation by Red Hat Network Satellite Server 7.0 in 2020): Satellite remote executions can also be configured to use Ansible indeed.
If you want to learn more on this topic, please read Enable And Configure Ansible On Red Hat Network Satellite.
