Managing Red Hat Network Satellite clients with Ansible roles and playbooks is a very powerful feature of Red Hat Network Satellite Server 6, as well as of its upstream project Katello. Conversely from Puppet, that requires the client host to install its agent package and to be registered to the Puppet master running on the Satellite or Capsule, Ansible does not require installing anything, since it relies on SSH or, to tell it in Red Hat Network Satellite 6 terms, it relies on remote execution with SSH.
This post shows you how to manage client hosts using Ansible, either executing the Ansible roles assigned to the host group the client host belongs to, or running Ansible playbooks using Job Templates.
The Linux distribution used in the examples is CentOS 7, but you can of course easily adapt it to any other Red Hat and derived Linux distribution.
Prerequisites
The straightforward requisite is having the client already registered on the Red Hat Network Satellite Server 6 or Katello. If you do not know how to do this, or simply want to learn more on this topic, please read Register Clients To Satellite Server 6 Or Katello before going on with this post.
In addition to that, you must already have configured remote execution with the Ansible plugin on the Satellite: if you need help on this requisite, please read Enable And Configure Ansible On Red Hat Network Satellite.
Ansible - Acquainting To It
Ansible is an open source community project, sponsored by Red Hat, aimed at easing configuration management; despite it's using an "imperative" approach, it enables you to implement automation quite close to infrastructure as code.
Declarative automation tools such as Terraform are certainly handy and powerful, but sometimes hit against the fact that very often the already existing infrastructure has not been structured using standard design patterns, and anyway against the use cases that have not been designed for a declarative approach.
Ansible instead, because of its imperative approach, provides you a fine grained control on implementing an automation that actually fits your existing infrastructure and use cases. Of course it has the disadvantage that you have to take care of implementing the necessary logic to make your playbooks and roles behave pretty same as declarative, but who better than you can add the necessary checks to prevent incidents that can be caused by running the automation with a mismatched configuration?
Inventory
Ansible fetches the information about the target hosts (the hosts you run the automation onto) from the Inventory: this can either be a text file or an executable that provides the information of every known host using a format that Ansible understands (the most used are INI and YAML).
When running Ansible the Satellite automatically provides the Inventory generating it from the registered hosts, adding the host attributes either using global values or with values that are specific to the matching host group the client host belongs to.
Playbook
Ansible can play a list of "tasks" that are specified into a manifest file called playbook: it can also contain "handlers", that are special tasks that run only at a specific moment of the play and only if they have been notified. Each task describes how to invoke an Ansible "module" (that is Python code), passing the necessary parameters to it.
It happens very often that among the various tasks there are some that make use of Ansible modules that copy files from the filesystem of the management station to the managed client hosts: these files can also be JINJA templates that are rendered only when generating the actual file on the managed client host.
Role
Ansible promotes code re-usability by the means of the so called roles: they provide a convenient way to bundle tasks files, handlers, resource files, templates and even custom modules within a single delivery unit that can be imported by a playbook, or even by another role.
Red Hat System Roles
Red Hat packaged the rhel-system-roles RPM with a set of Ansible roles specifically developed by Red Hat to configure its systems.
We can easily install them as follows on the Satellite (or either on any Capsule, if necessary):
sudo yum install rhel-system-rolesthey are installed into "/usr/share/ansible/roles" directory, so we can easily list them as follows:
ls /usr/share/ansible/rolesSatellite Concepts
Structuring things in a clean and tidy way is mandatory on the Satellite: if you do not take the necessary care into this, sooner or later - probably sooner - you'll get into maintainability problems that often wind up into a refactoring of everything you configured so far.
A tidy structure should address your needs for:
- segregation and authorization of access to objects
- have configuration group objects to which you can attach settings that are common to several hosts
Another key topic, but this is always true, not only for working with the Satellite, is having a perfectly designed naming scheme for your hosts: this allows you for example to easily guess the name of groups of hosts without having to remember anything nor needing to check some kind of inventory software. I'm going to write a post on this topic sooner or later.
Organizations
This is the highest level of grouping: each Satellite Organization governs its own product lifecycle, enabling it to manage its own list of Products, Subscriptions, Activation keys and so on. In my opinion, besides addressing problems when merging two different companies, the only good reason to use more that one Katello Organization is a scenario with different Organizational Units - for example "Linux Platforms" and "Databases" that independently manages their own servers, budgets and product lifecycle.
Locations
Locations are lighter organizational objects if compared to Organizations: you can use them to group resources such as hosts, subnets, realms and such, granting access to them only to users that have been granted access to the Location. It is of course less cumbersome to maintain,if compared to Organizations.
Mind also that, besides Organizations, Locations are the only way to segregate and grant access to contents in compliance to the corporate policy.
Host Groups
Host Groups belong only to one Organization and must be hierarchically structured: the very first thing to create are of course the top level host groups. Top level Host Groups not only let you assign a Capsule host (Foreman Proxy) to provide content sources as well as the Puppet Master and Puppet CA (if using Puppet), but also provide a convenient hook you can exploit to assign values to variables specific for the matched Host Group.
There are several ways to exploit Host Groups, depending on your needs to
- segregate, for example by organizational unit, by location or by security tier
- lifecycle environments - for example LAB, DEV, TEST, PREP and PROD
If your environment is not segregated, neither geographically nor using security tiers, you may even create just one top level Host Group and assign organization-wide values to variables specific for this Host Group, and have a nested Host Group level dedicated to the lifecycle environments.
If instead your environment is segregated, things become more complex - you may have (or not) the need to segregate by organizational unit, corporate branch, location and security tier. My only advice is to avoid using too many nesting levels.
Matchers
Matchers are a way to set variables with specific values only when the specified conditionals succeed. They are used to bind values of variables to objects containers, so that what is contained inherit these values. Examples of objects containers are Satellite Organizations, Locations, Host Groups and so on.
The default criteria available on the Satellite that can be exploited to define a matcher rule are:
- fqdn - the Fully Qualified Domain Name, for example "www-ci-up3a001.mgmt.carcano.local"
- hostgroup - the name of a Host Group
- os - name and version, for example "RedHat 7.9"
- domain - the domain, such as "carcano.local"
but you can add additional criterion such as:
- organization - the name of the Satellite Organization
- location - the name of the Satellite Location
- environment - the name of the Lifecycle Environment
to add new criterias cl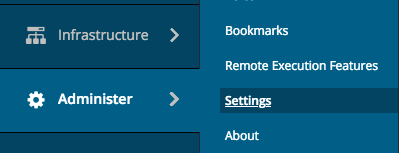 ick on "Administer", then click on "Settings" and pick-up the "Puppet" tab; from the list of settings shown, modify the list "Default variables lookup path" adding the criteria you want, such as "organization", "location", "environment" and such.
Mind that you can even add any kind of Satellite fact to the "Default variables lookup path" list.
For example:
[ fqdn, hostgroup, os, domain, location, organization, environment, "distribution::name" ]How The Satellite Exploits Ansible
You can run Ansible code from the Satellite using the two following flavors:
you can create a job template containing the YAML implementation of a playbook that loads one or more roles when needed, properly setting the required variables as needed before invoking them
you can simply assign the role to each single host or to a Host Group: the values of the variables that are needed by each selected role must be explicitly set with a reasonable default or using specific matchers.
We'll see both of them in detail later on.
An Example Scenario
Since applying these concepts to real life is not as easy as it may look, I want to provide you with a quite complex example that may help to better understand how to combine and apply them.
Requirements
- we have only one company, and the company name is "Carcano"
- we have no need to segregate by organizational unit, since both the licensing of the products and the product life cycle is governed at corporate level - this means that there's not the need to create Satellite Organizations for specific organizational units, but we want users to be granted to access to devices on a per class basis - for example "Web Servers", "Application Servers", "Databases" and so on.
- we have two data-centers:
- Switzerland (the ISO 3166-2 code is "CH"), in Zurich ("ZH")
- Singapore (the ISO 3166-2 code is "SG"), in West Region ("WR")
- we are subjected to regulatory that require us to configure two security tiers:
- Security Tier 1 - "S1"
- Security Tier 2 - "S2"
this means that users belonging to a specific security tier can access only to devices belonging to that security tier. Of course some selected users may be part of both security tiers. This can be exploited for example to grant only internals to access/manage some sensitive devices, preventing advisors from handling them. You can of course use this approach to create more security tiers if needed.
- We have the following lifecycle environments: "LAB", "DEV", "TEST", "PREP" and "PROD".
Organization, Location and Host Groups layout
My advice (and of course not the only way to deal), in such a scenario, is to configure Katello as follows:
- create the "Carcano" Katello Organization
- Locations:
- create "CH - ZH" and "SG - WR" Locations - they are used to have a granular control to who can manage hosts belonging to each datacenter.
- inside both "CH - ZH" and "SG - WR" create Locations relying on the purpose and security tier of the hosts belonging to each Location. Examples are "WebServers-S1", "WebServers-S2", "AppServers-S1", "AppServers-S2" and so on - they are used to have a granular control to who can manage hosts belonging to each security tier.
- Host Groups:
- create "CH - ZH" and "SG - WR" Host Groups - they are used to assign resources such as Foreman Proxies (Capsules), Puppet CA or parameters (for example a list of on premise time servers) that are inherited by the nested Host Groups.
- inside both "CH - ZH" and "SG - WR" create nested Host Groups with both the lifecycle environment and the Security Tier as name: for example, "DEV - S1" and "DEV - S2" come for combining the "DEV" lifecycle environment with the "S1" and "S2" security tiers. These nested Host Groups can be used to assign authentication realms or domains specific for the Security Tier within a lifecycle environment. Depending on your needs, you may assign many other specific settings, such as the DNS to be configured as resolvers or any other things that my be required by your segmentation.
- inside every environment, create a Host Group for every cluster of servers - here it is mandatory to have a perfectly designed naming scheme. For example, if you have "apps-ci-ud3a001", "apps-ci-ud3a002", "apps-ci-ud3a101" and "apps-ci-ud3a102", you can derive two host groups: "APPS-CI-0", with "apps-ci-ud3a001" and "apps-ci-ud3a002" as members, and "APPS-CI-1", with "apps-ci-ud3a101" and "apps-ci-ud3a102" as members. If you have only one host, you can consider it a degenerate cluster with only one member and derive the name of the host groups the same way - this way, if you decide to add other hosts later on, you already have a meaningful host group. You can then use these Host Groups to assign a lot of settings, such as subnets, Puppet classes or Ansible roles and any kind of parameter that is necessary to complete the description of the configuration that must be applied to the member hosts.
Exploiting Ansible Roles Within Satellite
Besides running Ansible Playbooks within Job Templates (we saw this in the Enable And Configure Ansible On Red Hat Network Satellite post), the 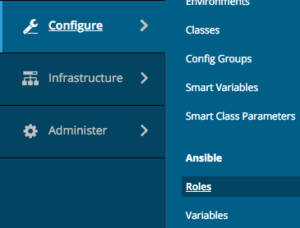 Satellite can also run Ansible Roles: they must be imported from the filesystem of the Satellite or of a Capsule.
By using the Satellite Web UI as a user with administrative rights, we can easily list the Ansible roles that are available for the selected Organization - simply click onto:
- "Configure"
- "Roles"
to get the list of available roles.
Please note that roles are bound to the currently selected Satellite Organization, so you may need to import them multiple times as per the needs of each of the Satellite Organizations.
Importing Ansible Roles
In this example, we import the linux-system-roles.timesync Ansible role, but you can of course use the following steps to also import more than one role, or every role as a whole.
Understanding How The Role Must Be Invoked
The very first thing to do is SSH Login to the Satellite so to have a close look to the role and learn how to use it - change to the directory that contains all the Ansible roles:
cd /usr/share/ansible/rolesand list all the roles with the work "timesync" in the name:
ls -dl *timesync*the output sounds interesting:
lrwxrwxrwx. 1 root root 26 Mar 2 21:55 linux-system-roles.timesync -> rhel-system-roles.timesync
drwxr-xr-x. 10 root root 152 Mar 4 11:12 rhel-system-roles.timesync
so linux-system-roles.timesync and rhel-system-roles.timesync are actually the same role: this means that we can import just one of them into the Satellite.

Are you enjoying these high quality free contents on a blog without annoying banners? I like doing this for free, but I also have costs so, if you like these contents and you want to help keeping this website free as it is now, please put your tip in the cup below:
Even a small contribution is always welcome!
Now let's change to the directory of the rhel-system-roles.timesync role:
cd rhel-system-roles.timesyncand explore its contents:
ls -1the output is as follows:
COPYING
defaults
handlers
library
meta
README.md
tasks
templates
tests
vars
the README.md contains the usage guidelines for the role, so this is the very first document to read.
Please note that there is a "tests" directory: this directory should contain playbooks that run some tests of the role - my personal advice is to always look into them to get some inspiration on how to use the role. In this case, a very good candidate to learn how to use this role is the "tests/tests_ntp.yml" file: have a look at it.
After reading both the README.md and a few tests files, we can argue that this role requires at least these two variables to be set:
- timesync_ntp_provider: a string with the provider to use - for example "chrony" or "ntp"
- timesync_ntp_servers: a YAML structure that describes the list of upstream NTP servers
the workaround is to modify both the "templates/chrony.conf.j2" and "templates/ntp.conf.j2" files as shown in the following snippet:
{% for value in timesync_ntp_servers | from_yaml %}
{{ 'pool' if 'pool' in value and value['pool'] else 'server' }} {{
value['hostname'] }}{{
' minpoll {0}'.format(value['minpoll']) if 'minpoll' in value else '' }}{{
' maxpoll {0}'.format(value['maxpoll']) if 'maxpoll' in value else '' }}{{
' iburst' if 'iburst' in value and value else '' }}
{% endfor %}
as you see we only need to add the "| from_yaml " JINJA filter at line 1 of the snippet.
Importing The Role
We are finally ready to import the role from the filesystem of the Satellite. As we already did, log-in as a user with administrative rights and pick-up the Organization the imported roles you want to belong to ("Carcano" in this example), then click on:
- "Configure"
- "Roles"
the page frame with all the roles we have already imported is shown: you can now click on the button that runs the import from your Satellite.
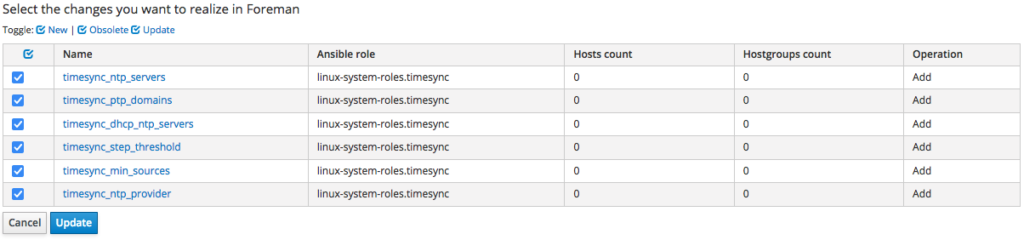
The list of the roles available on the file-system of the proxy is shown - note that the roles you already imported are not shown: select the linux-system-roles.timesync role and click on the "Update" button.

the outcome is as follows:

as you see, the linux-system-roles.timesync role is now listed along with the other Ansible roles imported on the Satellite.
Importing The Variables Of The Role
As you are certainly figuring out, since Ansible roles have variables, we need to import the variables of the Ansible role too: just click on the "Variables" button on the row of the rhels-system-roles.timesync role: you must get the following outcome:

this page is the one that displays the Ansible variables of the roles imported on the Satellite: it is is empty only because since we clicked on the button related to the linux-system-roles.timesync role, we are getting a filtered result limited to only the variables of this specific role. You can see in the search textbox the filter that has been automatically generated.
Anyway we can easily import the missing variables from the Satellite - just click the "import from sat-ci-up3a002.mgm.carcano.local" button: you'll get the following list:
these are the variables that are defined into the "defaults/main.yml" file of the role: select all and click on "Update": the page gets reloaded and this time you get the list of all the variables, including the ones of the linux-system-roles.timesync role.
Overriding Variables: Set The Default Value
Now let's see how to set a default value to a variable that gets applied to every client host: so to work easier, let's type a filter that lists only variables of the linux-system-roles.timesync role: type "ansible_role = linux-system-roles.timesync" within the Filter textbox.
We want to set a default value for "timesync_ntp_provider" - just click on it:
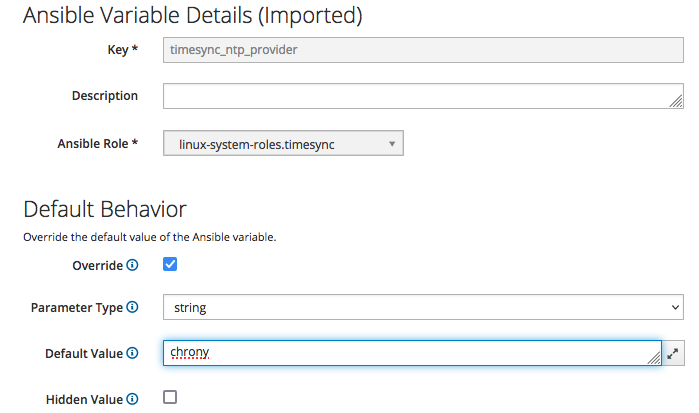
select the "Override" checkbox, deselect the "Hidden Value" checkbox and type "chrony" in the "Default Value" text box, then click on the "Submit" button.
As an exercise, repeat the previous steps, importing the
- linux-system-roles.certificate
- linux-system-roles.network
Ansible roles.
Providing Configurations Using Host Groups
The most 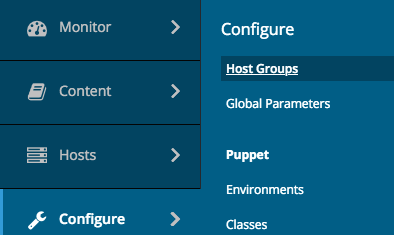 convenient way of assigning configurations on Satellite is by the means of Host Groups: an Host Group is just a container object of client hosts you can assign Puppet modules, Ansible roles and such that get inherited by every object contained in it.
Host Groups can of course contain nested Host Groups that inherit the properties from their parents.
Host Groups are Organization scope objects, so to operate on Host Groups you must first pick up the owning organization, then click onto:
- "Configure"
- "Host Groups"
the list of the existing Host Groups of the currently selected Satellite Organization gets displayed.
Of course the requisite is being logged to the Satellite Web UI as a user with enough privileges.
Create The Location Level Host-Groups
As we saw, Host Groups belong only to one Organization and must be hierarchically structured, so the very first thing to create are of course the top level Host Group.
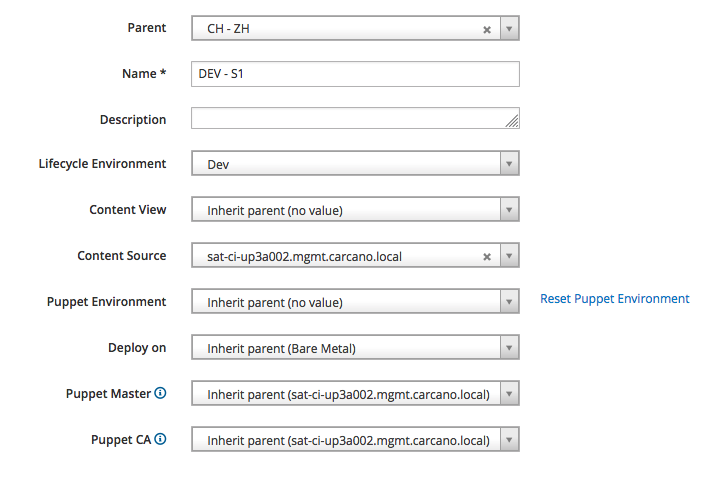
We are going to implement the structure previously described in this post, so the top level Host Groups are bound to "Locations": click on the "Create Host Group" button and fill-in the fields of the form as by the below picture, then click on the "Submit" button:
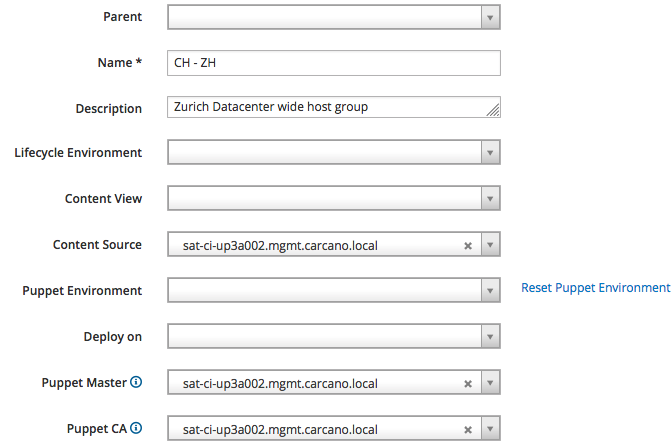
as you see, we are creating the "CH - ZH" Host Group: we use it as a hook to provide a convenient value for the "Puppet CA", "Puppet Master" and "Content Source" attributes; these values, as suggested by the description, are datacenter-wide for our fictitious Zurich based datacenter.
Assign A Location to the Host Group
Since this Host Group is "location oriented", we must assign it a location: reopen it so to edit it, then click on the "Location" tab and modify it as follows:
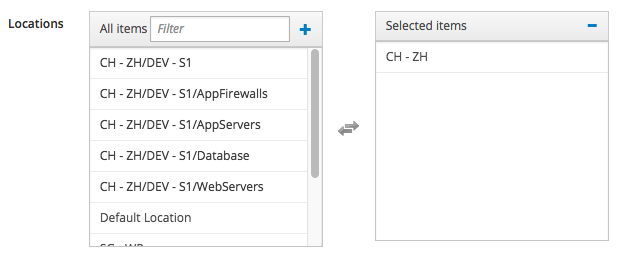
of course I'm assuming that you have already created the "CH - ZH" Satellite Location - if you haven't , please create it before doing this step.
Assign the Host Group To A Location
Same way, we must also assign the Host Group to a Satellite Location too: click on "Administer", "Locations", and clich on the "CH - ZH" Location, then click on the "Host Groups" tab
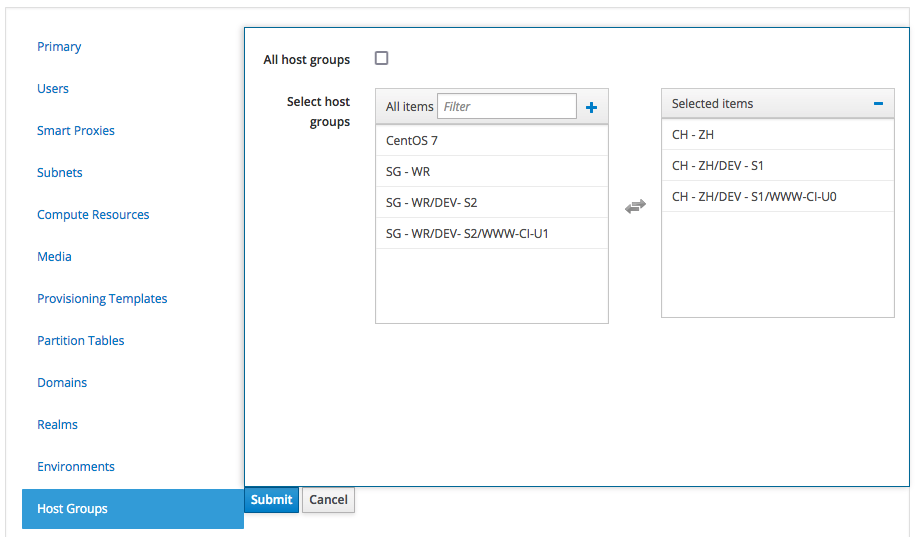
and assign the "CH - ZH" Host Group to the Satellite Location we are currently editing.
Assign Ansible Roles To The Host Group
The purpose of having a Location oriented Host Group as top level is being able to assign Location-wide Ansible roles to the Client Hosts belonging to it.
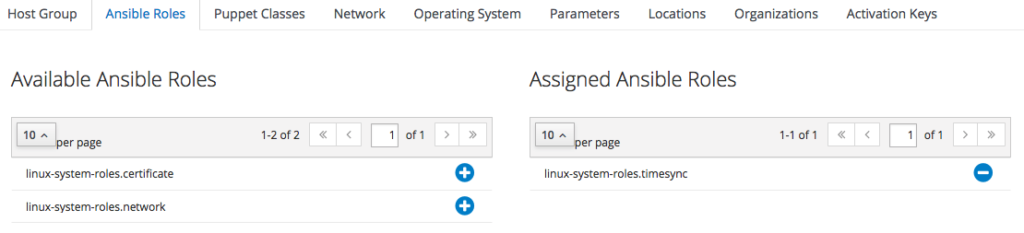
To do so, edit the "CH - ZH" Host Group we have just created: one the edit form is shown, click on the "Ansible Roles" tab and add the "linux-system-roles.timesync": it is listed beneath the "Available Ansible Roles" group, just click on the plus icon get it added to the "Assigned Ansible Roles" group.
The outcome must be as follows:
when finished, just click on "Submit".
Configure Variables For Matching Host Groups
The role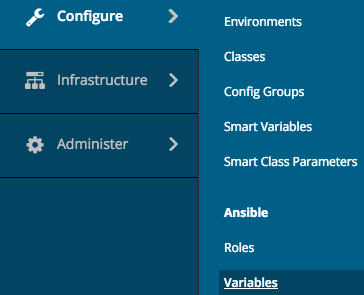 we assigned is still missing the list of NTP servers specific for each datacenter location: we can now configure this by creating a value override of the "timesync_ntp_servers" Ansible variable for matching Host Groups.
However this cannot be set within the Host Group edit form: we must pick the "timesync_ntp_servers" Ansible variable from the list of every Ansible variable and configure an override for a matching Host Group.
To get the list of every Ansible variable available on the Satellite, click on "Configure", then select "Variables" from the "Ansible" group:
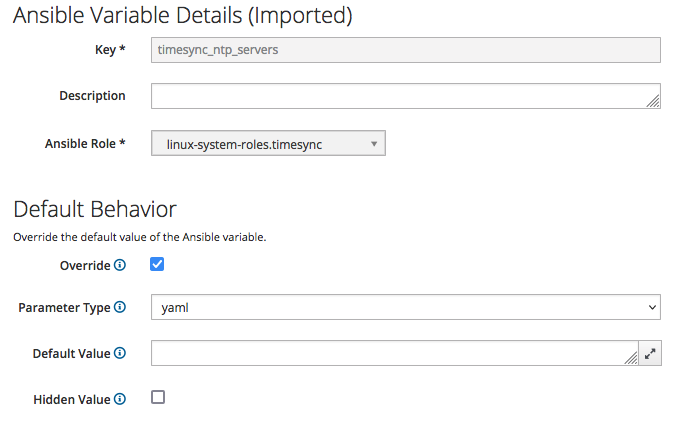
Click on the "timesync_ntp_servers" Ansible variable, tick the "Override" checkbox, untick the "Hidden Value" checkbox, select "yaml" as "Parameter type" and leave blank the "Default Value" text box.
The outcome must be as follows:
In this example, we specify a value that get applied only to client hosts belonging to the "CH - ZH" host group: click on the "+ Add Matcher" button and fill-in as by the following screenshot:
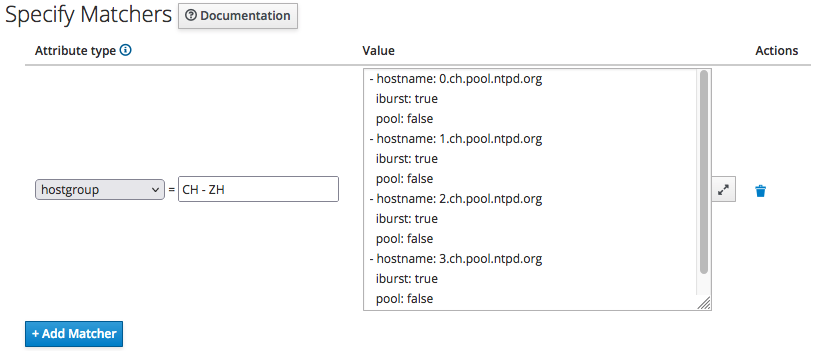
then just click on the "Submit" button.
Repeat the above steps to create the "SG - WR" Host Group, of course with the proper values for the time servers attributes for the fictitious datacenter in Singapore (0.sg.pool.ntpd.org and so on).
Create The Remaining Host-Groups
In real-life we would have to create nested Host Groups, so to be able to exploit them to assign other Ansible roles and settings, but for the purpose of showing how to deal with Ansible roles and Host Groups, what I showed you so far is enough.
In addition to that, thoroughly explaining also nested Host Groups would require too much room for this blog post, ... so I'll certainly write another post about this topic sooner or later, giving it the room it deserves.
Anyway I can provide you summary guidelines about how to go on with nested groups in the example scenario previously depicted.
Lifecycle Environment and Security Tier Level Host Groups
Create a nested Host Group level Lifecycle environment and the Security Tier oriented: for example "DEV- S1", "DEV - S2", "TEST - S1", "TEST - S2", "PREP - S1", "PREP - S2", "PROD - S1" and "PROD - S2".
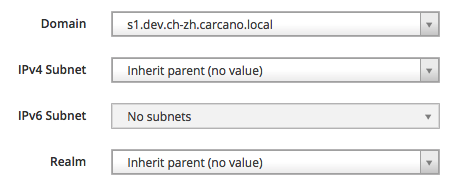
We can exploit these Host Groups to assign the proper value to the "Lifecycle Environment" attribute: for example, in the following picture I'm creating the "CH - ZH/Dev - S1" Host Group and assigning the "Dev" Lifecycle Environment to it:
of course this is the right place also to assign the proper domain:
as we did with the top level Host Groups, it is convenient to assign a Location to the Host Group, and to assign the Host Group to a Location.
Cluster Level Host Groups
The next and last Host Group nesting level is about the cluster of hosts: as we see, if you carefully design a naming scheme for your hosts, it is easy to derive summary names that identifies a cluster of hosts. You can then create Host Groups with that name and assign specific Ansible roles to them, and of course provide other specific attributes.
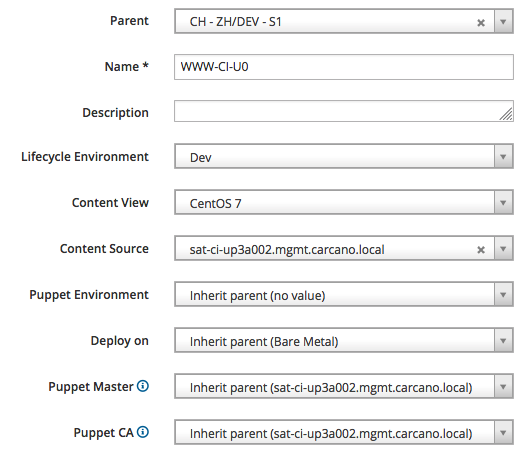
In the following snippet, we create the "CH - ZH/DEV - S1/WWW-CI-U0" Host Group and assign the "CentOS 7" Content View to it - we can of course override this default Content View with an Host Specific override if needed.
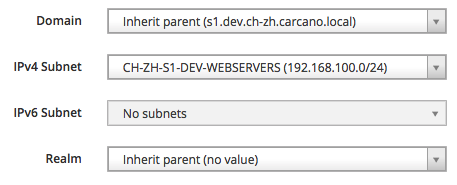
of course this is the right place also to assign the proper IPv4 (or IPv6) subnet:
and the OS settings to be used as baseline for every host that is member of this cluster:

Run Ansible Roles Inherited From The Host Group
Now that we have configured an Host Group, assigning an Ansible role with specific values, we are finally able to run the inherited Ansible roles on an host.
Assigning Hosts To The Right Host Group
Let's assign some client hosts to the Host Groups we have just created: within the Satellite Web UI, switch to the "All Hosts" listing page as follows:
- "Hosts"
- "All Hosts"
This page lists every client host we have registered on the Satellite for the currently selected Organization, providing an overview of the installed operating system, showing the Host Group they belong to and other useful information such as the last time the client host has submitted a report with its facts.
Since the number of the hosts can be huge, it is convenient to learn how to filter them so to get a shorter list to work on. You can select them by Host Group, or you can even select just one client host, as by shown in the following screenshot:

tick the checkboxes of the row of the hosts you want to reassign the Host Group, then click on the "Select Action" button and chose "Change Group": a summary like in the following screenshot is displayed:

just select the proper Host Group and click on the "Submit" button: you'll get back to the list of client hosts.
Verify the YAML Manifest Of The Client Host
Let's see how to check what configuration management settings are applied to specific client hosts: clicking on the FQDN of the client host you want to check.
In this example I clicked on "www-ci-ud1a001.s1.dev.ch-zh.carcano.local", getting to the page with the summary of the client host like in the following thumbnail:
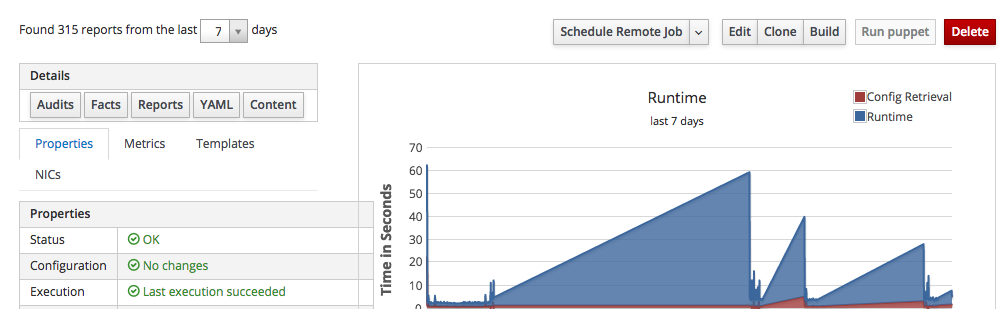
this summary page provides some of the most interesting collected metrics along with several buttons to perform actions on this client host.
Satellite provides every setting of a client host through a YAML manifest: click on the "YAML" button to get it shown.
The last lines of this manifest must be similar to the following ones:
---
parameters:
  timesync_ntp_provider: chrony
  timesync_ntp_servers:
    - hostname: 0.ch.pool.ntp.org
      iburst: true
      pool: false
    - hostname: 1.ch.pool.ntp.org
      iburst: true
      pool: false
    - hostname: 2.ch.pool.ntp.org
      iburst: true
      pool: false
    - hostname: 3.ch.pool.ntp.org
      iburst: true
      pool: false
kt_env: Lab
kt_cv: CentOS_7
foreman_host_collections: []
lifecycle_environment: Lab
content_view: CentOS_7
content_view_info:
  label: CentOS_7
  latest-version: '3.0'
  version: '3.0'
  published: 2022-01-22 21:47:16 UTC
  components: {}
  kickstart_repository:
  hostgroup: CH/CentOS 7
Run The Inherited Ansible Roles
Once selected the host, just select "Run Ansible roles" from the combo box:
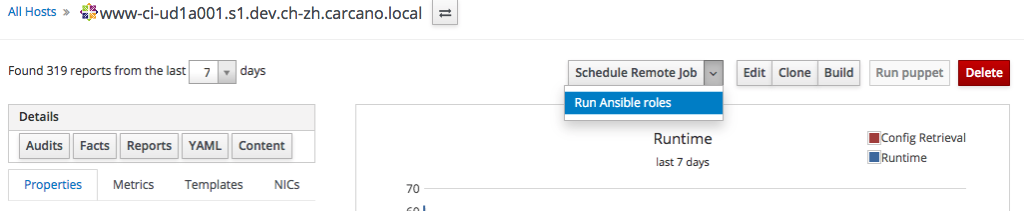
the Satellite schedule the execution of an immediate a remote command to the client host to run every Ansible role that is inherited by the currently selected host:
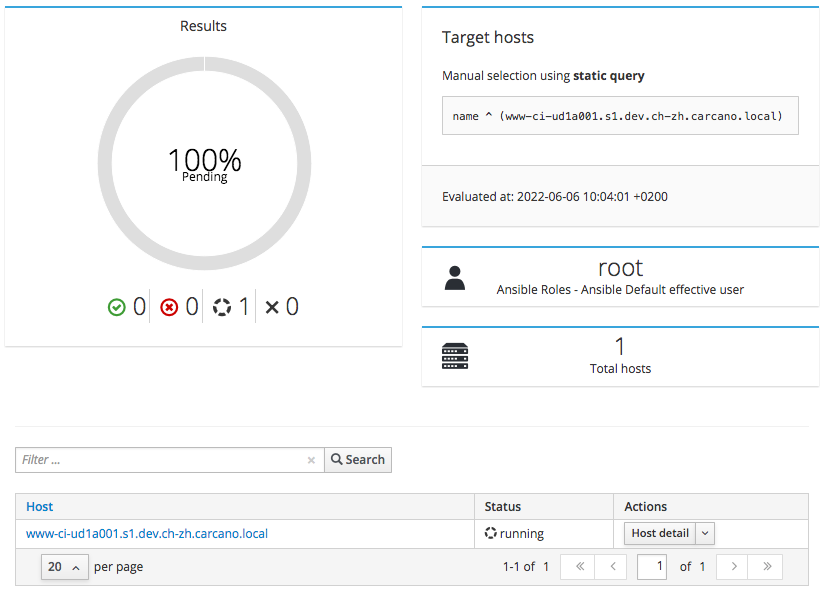
wait until the jobs status turns into "running", then click on the FQDN of the client host to get the console output ow the running command:
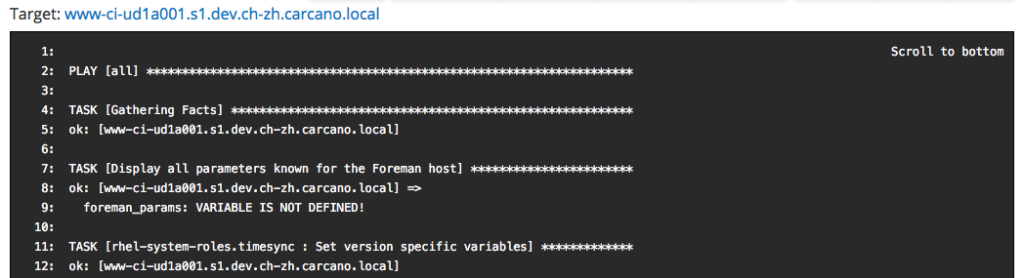
when finished, a report like the following one is shown:
Running Ansible Playbooks On Client Hosts
Assigning roles to Host Groups and directly running them is not the only way to use Ansible on the Satellite: since the Satellite has Ansible among the various provider types of Job Templates, you can of course create Job Templates that run Ansible playbooks.
Job Templates
The Satellite enables you to define Job Templates: these are Embedded Ruby (ERB) template files that are processed to generate a "Job" containing the actual logic to run. 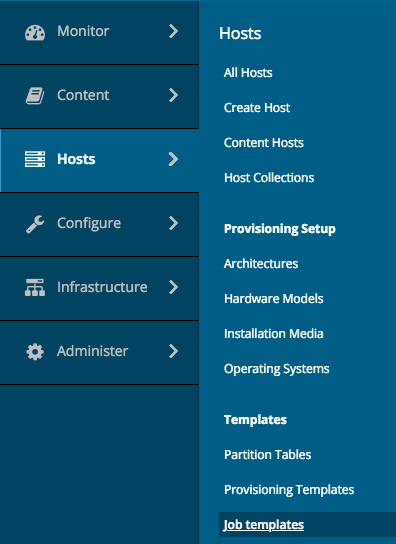 This enables you to derive from a Job Template almost any kind of statement files, such as shell scripts or even Ansible playbooks indeed: it is the Satellite, by the means of a specific provider, that takes care of generating and running the resulting statement file on the Client Hosts.
Job Templates are a very handy and powerful tool, since they let you even define input parameters such as textboxes, drop-downs, checkboxes and such: they are rendered by the Satellite Web UI while their values are stored within ERB variables.
To see the list of the already available Job Templates of the currently selected Organization, while connected to the Satellite Web UI as a user with administrative, click onto:
- "Hosts"
- "Job Templates"
as shown by the screenshot on the right.
The Satellite provides a small set of pre-configured Job Templates for common tasks such as installing RPM packages or errata, puppet modules, enabling or disabling services and so on.
Generating An Ansible Playbook From A Job Template
As an example, let's create a very simple Job Template that generates and runs an Ansible playbook that pings the selected host(s).
The ERB template of the playbook is as follows:
---
- hosts: all
  tasks:
    - name: ping the host
      ping: {}
the Ansible provider type generates from this ERB template a very simple playbook with a single play of one task only, that runs the Ansible ping module.
The purpose of this module, as we already saw, is to perform a "SSH ping" that not only checks the reachability of the targets at the networking level, but also attempts an SSH login.
Please note how this playbook has been coded so to run on every hosts of the Ansible inventory (line 1): when dealing with Satellite, you must always specify "all" as target, since it is the Satellite itself that takes care to limit the execution of the playbook only to the selected host(s) mimicking the --limit clause of Ansible.
So let's start the creation of the new Job Template by clicking on the "New Job Template" button and filling in the form as depicted by the following screenshot:
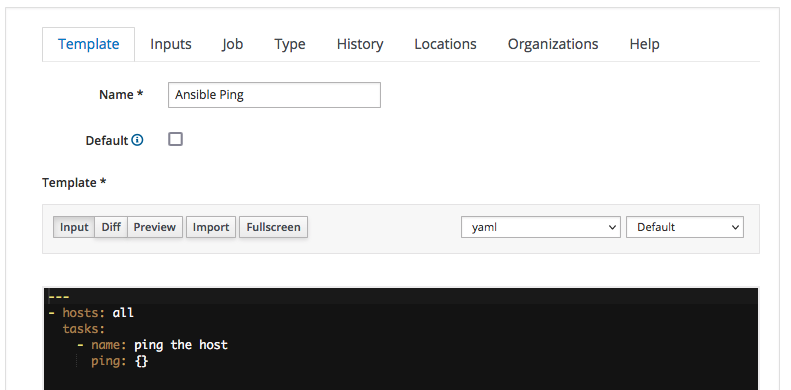
Here we:
- assign "Ansible Ping" as name of the Job Template
- select the "yaml" code syntax-highlighting - this is not mandatory, it but can be convenient when dealing with playbooks more complex than this
- type the actual YAML code of the playbook into the textbox
We must now classify the Job Template we are creating: switch to the "Job" tab and fill it as by the following screenshot:
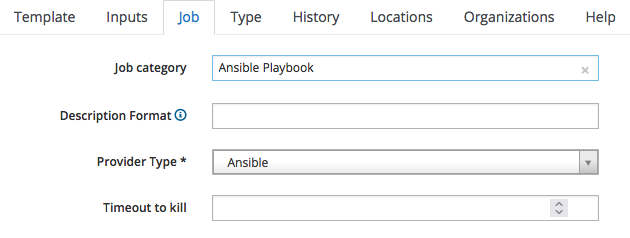
since it is an Ansible Playbook, we:
- assign it to the "Ansible Playbook" job category
- specify "Ansible" as the provider
We are finished: just click on "Submit" to save the Job Template.
Running A Job Template On A Client Host
It has come the time to run the "Ansible Ping" job template we just created on a client host: within the Satellite Web UI, switch to the "All Hosts" listing page as follows:
- "Hosts"
- "All Hosts"
As we saw, this page lists every client host you have registered on the Satellite providing an overview of the installed operating system, the host group they belong to, the Puppet Environment and the last time the client host has submitted a report with its facts.
If you have many hosts, it is convenient to learn how to filter them so to get a shorter list: you can even select just one client host, as by shown in the following screenshot:

Click on the host FQDN - in this example it is "srv-ci-up3a002.mgmt.carcano.local": a page like the following thumbnails is shown:
as you see it provides a summary of some of the most interesting collected metrics along with several buttons to perform actions on this client host.
Click on the "Schedule Remote Job" button, and fill-in the form as follows:
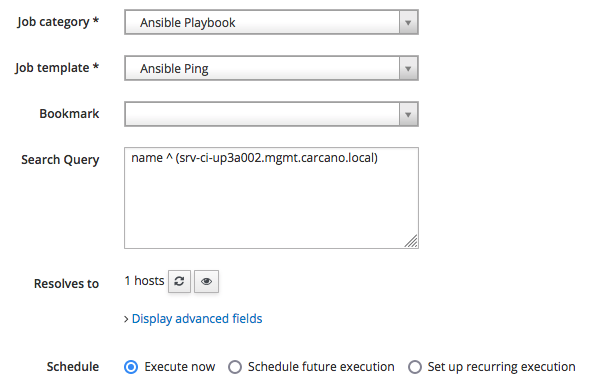
As you see, we just need to:
- select the category "Ansible Playbook" so to get listed only the Job Templates that belongs to it
- pick "Ansible Ping"
- click on "Submit" to schedule the job for immediate execution
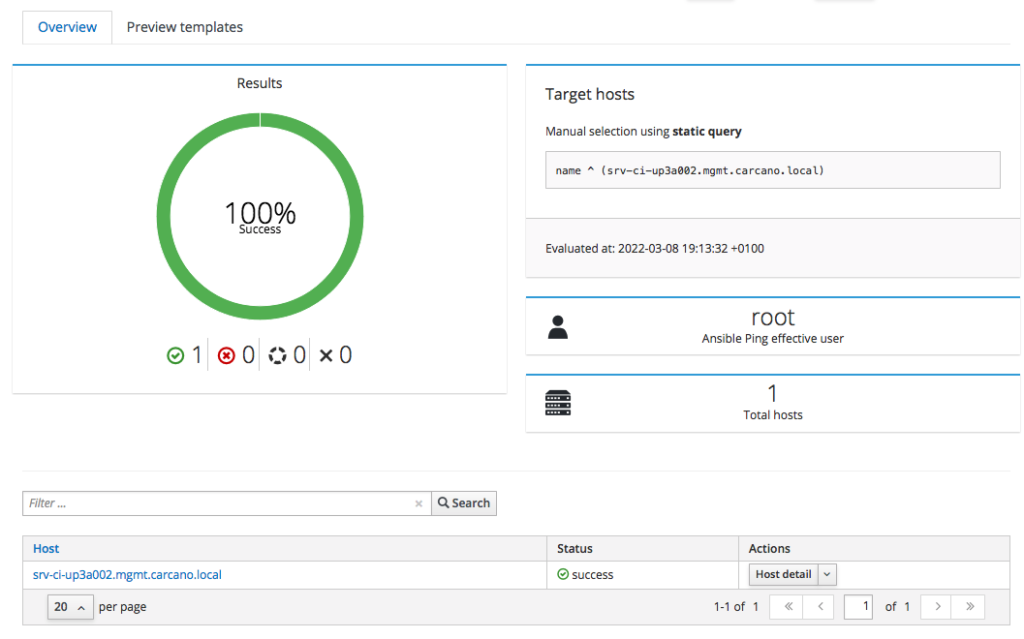
The job is then queued and run.
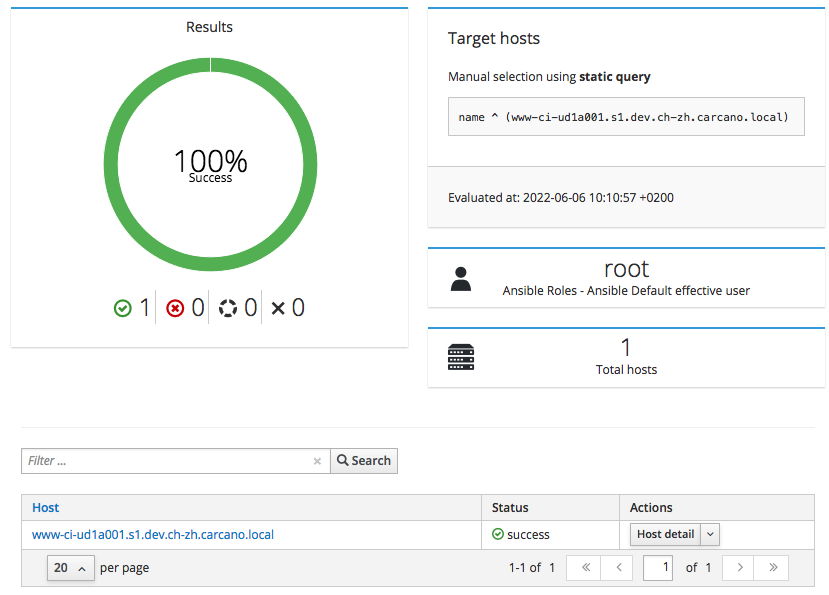
The following screenshot show the outcome of a successfully terminated job:
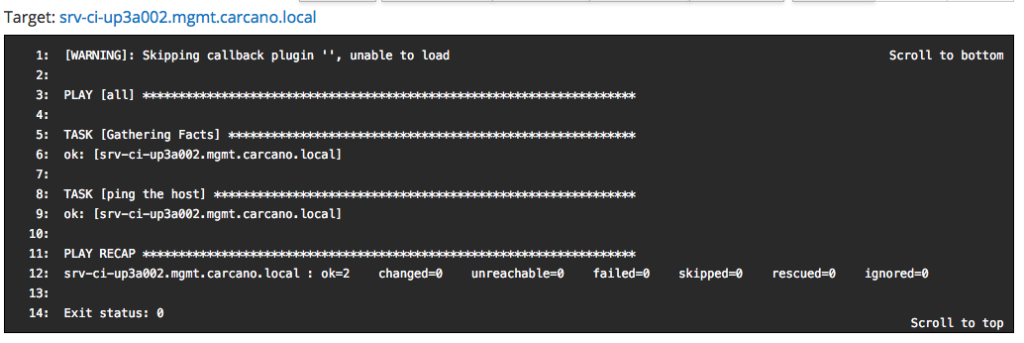
same way as we did when running the Ansible roles, you may want to see the console output: you have just to click on the FQDN - in this case "srv-ci-up3a002.mgmt.carcano.local".
This is the output of a successful execution of the playbook generated by the "Ansible Ping" Job Template.
Footnotes
Here it ends this tutorial on using Ansible on Red Hat Network Satellite Server or Katello to manage Client Hosts: besides learning how to create Job Templates to run playbooks, and how to assign Ansible roles to Host Groups, we also learned a design pattern you can use to structure the nesting of Host Groups and Locations. I hope you enjoyed the post, and that maybe you consider using Ansible on your Satellite or Katello.

Balaji says:
This gives a great insight to use ansible role in satellite, thanks for sharing the knowledge.
Marco Antonio Carcano says:
Thank you for your feedback Balaji. Most of the people focus only on Ansible Tower to ease O&M using Ansible, forgetting that also Red Hat Network Satellite provides a very good support to it. In addition to that, Red Hat Network Satellite is specifically designed for system configuration and management, whereas Ansible Tower is better tailored for applications configuration and deployment.
david sives-rutherforf says:
Would you know how to assign hosts in a hostgroup to a specific content view using a Ansible automation platform ? When I try it says it worked but nothing updated in satellite, I’m now wondering if I also need the publish version also.
G D says:
great write-up — will definitely be trying this since we just moved to Satellite. Thanks!
kyle jones says:
Thanks for sharing! Is it recommended to run ansible roles against inherited host groups or would it be possible to/easy to manage scheduling a role to run against the host collection?
Marco Antonio Carcano says:
Hello Kyle, thank you for your comment. I’m sorry for being a little late with this answer. Maybe I have to better clarify the “Host Groups”: Katello has two different ways to describe a host: “Host” and “Content Host”. Basically they are “perspectives” – the “Host” perspective is bound to O&M tasks such as assigning the correct software and configuration source and running tasks such as playing Ansible roles. The “Content Host” perspective instead is used to assemble inventory settings exploiting “Host Groups” and other grouping objects the Host belongs to.
So, you can run Ansible roles on a Host when opening the related form in the “All Hosts”. As for “Host Collections”, they are groups you can assign “Hosts” to perform essentially Pulp related O&M tasks, so AFAIK there is no way to run Ansible against a “Host Collection” using the Katello Web UI.
A quick and easy workaround is to click on “Hosts” / “All Hosts” and then filter by “Host Collection”: for example ‘host_collection = “Fancy Host Collection”‘. Then you can select all the displayed hosts and use the “Select Action” button to run Ansible Roles on all of them.
I hope this helps
Kyle says:
Thank you Marco! I ended up going with the hostgroup configuration and developed a custom ansible role, to handle patch management. I had one last burning question about this.
Since this role will be used against multiple host groups, there are pre_tasks/post_tasks (I basically import tasks based on the hostgroup) that I perform on each server to get it in a state for patching. I am having issues calling the tasks, based on the host group. I noticed you set a parameter for this, would I have to do the same?
Here is a snipet example:
– name: Import Pre_Task playbooks for Hostgroup – Axway
include_tasks: axway_pretask.yml
when: “‘foreman_rhel7_mft_axwaysecuretransport’ in group_names”
foreman_rhel7_mft – is the top level parent hostgroup, that hosts other nested hostgroups. But unfortunately, this is skipped. Satellite can be quite confusing sometimes! Lol
Marco Antonio Carcano says:
Hello Kyle,
first excuse me for the late reply, but I’m working away from home during the week, and so weekends must be for the family 🙂
Satellite is confusing, sure, … simply because it manages inventories in a different way you’d do with Ansible.
More specifically, every time you run the Roles on a host (or Hostgroup), besides generating on the fly a disposable playbook with the Roles, it also generates a disposable JSON formatted inventory file on the fly beneath the “/tmp/foreman-inventories” directory.
When running an Ansible task, basically it runs as “foreman-proxy” user statement like the following one:
export JSON_INVENTORY_FILE"=>"/tmp/foreman-inventories/8131dd04-9694-46f6-8c32-e2802d0bcde3
ansible-playbook -i /usr/share/gems/gems/smart_proxy_ansible-3.0.1/bin/json_inventory.sh /tmp/foreman-playbook-d8812ac9-44da-41c2-992e-e5f17768bc3e.yml
Beneath the hostvars, it creates dictionary called “foreman” containing all the foreman related attributes – you can easily dump adding into the role a task like the following one:
– name: “display foreman variables”
ansible.builtin.debug:
var: foreman
Note for example that there is the “foreman_host_collections” array listing all the Host Collection the host belongs to.
So you can use any of those entries to set “when” conditionals. The only trouble is that it does not provide “complete” information.
For example it shows only the Hostgroup the host belongs to, but not the parents.
For this reason, IMHO the best way to add Hostgroups specific behavior is to add these values in the Katello Web-UI inside the Role’s Ansible variables, specifying matchers as shown in the post.
I hope this clarifies more this specific topic.
Cheers
Marco