Rancher is a complete software stack for managing multiple Kubernetes clusters either on a public cloud or on premises. With the first stable release issued in 2016, it has slowly improved its feature set and become more and more popular. Currently it is probably the best option for managing Kubernetes clusters.
In the "Rancher Tutorial - Rancher Howto Install On Oracle Linux 9" post we see it in action learning how to to quickly deploy and install it on a Oracle Linux 9 platform, so to be able to immediately start playing with it and learning how this amazing tool can really simplify your life when dealing with Kubernetes.
What Is Rancher
Rancher is a complete software stack for managing multiple Kubernetes clusters, no matter if they are on a public cloud or on premises. It has specifically been designed to simplify and accelerate deployments’ management, taking care of addressing all the required operational and security challenges. DevOps teams can operate several Kubernetes clusters from a central and convenient Web UI not only providing almost the same features they will have running the “kubectl” command line utility.
In addition to that, Rancher provides its own extensions to Helm charts enabling it to render a full featured input form with multiple tabs support, textboxes, combo boxes, options that can be used when deploying workloads. This very user-friendly feature spares the user from having to manually edit the Helm's values file.
Rancher is available as a free community version (licensed under the Apache License 2.0, which allows you to use, modify, and distribute the software freely). Of course if you fancy it is possible to pay a subscription to Suse, enabling a set of commercial features and access to the official Rancher Support
Components
Before going on it is certainly worth the effort to spend some words describing the components of this solution.
Containerd And Docker
Developed by Docker, containerd is a runtime using the Open Container Initiative (OCI)-compliant runtimes built to run containers inside an abstraction layer, which manages namespaces, cgroups, union file systems, networking capabilities, and more. It was donated in March 2017 to the Cloud Native Computing Foundation (CNCF).
While Containerd just manages the containers themselves, the Docker engine provides additional functionality such as Volumes, Networking and so on.
K3s
K3s is a fully certified by the Cloud Native Computing Foundation (CNCF) lightweight (around 50MB in size, requiring around 512M of RAM) Kubernetes distribution created by Rancher Labs: simply put, it is Kubernetes with bloat stripped out and a different backing datastore - that means K3s is not a fork, as it doesn’t change any of the core Kubernetes functionalities and remains close to stock Kubernetes.
Rancher
Rancher is a Kubernetes management tool supporting multiple clusters not only deployed on premises, but also on public clouds. It centralizes authentication and role-based access control (RBAC) for all of the managed clusters and enables detailed monitoring and alerting for clusters and their resources, shipping logs to external providers. It also enables an easy workload deployment thanks to its direct integration with Helm via the Application Catalog.
When dealing with a Single Node Docker setup, Rancher is automatically deployed on top of a K3s Kubernetes running in a Docker container.
Load Balancer
Since after an initial probation time you will certainly consider redeploying Rancher on a High Available Kubernetes cluster dedicated to it, the best practice is to immediately put it behind a load balancer, so as to minimize impact and effort when deploying the new instance.
Prerequisites
Since as we said in a Single Node Docker setup Rancher is deployed on K3s, which leverages on Docker-In-Docker, there are some prerequisites that must be configured before deploying it.
Remove Podman And Buildah
Since (sadly) Podman is not supported, we must uninstall it as follows:
sudo dnf remove -y podman buildahUpdate The System
As by best practices, the very first requisite is to update the platform:
sudo dnf update -yInstall Docker
once done, add the Docker Community Edition DNF repository and install the "docker-ce", "docker-ce-cli", "docker-buildx-plugin" and "docker-compose-plugin" RPM packages as follows:
sudo dnf config-manager --add-repo https://download.docker.com/linux/rhel/docker-ce.repo
sudo dnf install -y docker-ce docker-ce-cli containerd.io docker-buildx-plugin docker-compose-plugin
We must now of course enable the "docker" service to start at boot:
sudo systemctl enable dockerEnable Required Networking Modules
It is mandatory to load the following kernel modules:
- ip_tables
- ip_conntrack
- iptables_filter
- ipt_state
Just create the "/etc/modules-load.d/rancher.conf" file with the following contents, so to have them loaded at boot:
ip_tables
ip_conntrack
iptable_filter
ipt_state
Set Up Required Networking Tunables
It is also mandatory to set the following Kernel tunables:
- net.bridge.bridge-nf-call-iptables
- net.bridge.bridge-nf-call-ip6tables
- net.ipv4.ip_forward
Just create the "/etc/sysctl.d/rancher.conf" file with the following contents, so to have them set at boot:
net.bridge.bridge-nf-call-iptables  = 1
net.bridge.bridge-nf-call-ip6tables = 1
net.ipv4.ip_forward                 = 1
Add HTTP and HTTPS Firewall Exceptions
Since Rancher will expose ports 80 for http and 443 for https traffic, we must add the related firewall exceptions:
sudo firewall-cmd --permanent --add-service=http
sudo firewall-cmd --permanent --add-service=https
Reboot The System
Se we didn't do after the upgrade, we must now restart the system so to have all the changes we did so far applied:
sudo shutdown -r nowSet Up Rancher
We have finally reached the stage of the actual Rancher's setup.
Create Directory For Persisting Container's Data
Rancher runs several containers inside the K3s: we must create the directory tree to be used as the mount point for persisting the data.
These directories are:
- /etc/rancher/ssl - the directory with the CAs' certificates bundle
- /var/lib/rancher - all the rancher data
- /var/log/rancher - Rancher's log files
- /var/log/rancher/auditlog - Rancher's audit log files
Create them as follows:
sudo mkdir -m 755 /etc/rancher /etc/rancher/ssl /var/lib/rancher /var/log/rancher /var/log/rancher/auditlogCreate The K3s Container And Deploy Rancher

Are you enjoying these high quality free contents on a blog without annoying banners? I like doing this for free, but I also have costs so, if you like these contents and you want to help keeping this website free as it is now, please put your tip in the cup below:
Even a small contribution is always welcome!
We are now ready to create and run the Rancher's K3s container - just run:
sudo docker run --name k3s -d --restart=unless-stopped --privileged \
-e AUDIT_LEVEL=1 -p 80:80 -p 443:443 -v /etc/localtime:/etc/localtime:ro \
-v /dev/urandom:/dev/random:ro -v /var/log/rancher/auditlog:/var/log/auditlog \
-v /var/lib/rancher:/var/lib/rancher \
-v /etc/rancher/ssl/ca-bundle.crt:/etc/rancher/ssl/cacerts.pem \
rancher/rancher:v2.9.1
as you see, the container is called "rancher" and runs in privileged mode and detached ("-d" option), being automatically restarted unless it was stopped on purpose; it maps the ports 80 and 443 from the host to the same ports inside the container and sets the audit level is to 1.
As for the volumes, it mounts all the directories we just created along with the CA's certificate file, the timezone file and the entropy source file ("/dev/urandom").
The rancher version used is 2.9.1.
Monitoring Rancher's Deployment And Startup
Since the Rancher's deployment prints its logs into the k3s container's standard output, we can watch the Rancher's deployment and starting in K3s by typing:
sudo docker logs -f k3s 2>&1Operating K3s
It is certainly worth the effort to spend a few words on how to operate K3s.
Connecting To The Kubernetes Container
If everything worked properly, we must be able to launch a bash shell inside the K3s rancher container as follows:
sudo docker exec -ti k3s bashonce done, we can check the status of K3s cluster:
kubectl get nodes
the output must look like:
NAME STATUS ROLES AGE VERSION
local-node Ready control-plane,etcd,master 13d v1.30.2+k3s2
Once inside the container you can operate Kubernetes statements using the "kubectl" command line utility as you would do with any normal Kubernetes cluster.
Directly Operate The Kubernetes Container
Having to jump inside the k3s container each time for running "kubectl" statements can quickly become annoying: we can add an alias to emulate running the "kubectl" statement directly from the shell.
Simply create the "/etc/profile.d/k3s.sh" file with the following contents:
alias kubectl="sudo docker exec -ti k3s kubectl"Disconnect and reconnect: you must now be able to run the "kubectl" statements directly - for example, let's have a look to the whole workload deployed on the K3s Kubernetes:
kubectl get all --all-namespacesthe output must look like as follows:
NAMESPACE                         NAME                                          READY   STATUS    RESTARTS         AGE
cattle-fleet-local-system         pod/fleet-agent-0                             2/2     Running   0                7m
cattle-fleet-system               pod/fleet-controller-58d98bddff-xnbgb         3/3     Running   0                7m
cattle-fleet-system               pod/gitjob-994c56c64-dk9zz                    1/1     Running   0                7m
cattle-provisioning-capi-system   pod/capi-controller-manager-9b9c8ccf8-m9qhp   1/1     Running   0                7m
cattle-system                     pod/rancher-webhook-54c9f8fdbc-fpcgw          1/1     Running   0                7m
kube-system                       pod/coredns-576bfc4dc7-qpm6p                  1/1     Running   0                7m

NAMESPACE                         NAME                                  TYPE        CLUSTER-IP      EXTERNAL-IP   PORT(S)                  AGE
cattle-fleet-local-system         service/fleet-agent                   ClusterIP   None                                       7m
cattle-fleet-system               service/gitjob                        ClusterIP   10.43.111.196           80/TCP                   7m
cattle-fleet-system               service/monitoring-fleet-controller   ClusterIP   10.43.100.181           8080/TCP                 7m
cattle-fleet-system               service/monitoring-gitjob             ClusterIP   10.43.248.236           8081/TCP                 7m
cattle-provisioning-capi-system   service/capi-webhook-service          ClusterIP   10.43.240.239           443/TCP                  7m
cattle-system                     service/rancher                       ClusterIP   10.43.9.184             443/TCP                  7m
cattle-system                     service/rancher-webhook               ClusterIP   10.43.195.53            443/TCP                  7m
default                           service/kubernetes                    ClusterIP   10.43.0.1               443/TCP                  7m
kube-system                       service/kube-dns                      ClusterIP   10.43.0.10              53/UDP,53/TCP,9153/TCP   7m

NAMESPACE                         NAME                                      READY   UP-TO-DATE   AVAILABLE   AGE
cattle-fleet-system               deployment.apps/fleet-controller          1/1     1            1           7m
cattle-fleet-system               deployment.apps/gitjob                    1/1     1            1           7m
cattle-provisioning-capi-system   deployment.apps/capi-controller-manager   1/1     1            1           7m
cattle-system                     deployment.apps/rancher-webhook           1/1     1            1           7m
kube-system                       deployment.apps/coredns                   1/1     1            1           7m

NAMESPACE                         NAME                                                DESIRED   CURRENT   READY   AGE
cattle-fleet-system               replicaset.apps/fleet-controller-58d98bddff         1         1         1       7m
cattle-fleet-system               replicaset.apps/gitjob-994c56c64                    1         1         1       7m
cattle-provisioning-capi-system   replicaset.apps/capi-controller-manager-9b9c8ccf8   1         1         1       7m
cattle-system                     replicaset.apps/rancher-webhook-54c9f8fdbc          1         1         1       7m
kube-system                       replicaset.apps/coredns-576bfc4dc7                  1         1         1       7m

NAMESPACE                   NAME                           READY   AGE
cattle-fleet-local-system   statefulset.apps/fleet-agent   1/1     7m
Set Up A Load Balancer
You must create two distinct high-available resources:
- an http endpoint
- an https endpoint: since Rancher automatically generates a self-signed certificates, this endpoint must be set up so terminate the TLS connection providing its own certificate signed by a valid (either private or public) Certification Authority
You are probably wondering why to use a load balancer since we have just a single host running Rancher: besides the benefit of decoupling Rancher's TLS from the TLS certificate returned to clients, this way we are already ready when we will want to switch to a brand new dedicated High Available Kubernetes cluster with Rancher on it - we will just have to rollover the configuration using a backup and use its nodes as balanced service's backend's pool members, disabling the current Rancher instance.
You can of course use your preferred load balancer, but for the sake of completeness here are two basic snippets for configuring it with HAProxy.
If you are using HAProxy, may find interesting my posts "High Available HAProxy Tutorial With Keepalived" and "HAProxy Tutorial - A Clean And Tidy Configuration Structure".
In this example we are configuring two endpoints (HTTP and HTTPS) with the URL "http://rancher-ca-p1-0.p1.carcano.corp" and "https://rancher-ca-p1-0.p1.carcano.corp" - that is the FQDN "rancher-ca-p1-0.p1.carcano.corp" resolves on the high-available IP address "10.10.10.250".
Balancing The HTTP Endpoint
This snippet provides samples for configuring both the frontend and backend for load balancing the Rancher's HTTP endpoint.
frontend rancher-ca-p1-0:80
    mode http
    description Rancher HTTP running on the rancher-ca-up1a0 K3s cluster
    bind 10.10.10.250:80
    http-request set-header X-Forwarded-Proto http
    default_rancher-ca-up1a001.p1.carcano.corp:80

backend rancher-ca-up1a001.p1.carcano.corp:80
    description rancher http on cluster rancher-ca-up1a001.p1.carcano.corp
    mode http

    option httpchk HEAD /healthz HTTP/1.0
    server rancher-ca-up1a001 10.12.18.31:80 check weight 1 maxconn 1024
Balancing The HTTPS Endpoint
This snippet provides samples for configuring both the frontend and backend for load balancing the Rancher's HTTPS endpoint.
frontend rancher-ca-p1-0:443
    mode http
    description Rancher HTTPS running on the rancher-ca-up1a0 K3s cluster
    bind 10.10.10.250:443 ssl crt /etc/haproxy/certs
    default_backend rancher-ca-up1a001.p1.carcano.corp:443

backend rancher-ca-up1a001.p1.carcano.corp:443
    description rancher https on cluster rancher-ca-up1a001.p1.carcano.corp
    mode http
    option httpchk HEAD /healthz HTTP/1.0
    server rancher-ca-up1a001 10.12.18.31:443 check weight 1 maxconn 1024 ssl verify none
As you see, since the Rancher's TLS certificate is self-signed, the backend is configured not to verify the TLS connection: if this setup is unsuitable for your security level, you must deploy Rancher with a certificate signed by a trusted certification authority.
Connection To Rancher
Once completed the load balancer, we can log in to the Rancher's dashboard: just open with a browser the URL "https://rancher-ca-p1-0.p1.carcano.corp":

as you see from the above graphic, type "admin" as the username. As for the password, it must be fetched by running the following statement on a shell:
docker logs rancher 2>&1 | grep "Bootstrap Password"Rancher Backups
We must of course configure Rancher's backups: it is performed by the "Rancher Backups" app. Since this app is running on the K3s Kubernetes, it is necessary to provide a Persistent Volume (PV) to bind its Persistent Volume Claim (PVC). There are a few options, such as an S3 storage or a "regular" PV if you want it on premise.
Provision The Persistent Volume
For the sake of avoiding external dependencies - such as having an S3 storage already, in this post we create an HostPath type Persistent Volume - it is anyway a viable solution since data is stored on the local filesystem and so it can be easily backed up to tape later on as necessary.
Since the storage is local, first we must create the directory tree where to mount the HostPath Persistent Volume as follows:
sudo mkdir -m 750 /var/lib/rancher/backupsWe are now ready to provision the Persistent Volume (PV): within the Rancher's web UI, select the "local" cluster (the button with the bull's head), expand the "Storage" group and click on "PersistentVolumes": this displays the list of available Persistent Volumes (that of course now is empty).
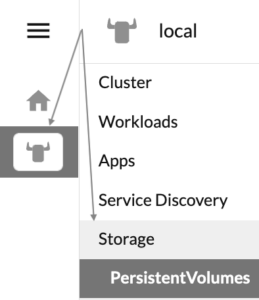
Click on the "Create" button on the top right, chose to create the PV using a YAML manifest and cut and paste the following snippet into the YAML manifest's text box:
apiVersion: v1
kind: PersistentVolume
metadata:
  annotations:
    field.cattle.io/description: PV dedicated to Rancher backups
  name: rancher-backups
spec:
  accessModes:
    - ReadWriteOnce
  capacity:
    storage: 10Gi
  hostPath:
    path: /var/lib/rancher/backups
    type: DirectoryOrCreate
  persistentVolumeReclaimPolicy: Retain
  volumeMode: Filesystem
the only settings you may want to change is the storage capacity: you can leave all the rest as they are.
Once done, just click on the "Create" button: the Persistent Volume will be immediately provisioned.
Deploy The Rancher Backups App
We are now ready to deploy the "Rancher Backups" application: within the Rancher's web UI, select the "local" cluster (the button with the bull's head), expand the "Apps" group and click on "Charts": this will display all the available charts.
Using the filter textbox, type "Rancher Backups" so to get only the Rancher Backups application: click on it to display it's Readme page, then deploy it using the "Install" button on the top right: specify you want to us a Persistent Volume and type "rancher-backups" in the PV name's textbox.
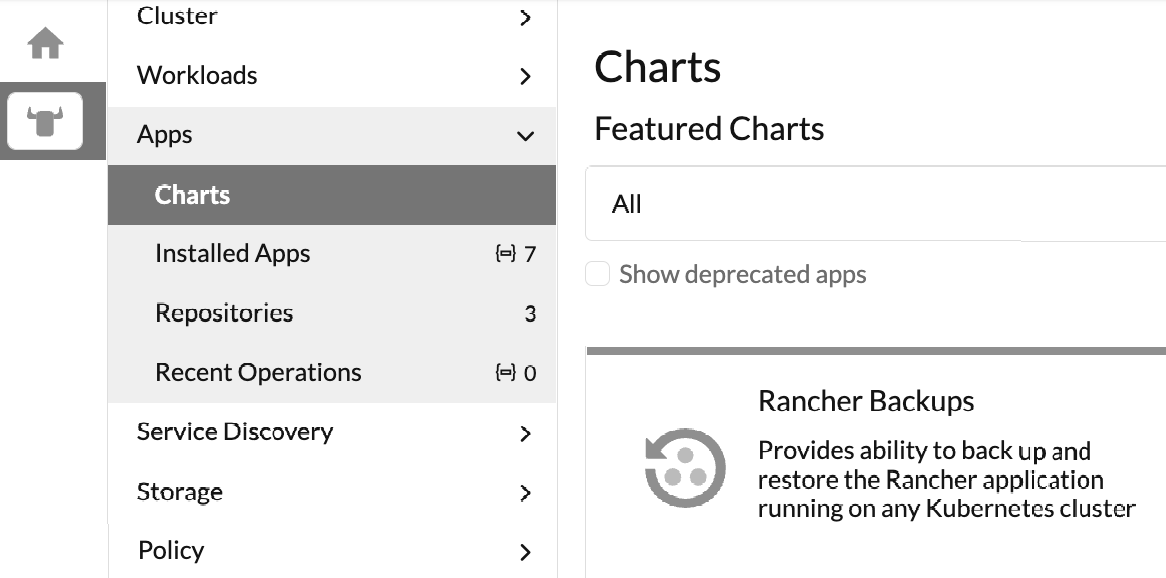
Once the deployment completes, its containers will be available in the "cattle-resources-system" namespace.
We can of course have a look to the contents of the "cattle-resources-system" namespace:
kubectl -n cattle-resources-system get allIf everything worked properly, the output must look like as follows:
NAME                                  READY   STATUS    RESTARTS   AGE
pod/rancher-backup-64454bd8f9-dqvb6   1/1     Running   0          26m

NAME                             READY   UP-TO-DATE   AVAILABLE   AGE
deployment.apps/rancher-backup   1/1     1            1           26m

NAME                                        DESIRED   CURRENT   READY   AGE
replicaset.apps/rancher-backup-64454bd8f9   1         1         1       26m

kubectl -n cattle-resources-system get pvc
NAME              STATUS   VOLUME            CAPACITY   ACCESS MODES   STORAGECLASS   VOLUMEATTRIBUTESCLASS   AGE
rancher-backups   Bound    rancher-backups   10Gi       RWO                           <unset>                 28m
I am not explaining the procedure for recovering since it would be a duplication of the official manual.
Schedule A Backup
We are still missing the last thing: scheduling a backup - select the "local" cluster (the button with the bull's head), expand the "Rancher Backups" group and click on "Backups": this will display all the available backups.
Click on the "Create" button and fill in the form as shown below:
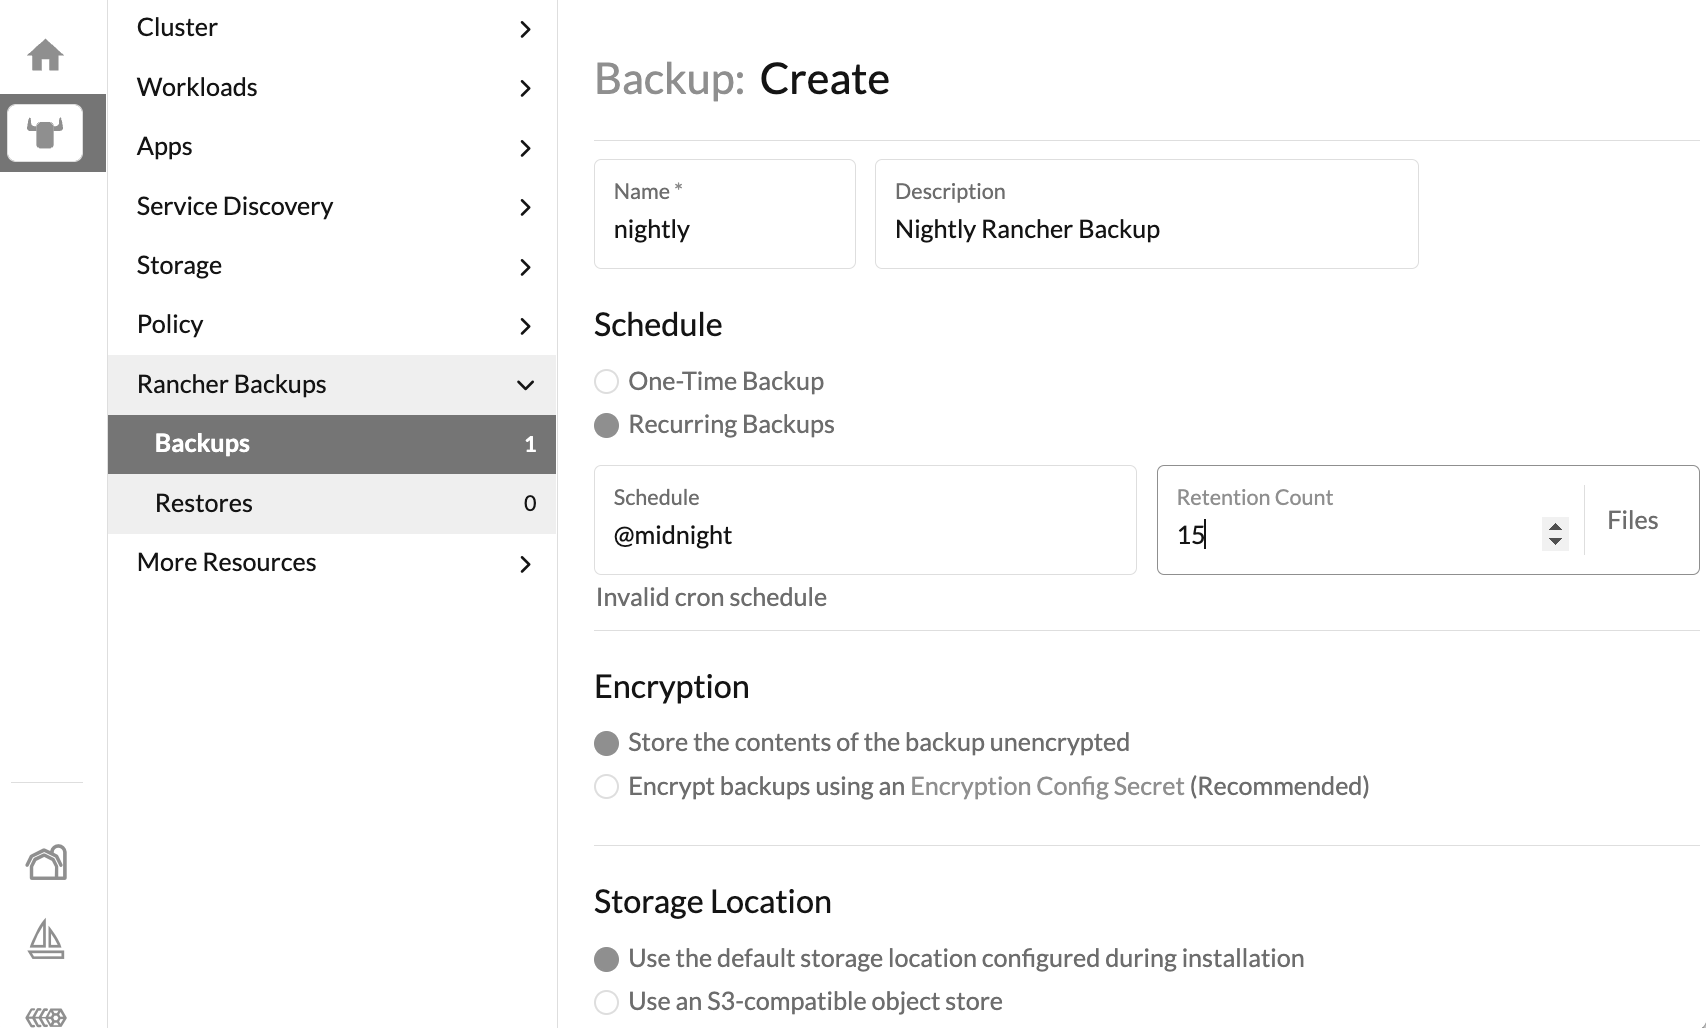
We have just scheduled an unencrypted nightly backup with a 15 days retention.
External Authentication Source
So far we connected using the "admin" user, that is a local user account. In real life we must connect to a corporate-wide authentication service, such as Active Directory, Red Hat Directory Server (aka Free IPA) and so on.
Active Directory Authentication
In this post we see how to use Active Directory as the external authentication source:
- log into the Rancher UI using the initial local "admin" account
- from the global view, navigate to "Users & Authentication", then to "Auth Provider"
Select and configure "ActiveDirectory" to load the related configuration form.
Fill in as follows:
- Enter in the Hostname/IP the FQDN of the Active Directory service - it is of course best to use a load balancer instead of directly pointing one of the servers
- if you support LDAPS (as in the graphic below) tick the "TLS" option: the port is automatically changed to 636
- Using the "Read from File" button, upload the Certificate Authority's certificate used to sign the Active Directory service Certificate
- Enter the Service Account Distinguished Name (the username used to bind the Active Directory Service), along with its password in the Service Account Password text box - please note that you must prepend the Active Directory REALM to the username. In this example the Active Directory realm is "CARCANO", so the Service Account Distinguished Name is "CARCANO\rancher-ca-p1-0".
- Enter the Active Directory realm in the Default Login Domain textbox - in this example it is "CARCANO"
- Enter the User Search Base and Group Search Base as in the below graphic
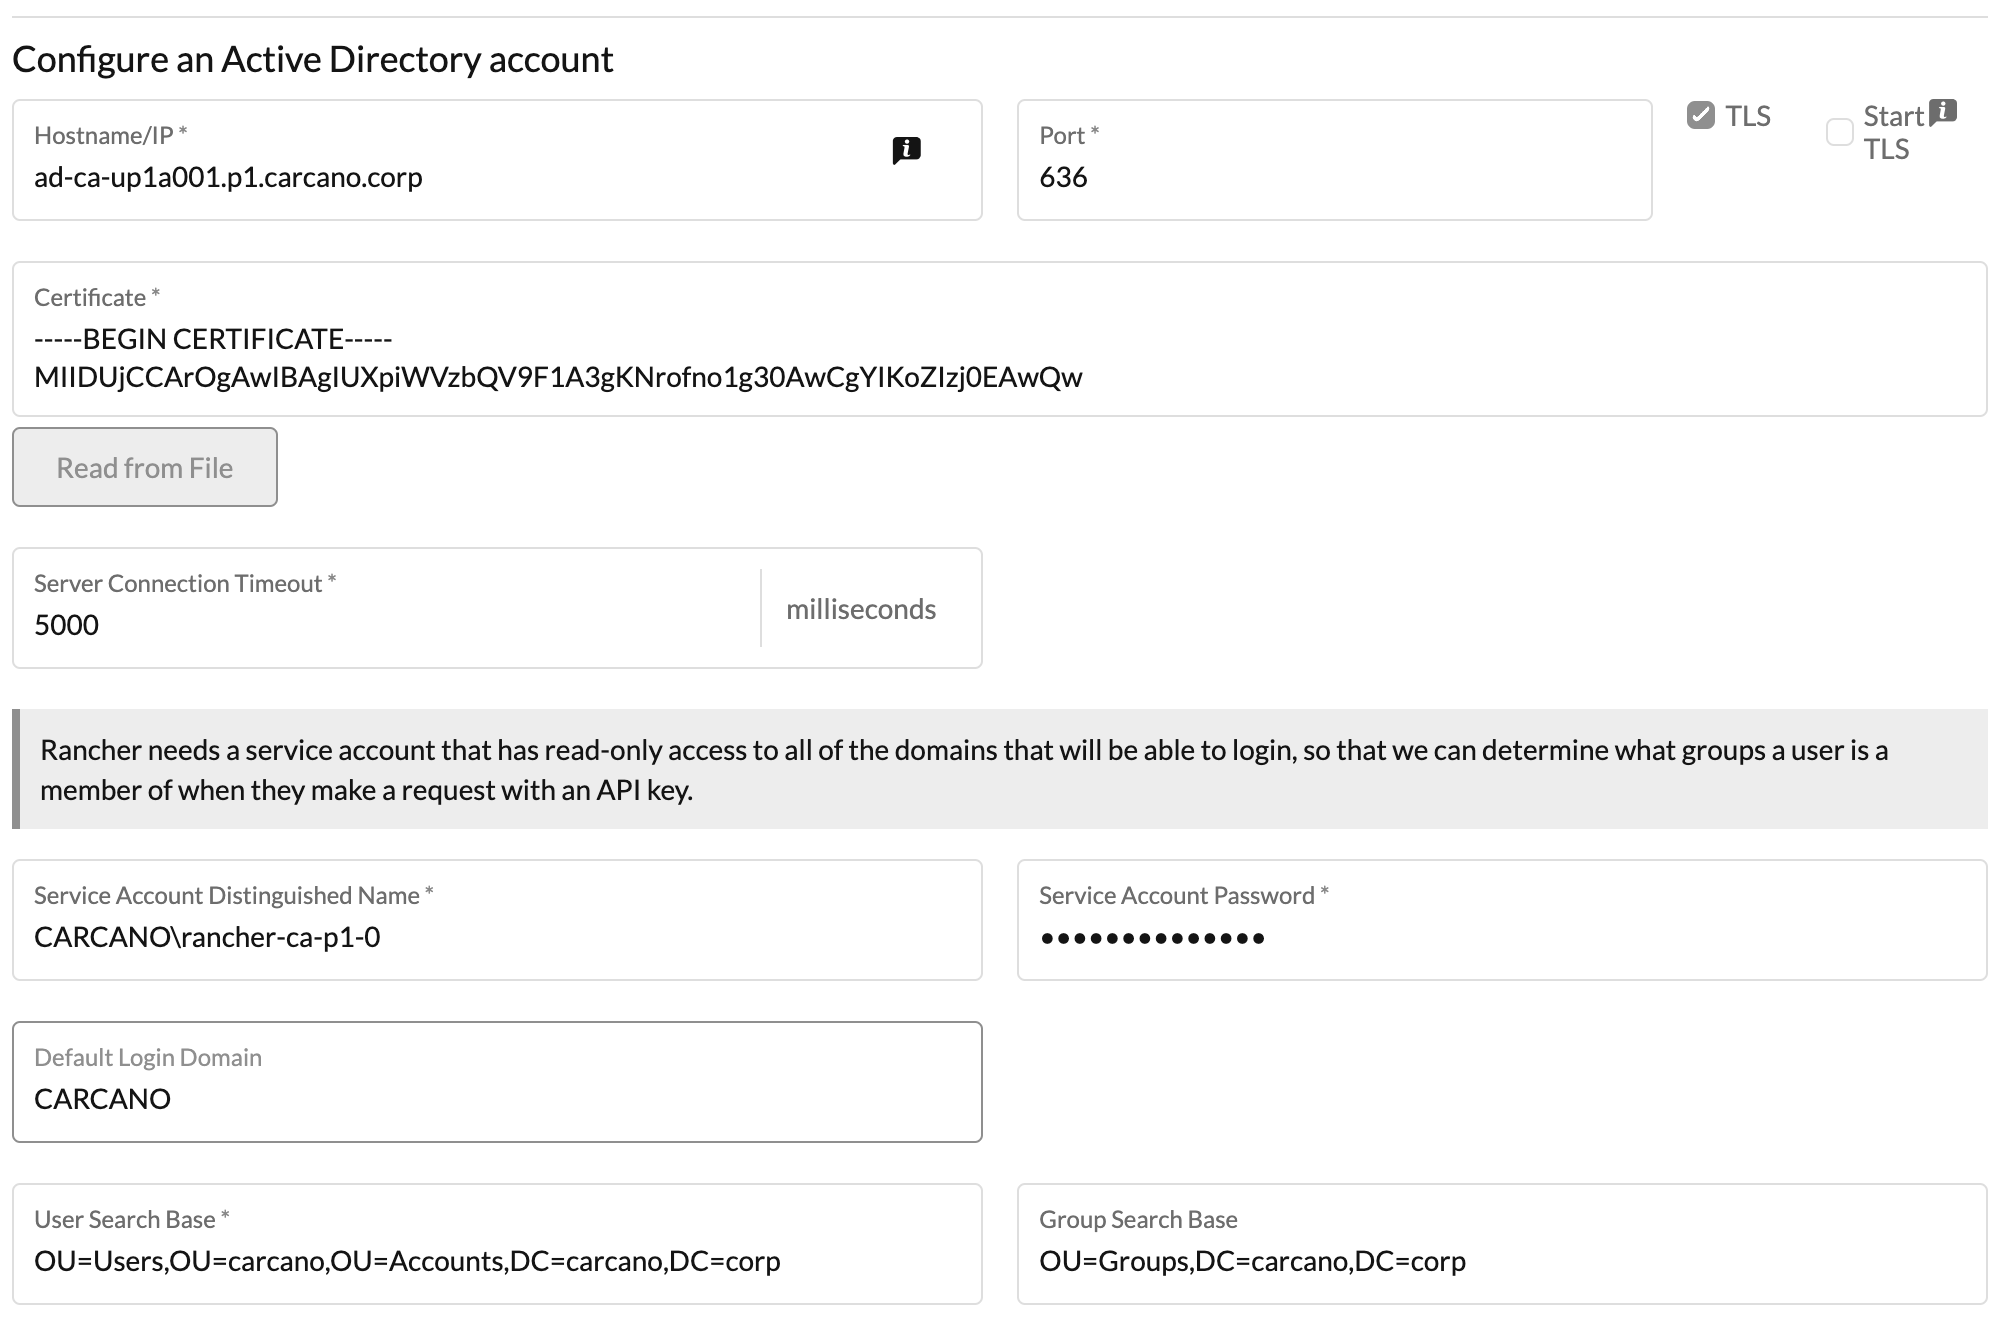
If you want to use Active Directory nested groups in Rancher, remind to tick the "Search direct and nested group membership" option button like in the below graphic.
At the very bottom of the form, enter a username and a password that are used to perform an authentication attempt used to test the above settings.

Once done, just click on the "Save" button.
If everything is properly set, the authentication provider gets set and it starts retrieving users and groups from the Active Directory.
It is of course best to restrict access to the Rancher instance to users that are members of a specific group. In this example we are granting access to members of the "Rancher-0" Active Directory group.

Once done, disconnect the local "admin" user and login again with a corporate user: if it is a member of the "Rancher-0" Active Directory group it should be granted access, otherwise the login must fail.

Footnotes
Here it ends our tutorial on how to install Rancher on an Oracle Linux 9 platform - as you saw installing Rancher on a single node provides an extremely fast and easy way to start playing with this amazing piece of software.
Back in the early days with Kubernetes I really was eager to have a good web UI for operating it: I think at Rancher Labs they did a great job so far, as they did also with RKE2.
If you liked this post, you will probably find useful the "RKE2 Tutorial - RKE2 Howto On Oracle Linux 9" post too.
I hope this post arouses your curiosity and you give it a try, because it is really worth the effort.
If you appreciate this post and any other ones, just share this and the others on Linkedin - sharing and comments are an inexpensive way to push me into going on writing - this blog makes sense only if it gets visited.
